``). Inside a template literal, you're able to refer to variables or execute code by using ${}. Take a look at the following example:",{"codeBlock":"console.log(`10 + 25 = ${10 + 25}`) // => \"10 + 25 = 35\""},"By wrapping the calculation 10 + 25 in the ${}, we are able to calculate the total right there inside of the string. We can also refer to specific variables in a template literal as well:",{"codeBlock":"const firstName = 'Kyle';\nconst greeting = `Hi, ${firstName}!`;\nconsole.log(greeting); // => \"Hi, Kyle!\""},"Template literals also remove the need for escaped characters and string concatenation in many case as well. If you hit return, tab, etc inside of a template it will format the string in that form for you! You can also inject multiple variables into the same string.",{"codeBlock":"const firstName = 'David';\nconst lastName = 'Bowie';\nconsole.log(`My favorite artist is ${firstName} ${lastName}`) \n// => \"My favorite artist is David Bowie\""}]},{"instructionHeading":"Challenge","instructionContent":["Declare 2 variables x & y, and set their values to any number you like. Next declare a constant solution which is a string that prints to the console like the example below:",{"codeBlock":"let x = 2;\nlet y = 5;\nconst solution = ``)!"]}]}},"challenge-type-coercion":{"subunitId":"challenge-type-coercion","heading":"Challenge: Type Coercion","solve":{"code":"// Uncomment the code below to test\n// console.log(10 + 5);\n// console.log(\"10\" + 5);\n// console.log(5 + \"10\");","instructions":[{"instructionHeading":" ","instructionContent":["Look at the console.log statements for this challenge. What do you think will be logged to the console? When you have an idea, uncomment and run the code.","What happened?",{"codeBlock":"console.log(10 + 5); // 15\nconsole.log(\"10\" + 5); // 105"},"The first statement adds the numbers as expected. But in the second statement, '105' is logged to the console. Notice the quotation marks wrapped around the number 10 in the console.log statement; this means that the value is a string. There are no quotation marks around the number 5.","What happened is type coercion, an important concept in JavaScript. We can't add a string value and a number value together; instead, JavaScript \"coerces\" (changes) the number into a string and treats the + operator as an instruction to concatenate strings.",{"codeBlock":"console.log(\"10\" + \"5\"); // 105\nconsole.log(\"10\" + 5); // 105"}]},{"instructionHeading":"Challenge","instructionContent":["Uncomment the code and see what happens. Then, try it out yourself and make sure you really understand the concept."]}]}},"challenge-typeof":{"subunitId":"challenge-typeof","heading":"Challenge: typeof Operator","solve":{"code":"const favMovie = \"Star Wars: Episod IV\";\nconst timesSeen = 732;\nconst goingToWatchItAgain = true; \n\n// ADD CODE BELOW HERE","test":"describe('favMovieType', () => {\n it('should be a string', () => {\n expect(favMovieType).to.be.a('string');\n });\n it('should be \"string\"', () => {\n expect(favMovieType).to.equal('string');\n });\n});\n\ndescribe('timesSeenType', () => {\n it('should be a string', () => {\n expect(timesSeenType).to.be.a('string');\n });\n it('should be \"number\"', () => {\n expect(timesSeenType).to.equal('number');\n });\n});\n\ndescribe('seeAgainType', () => {\n it('should be a string', () => {\n expect(seeAgainType).to.be.a('string');\n });\n it('should be \"boolean\"', () => {\n expect(seeAgainType).to.equal('boolean');\n });\n});\n","instructions":[{"instructionHeading":" ","instructionContent":["Quite often in programming, we need to be able to look up what the specific data type of a given operand is. In JavaScript, the typeof operator returns the data type of its operand in the form of a string. Operand can be any object, function or variable.",{"codeBlock":"typeof(\"testing\") // => \"string\"\ntypeof(22) // => \"number\"\ntypeof(false) // => \"boolean\""},"Keep in mind that the typeof an array is an object."]},{"instructionHeading":"Challenge","instructionContent":["1. Declare a variable favMovieType. Then, using the typeof operator, assign it the value of favMovie's data type.","2. Declare a variable timesSeenType. Then, using the typeof operator, assign it the value of timesSeen's data type.","3. Declare a variable seeAgainType. Then, using the typeof operator, assign it the value of goingToWatchItAgain's data type."]}]}},"challenge-union":{"subunitId":"challenge-union","heading":"Challenge: union","solve":{"code":"// ADD CODE HERE\n\n// Uncomment these to check your work!\n// const arr1 = [5, 10, 15];\n// const arr2 = [15, 88, 1, 5, 7];\n// const arr3 = [100, 15, 10, 1, 5];\n// console.log(union([arr1, arr2, arr3])); // should log: [5, 10, 15, 88, 1, 7, 100]","test":"describe('union', () => {\n it('should be a function', () => {\n expect(union).to.be.a('function');\n });\n it('should return an array', () => {\n const answer = union([[], []]);\n expect(answer).to.eql([]);\n });\n it('should flatten two distinct arrays', () => {\n const arr1 = [1, 2];\n const arr2 = [3, 4];\n const answer = union([arr1, arr2]);\n expect(answer).to.eql([1, 2, 3, 4]);\n });\n it('should flatten many arrays with repeated values', () => {\n const arr1 = [1, 2];\n const arr2 = [3, 4];\n const arr3 = [3, 4, 5];\n const arr4 = [0, 1, 2, 3, 4, 5];\n const answer = union([arr1, arr2, arr3, arr4]);\n expect(answer).to.eql([1, 2, 3, 4, 5, 0]);\n });\n});\n","instructions":[{"instructionContent":["Construct a function union that takes an input array of arrays, compares each array, and returns a new flat array that contains all elements. If there are duplicate elements, only add it once to the new array. Preserve the order of the elements starting from the first element of the first input array. BONUS - Use reduce!"]}]}},"challenge-variable-assignment":{"subunitId":"challenge-variable-assignment","heading":"Challenge: Variable Assignment","solve":{"code":"const firstName = \"Jenny\";\n\n// Try un-commenting the line below\n// console.log(\"Hi, \" + firstName)\n\n// ADD CODE HERE\n\n\n// Uncomment the line below to check your work!\n// console.log(\"Hi, \" + firstName + \" \" + lastName);\n","test":"describe('firstName', () => {\n it('should not be undefined or null', () => {\n expect(firstName).to.not.equal(undefined);\n expect(firstName).to.not.equal(null);\n });\n\n it('should have a value of type string', () => {\n expect(firstName).to.be.a('string');\n });\n});\n\ndescribe('lastName', () => {\n it('should not be undefined or null', () => {\n expect(lastName).to.not.equal(undefined);\n expect(lastName).to.not.equal(null);\n });\n it('should have a value of type string', () => {\n expect(lastName).to.be.a('string');\n });\n});\n","instructions":[{"instructionHeading":"Challenge","instructionContent":["Now that we know what variables are, let's create one of our own. Below line 6, declare a constant named lastName and assign it the value of your last name. Make sure you wrap your name in quotation marks, e.g. \"Smith\".","Now, go back to line 1 and modify the value of firstName to be your first name. Uncomment the console.log statement on line 10 and run your code; you should see Jenny replaced by your first name—unless your first name is Jenny, of course."]}]}},"challenge-variable-assignment-const":{"subunitId":"challenge-variable-assignment-const","heading":"Challenge: Constant Assignment - (const)","solve":{"code":"// Declare a constant myCodingConfidence and assign it a value of \"unwavering\"\n// ADD CODE HERE\n\n\n// Try un-commenting the line below to test your answer\n// console.log(\"My confidence in my coding ability is \" + myCodingConfidence);\n\n// ADD CODE HERE\n\n\n\n","test":"function changeConst() {\n return (myCodingConfidence = 'i can change');\n}\n\ndescribe('myCodingConfidence', () => {\n it('should not be undefined or null', () => {\n expect(myCodingConfidence).to.not.equal(undefined);\n expect(myCodingConfidence).to.not.equal(null);\n });\n\n it('should be a constant', () => {\n expect(changeConst).to.throw();\n });\n\n it('should have a value of type string', () => {\n expect(myCodingConfidence).to.be.a('string');\n });\n\n it('should be assinged a value of \"unwavering\"', () => {\n expect(myCodingConfidence).to.equal('unwavering');\n });\n});\n","instructions":[{"instructionHeading":"Challenge","instructionContent":["Ok, so now that you have a hang of var and let, let's practice declaring a constant. As we metioned in the previous lesson, sometimes we want a variable who's value never changes. In this case we use the const keyword. For instance, take a look at the example below. My favorite TV show is Game of Thrones, and obviously that's never going to change, so I've declared a constant myFavoriteShow and assigned it a value of \"Game of Thrones\".",{"codeBlock":"const myFavoriteShow = \"Game of Thrones\";\nconsole.log(myFavoriteShow) // => \"Game of Thrones\""},"Maybe your favorite tv show changes quite often though, so here's a few more concrete examples of variables that won't ever change:",{"codeBlock":"const threeTimesFive = 15;\nconst christmasDay = \"December 25th\"\nconst myDateOfBirth = \"02/23/1978\""},"Now it's your turn. You're on a roll, and you're feeling good about it, so on line 3, declare a constant myCodingConfidence and assign it a value of \"unwavering\". Next, uncomment out line 6 to test your code!","Now below line 8, let's try and reassign the value of myCodingConfidence to something else. After you've reassigned it, hit the Run Code button again and you'll know you did it right if you get the following error in the console:",{"codeBlock":"Type Error: Assignment to constant variable."},"Did you get the error message? Congratulations, you have successfully declared a constant!","Now in order to pass the tests, you'll need to get rid of that error, so comment out line 9 where you attempted to reassign the variable and click the Check My Answer button below to run the tests!"]}]}},"challenge-variable-assignment-let":{"subunitId":"challenge-variable-assignment-let","heading":"Challenge: Variable Assignment - (let)","solve":{"code":"// Declare a variable favFood and assign it a value of \"tacos\"\n// ADD CODE HERE\n\n\n// Try un-commenting the line below to test your answer\n// console.log(\"My favorite food is \" + favFood);\n\n// ADD CODE HERE\n\n\n// Uncomment the line below to check your work!\n// console.log(\"No, but really, my favorite food is \" + favFood);","test":"describe('favFood', () => {\n it('should not be undefined or null', () => {\n expect(favFood).to.not.equal(undefined);\n expect(favFood).to.not.equal(null);\n });\n\n it('should have a value of type string', () => {\n expect(favFood).to.be.a('string');\n });\n\n it('should be not be \"tacos\"', () => {\n expect(favFood).to.not.equal('tacos');\n });\n});\n","instructions":[{"instructionHeading":"Challenge","instructionContent":["Now let's try declaring a variable with the let keyword. On line 3, declare a variable favFood using let and then assign it a value of the string \"tacos\". Now you can uncomment out line 6 to test your code. You should see \"My favorite food is tacos\" in your console.","But wait! Maybe tacos aren't YOUR favorite food. Luckily, since we declared our variable, favFood, using the let keyword, we can reassign it's value to something different!","The best part is we don't have to declare the variable again. All we need to do is reassign it's value. Check out the example below:",{"codeBlock":"let lastName = \"Snow\";\nconsole.log(lastName); // => Snow\nlastName = \"Targaryen\";\nconsole.log(lastName); // => Targaryen"},"On line 9, let's change the value of favFood to whatever your favorite food is. Next, uncomment the console.log on line 12 to check your code. You should see \"No, but really, my favorite food is lastName and assign it the value of your last name. Make sure you wrap your name in quotation marks, e.g. \"Smith\". Here's another example in case:",{"codeBlock":"var myName = \"Kyle\";\nconsole.log(myName) // => \"Kyle\""},"Now, go back to line 1 and modify the value of firstName to be your first name. Uncomment the console.log statement on line 10 and run your code; you should see Jenny replaced by your first name—unless your first name is Jenny, of course."]}]}},"challenge-variable-reassignment":{"subunitId":"challenge-variable-reassignment","heading":"Challenge: Variable Reassignment","solve":{"code":"let firstName = \"Jenny\";\n\n// ADD CODE BELOW\n\n\n// Uncomment the line below to check your work!\n// console.log(\"Hi, \" + firstName);","test":"describe('firstName', () => {\n it('should no longer have the value \"Jenny\"', () => {\n expect(firstName).to.not.equal('Jenny');\n expect(firstName).to.not.equal(null);\n expect(firstName).to.not.equal(undefined);\n });\n it('should not be undefined or null', () => {\n expect(firstName).to.not.equal(undefined);\n expect(firstName).to.not.equal(null);\n });\n\n it('should have a value of type string', () => {\n expect(firstName).to.be.a('string');\n });\n});\n","instructions":[{"instructionHeading":" ","instructionContent":["You can update variables that you declare with let and var. (What happens if you try to reassign the value of a const?)","Look at the example below and notice how the value assigned to the variable lastName changes.",{"codeBlock":"let lastName = \"Snow\";\nconsole.log(lastName); // should log: Snow\nlastName = \"Fowlkes\";\nconsole.log(lastName); // should log: Fowlkes"}]},{"instructionHeading":"Challenge","instructionContent":["In the code editor, reassign the variable firstName to a new name on line 4."]}]}},"challenge-were-awesome":{"subunitId":"challenge-were-awesome","heading":"Challenge: wereAwesome","solve":{"code":"function wereAwesome(you, yourBuddy) {\n // ADD CODE HERE\n}\n\n\n// Uncomment the lines below to test your function:\n// console.log(wereAwesome(\"Dave\", \"Will\")); // => \"Will and Dave are awesome!\"\n// console.log(wereAwesome(\"Victoria\", \"Jenny\")); // => \"Jenny and Victoria are awesome!\"\n// console.log(wereAwesome(\"Chris\", \"Jac\")); // => \"Jac and Chris are awesome!\"\n// console.log(wereAwesome(\"Phillip\", \"Skyler\")); // => \"Skyler and Phillip are awesome!\"","test":"describe('wereAwesome', () => {\n it('should be a function', () => {\n expect(wereAwesome).to.be.a('function');\n });\n});\n\ndescribe('wereAwesome(\"Dave\", \"Will\")', () => {\n it('should return \"Will and Dave are awesome!\"', () => {\n expect(wereAwesome('Dave', 'Will')).to.eq('Will and Dave are awesome!');\n });\n});\n\ndescribe('wereAwesome(\"Jenny\", \"Victoria\")', () => {\n it('should return \"Jenny and Victoria are awesome!\"', () => {\n expect(wereAwesome('Victoria', 'Jenny')).to.eq('Jenny and Victoria are awesome!');\n });\n});\n\ndescribe('wereAwesome(\"Chris\", \"Jac\")', () => {\n it('should return \"Chris and Jac are awesome!\"', () => {\n expect(wereAwesome('Jac', 'Chris')).to.eq('Chris and Jac are awesome!');\n });\n});\n\ndescribe('wereAwesome(\"Phillip\", \"Skyler\")', () => {\n it('should return \"Skyler and Phillip are awesome!\"', () => {\n expect(wereAwesome('Phillip', 'Skyler')).to.eq('Skyler and Phillip are awesome!');\n });\n});\n","instructions":[{"instructionContent":["Write a function wereAwesome that takes you and your pair programming partner's name and returns the string \"[your buddy's name] and [you] are awesome!\"","If you are coding on your own, get creative! Instead of a pair programming partner, it could be the name of your friend, your pet, or even your rubber ducky!"]}]}},"challenge-while-loops-conditional-expression":{"subunitId":"challenge-while-loops-conditional-expression","heading":"Challenge: While Loops - Conditional Expression","solve":{"code":"// ADD CODE HERE\n\n\n// Uncomment the line below to check your work!\n// console.log(sum);","test":"describe('addThis', () => {\n it('should equal 10', () => {\n expect(addThis).equal(10);\n });\n});\n\ndescribe('sum', () => {\n it('should equal 45', () => {\n expect(sum).to.equal(45);\n });\n});\n","instructions":[{"instructionHeading":" ","instructionContent":["Initialize a variable addThis to 0 and a variable sum to 0. Use a while loop to repeat a code block as long as addThis is less than 10. In the code block, add the value of addThis to sum, then increment addThis by 1. After the while loop runs, the value of sum should be the sum of the numbers 0 through 9. It's crucial to note that if there's more than one statement in the loop block, the entire block needs to be enclosed in curly braces {}. This ensures that all statements within the block are executed together in each iteration of the loop."]}]}},"challenge-while-loops-counters":{"subunitId":"challenge-while-loops-counters","heading":"Challenge: While Loops - Counters","solve":{"code":"function imAboutToExplodeWithExcitement(n){\n // ADD CODE HERE\n}\n\n// Uncomment the line below to check your work!\n// imAboutToExplodeWithExcitement(10); // expected log 10, 9, 8, 7, 6, 'Oh wow, I can't handle the anticipation!', 4, I'm about to explode with excitement!', 2, 1, 'That was kind of a let down'","test":"describe('imAboutToExplodeWithExcitement', () => {\n it('should be a function', () => {\n expect(imAboutToExplodeWithExcitement).to.be.a('function');\n });\n});\n","instructions":[{"instructionContent":["Using a WHILE loop, write a function imAboutToExplodeWithExcitement which prints a countdown from n. When the countdown gets to 5, print 'Oh wow, I can't handle the anticipation!' When it's at 3, print 'I'm about to explode with excitement!' When the counter is finished, print 'That was kind of a let down'."]}]}},"challenge-while-loops-fundamentals":{"subunitId":"challenge-while-loops-fundamentals","heading":"Challenge: While Loops - Fundamentals","solve":{"code":"let count = 2;\n// ADD CODE HERE\n\n\n// Uncomment these to check your work!\n// console.log(count); ","test":"describe('count', () => {\n it('should equal 8', () => {\n expect(count).equal(8);\n });\n});\n","instructions":[{"instructionHeading":" ","instructionContent":["A while loop is an alternative iteration statement. JavaScript's thread of execution will repeatedly process the code block until the while loop's conditional expression evaluates to false. **Be careful to avoid an infinite loop!**"]},{"instructionHeading":"Challenge","instructionContent":["Use a while loop to increment count by 2 on each repetition of the block of code. Run the code block of your while loop until count is 8."]}]}},"chrome-extension-1":{"subunitId":"chrome-extension-1","heading":"Project Part 1 - Introduction to Chrome Extension Project","read":["You have heard many times in CSX that the best way to learn to code is not to ‘learn to code’. Instead, you should write code to solve problems. Here we’re going to solve a real world problem with JavaScript, HTML and CSS. If you have gone through the JavaScript for Beginners or CS Prep programs, we highly encourage you to complete this project. This experience will introduce you to concepts that will help you prepare for the Codesmith immersive programs. This is a great project to do as part of a hackathon!","We're going to do this by building a Chrome Extension that solves a problem you face every day. Why is this so effective?",{"orderedList":["Minimal lines of 'setup code' means less copying and pasting from tutorials (not effective).","When the going gets tough, you have a clear goal to help push you through blocks.","Focuses you on problem-solving (it's what we look for in Codesmith candidates)."]},"Our Chrome extension is a powerful productivity tool. It keeps a user focused by allowing them to load their favorite distracting site - say Twitch. But rather than showing videos, they see an inspiring image with the text \"Get back to achieving your coding dreams.\"","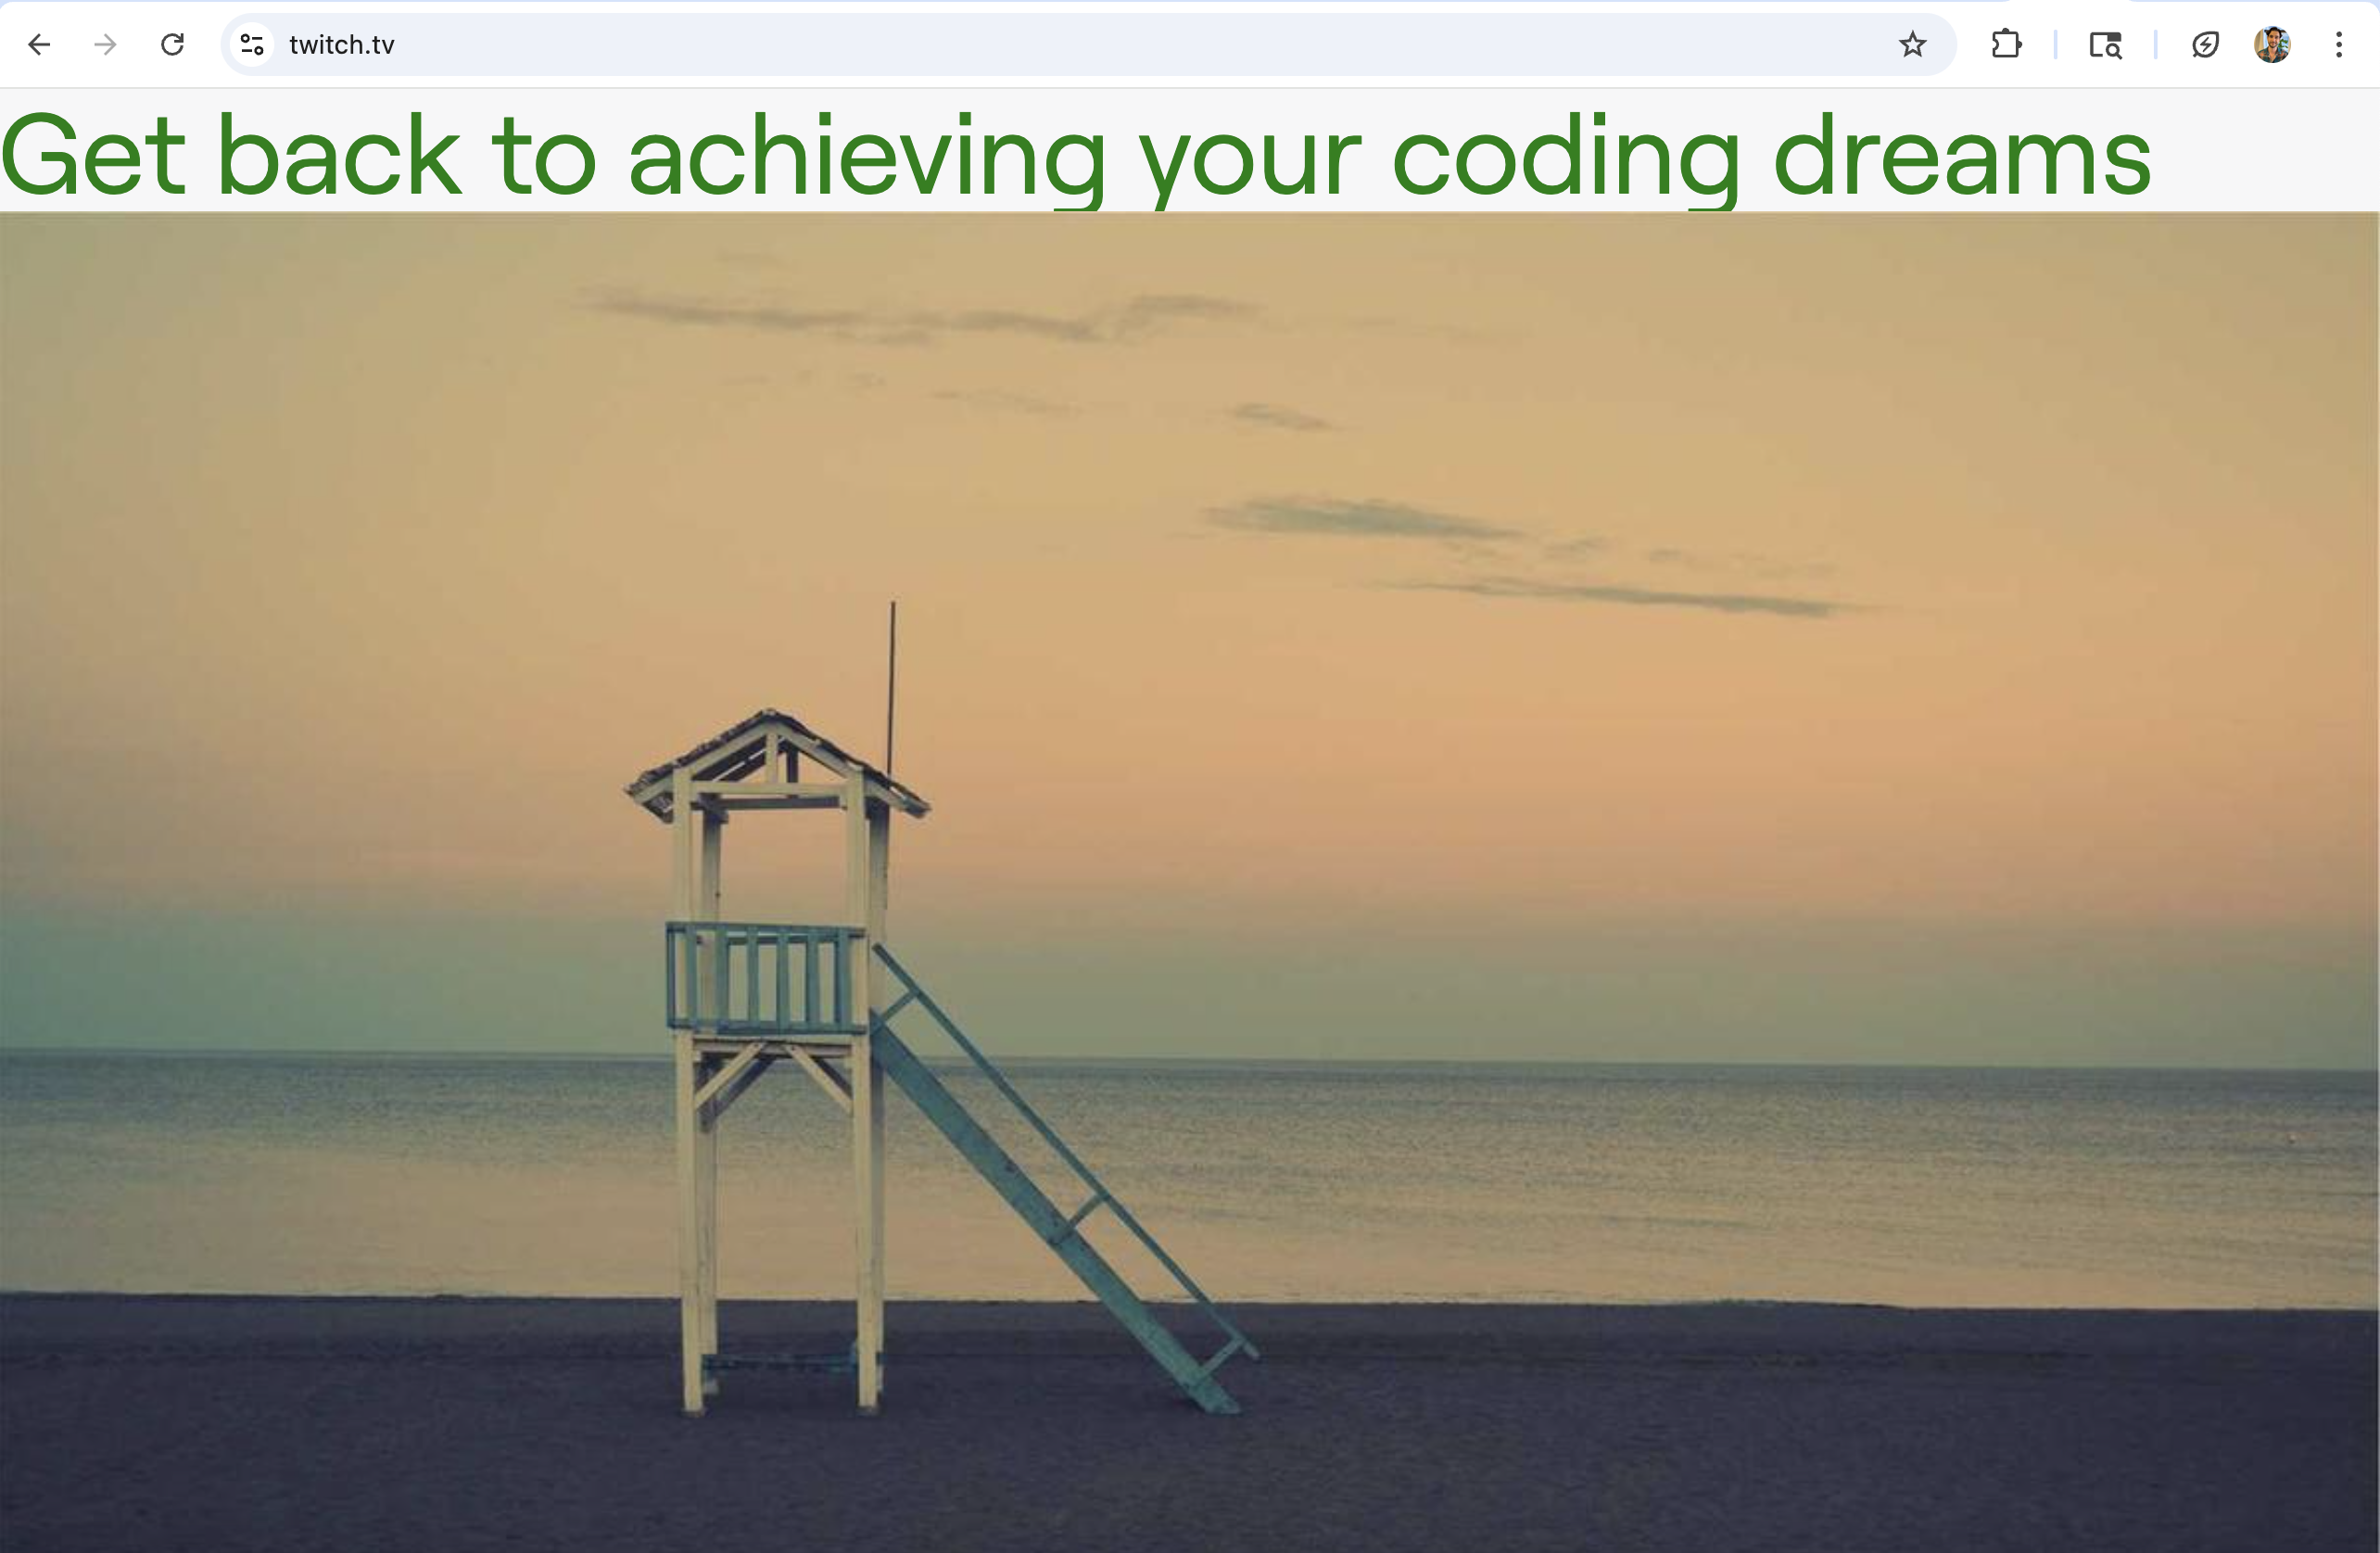 ","This extension is powerful. You don’t need to switch off the extension if you want to watch a specific individual video. There’s less psychological cost than finding a site fully blocked. Instead you see the site load, but the distracting content is replaced with a motivating message.","We'll have 5 parts to building our extension that will introduce us to 5 core concepts of web development.","Part 1: Introduction and overview","Part 2: DOM manipulation and Chrome developer tools",{"list":["Introduction to the DOM","Manipulating the DOM manually with Chrome dev tools","Using JavaScript in the Chrome dev tools console to select the main container element on Twitch","Using JavaScript to remove the element"]},"Part 3: JSON and configuration ",{"list":["Creating a manifest file","Adding the key pieces to the manifest (with JSON)","Creating the main JavaScript file","Inserting our DOM manipulation code in the JavaScript file","Running the unpackaged extension in Chrome"]},"Part 4: Libraries and jQuery",{"list":["Introducing jQuery to gain experience working with 3rd party libraries","Dependencies: Adding jQuery into manifest","Using jQuery to append an image to the DOM and add our custom text: \"Get back to achieving your coding dreams\"","Adding a CSS class to the element (using a CSS style file)"]},"Part 5: Asynchronous callbacks and the JavaScript engine",{"list":["Introducing the JavaScript engine and how it fits in the browser setup","Asynchronous callbacks - web APIs, event queue"]},"Part 6: APIs and Ajax",{"list":["Using Lorem Picsum API to return a random image each time we load twitch.tv"]},"All while building a tool that is powerful enough to improve your productivity every day.","We'll start by developing a thorough understanding of the DOM and Chrome developer tools in order to remove the distracting content."]},"chrome-extension-2":{"subunitId":"chrome-extension-2","heading":"Project Part 2 - DOM manipulation and Chrome developer tools","read":["Twitch's webpage, like any, is a collection of ‘content in content’ - video thumbnails, titles, subtitles, text areas, icons, etc.","That’s all HTML is - words that describe:",{"orderedList":["What should be on the page and","In what order"]},{"codeBlock":"
Welcome to Twitch
\n "},"The code above tells the web browser (e.g., Chrome) to place a header with the words 'Welcome to Twitch', then right afterwards place an image - the Twitch logo (which is in the JPG image format).","Behind the scenes, the browser analyzes each of these instructions and uses them to form a behind-the-scenes diagram/model of the page.","
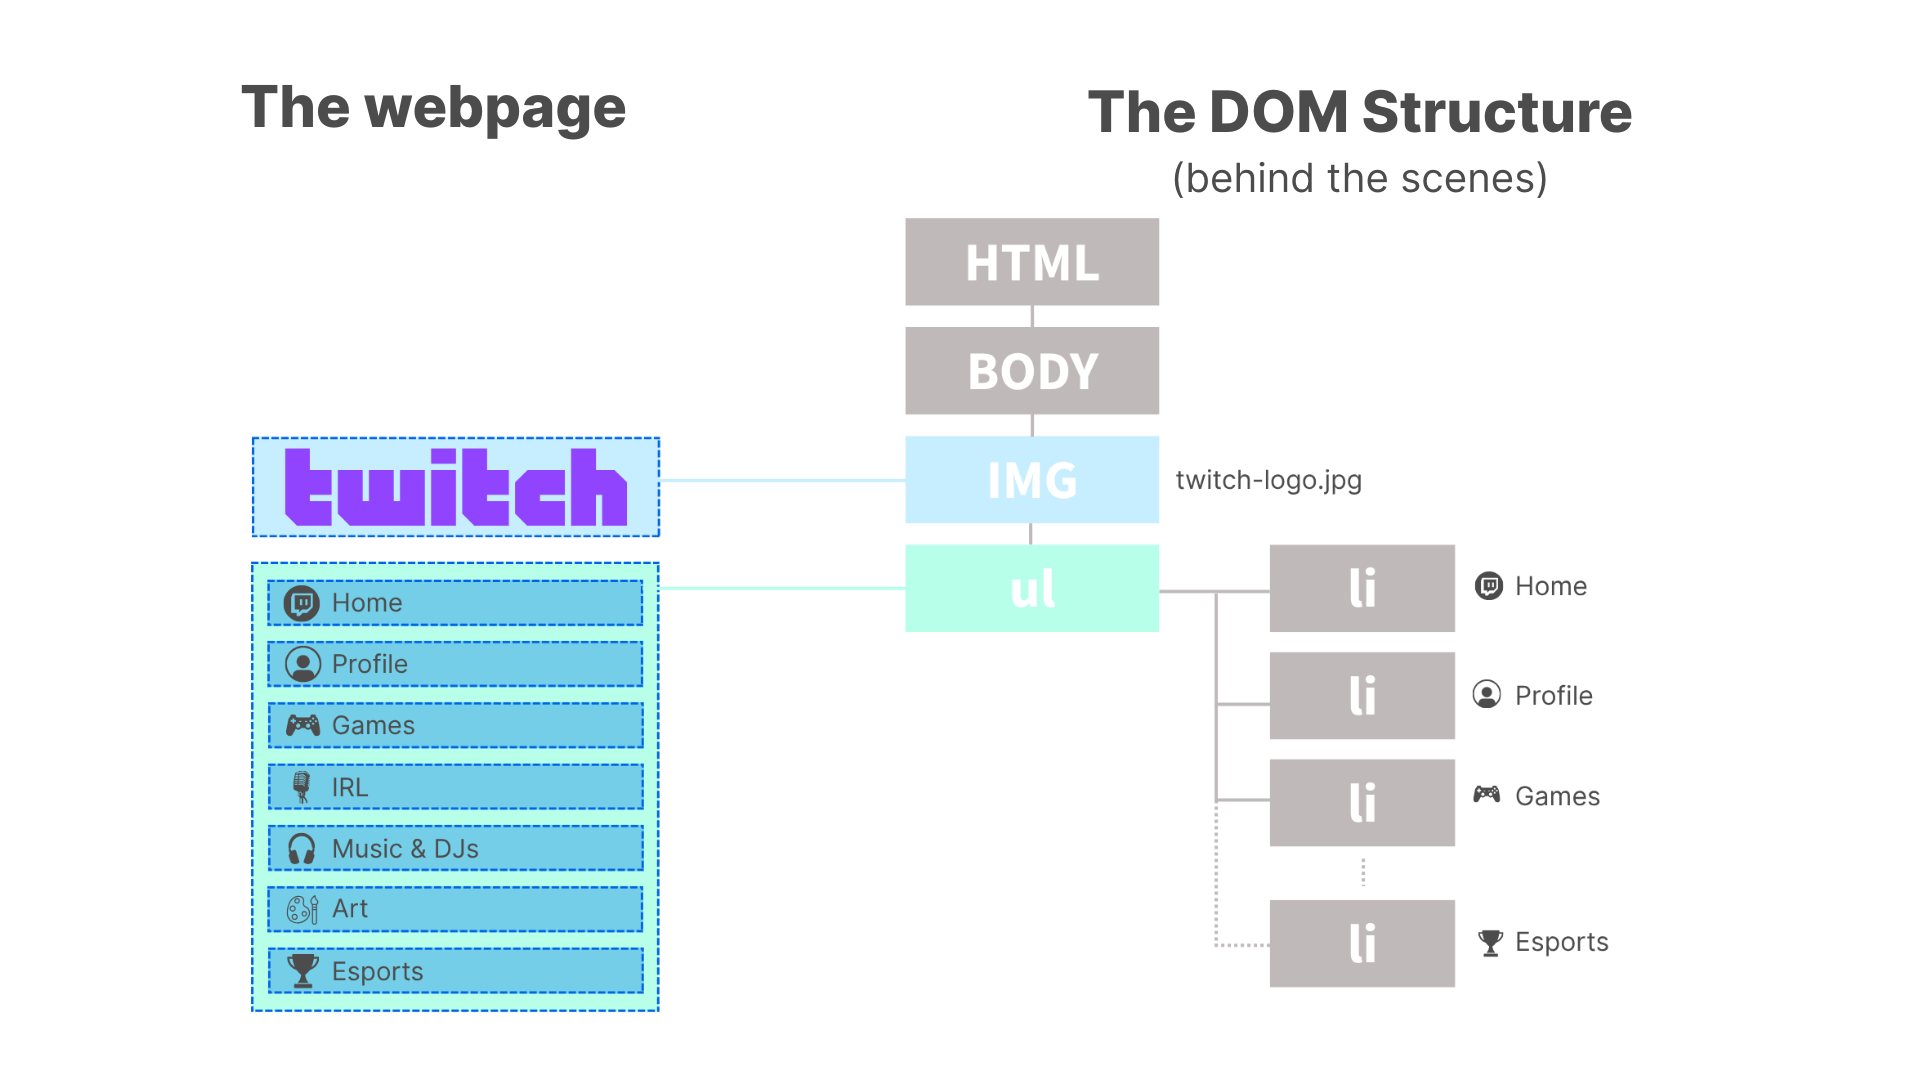 ","This is crucial. It allows us to write JavaScript code that can go and interact with the page by navigating (known as 'traversing') this diagram/model (DOM). We can then use JavaScript to add elements to the page or delete bits without writing any further HTML. We want to use JavaScript to add/remove content because we don’t have to reload the page to do it - it can be done live, or ‘dynamically’, while the page is already loaded.","We can see this behind-the-scenes structure by selecting one of the elements on the page and viewing it in the source code in Chrome's developer tools.","
 ","We need to delete our main element here - we can just go ahead and do it by right clicking on the right section of the source code and deleting!","But of course we need to do it automatically - so we'll need to write code.","We can run JavaScript straight in the webpage from the ‘Console’ (later we'll put the code in a file that will be part of the Chrome extension so we can run it automatically in the background) but for now we can test out the right code to write here. To go to the Console, open it with Command + Option + J (Mac) or Control + Shift + J (Windows).","Each element (in code that is helpfully written) has a label we can use to grab it - called a selector. We can find it by clicking on the element...and there it is:","
 ","The element’s label (its ‘id’) is 'root' (there are different types of labels - ‘id’, ‘class’).","So now we need to use some JavaScript to grab/select that element so we can then apply the delete command (function) to it.","This is where the problem-solving research begins. Before you get the answer from me, take a look at MDN. MDN is a great resource for finding the methods/functions that you will need to interact with the DOM. You can find a method for selecting an element here under \"instance methods\".","","OK, hopefully you went and found that the method we need is:","const contents = document.getElementById('root');","document is an object with lots of built in methods stored on it (functions stored on an object are called methods) and the one we're using takes an 'id' and finds the element with that particular 'id'.","So we now store that element in a variable ready for deletion - we store it in a variable 'contents'. Let’s check if it’s there stored in 'contents':","
 ","...and there it is!","Now we need to find the delete method (again, you can go look it up here on MDN.","So we need to run the delete function on the element - Our docs say we need to run:","el.parentNode.removeChild(el);","We have to replace ‘el’ with our actual element that we stored in a variable so we’ll be running:","contents.parentNode.removeChild(contents);","Success! We've removed the distracting content from our page using JavaScript, our understanding of the DOM, and the Chrome developer tools."," It’s important to note that, today, it’s more common to use: ","document.querySelector('#root') instead of document.getElementById('root')
 \n → document.querySelector() can select elements using any CSS selector, not just IDs.
\n contents.remove() instead of contents.parentNode.removeChild(contents)
\n → element.remove() is a newer, simpler method that removes an element directly from the parent without needing a reference.","For our purposes, we’re keeping it old school because it’s more explicit and a little easier to follow when you’re first learning how the DOM works.","Next we'll move this functionality into an 'extension' so we don't need to type it out in our code each time - instead we can save our code in a file and run it in the background as an extension. We'll do this in Part 3.","Further Challenges:",{"list":["Remove more specific elements - perhaps the History button or other buttons on the page","Try adding (hint: appending) content to the page from the console","If your most addictive site isn't Twitch, but for example Instagram, try to emulate this same process with Instagram’s page."]}]},"chrome-extension-3":{"subunitId":"chrome-extension-3","heading":"Project Part 3 - JSON and configuration","read":["In the last lesson, we learned how we could manipulate real website content just by typing a few lines of code directly in our browser. This is really cool, but we wouldn’t want to do this manually every time we visited Twitch.","Luckily for us, we can build a Chrome extension to automate this - and it’s really simple!","To start, open your favorite text editor. If you want to try a tool specifically for coding, check out VSCode! From the file menu, let’s create a new folder to hold our project. It’s in this folder that we will put all of our files.","Since the code is fresh in our minds, let’s start with the file that will contain that functionality. In our new project folder, let’s add a new file and call it “main.js\". (The ‘.js’ extension tells us that the contents of this file are in JavaScript.)","In this file, let’s add the two lines of code we previously typed directly into the browser console:","
 ","Later on we’ll add the code to replace our lost videos with an image, but for the moment this is all we need here. Make sure to save the file!","Now how on earth does this code that lives in this main.js file on our computer know that it should run as a Chrome extension? So far, it really has no idea!","We need to create one other file to tell Google the settings for this code - that this code is a Chrome extension and that it should apply only when we visit Twitch.","
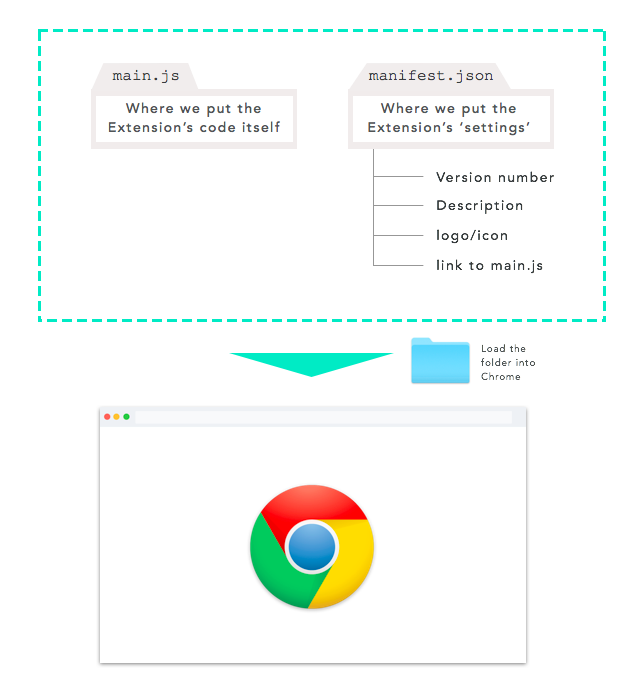 ","Before we create this second file, it is important to understand JavaScript Object Notation - or JSON for short. JSON is a way to format data so it is easily interpreted by computers. Here is an example of how we might format data about a person in JSON:",{"codeBlock":"{\n \"name\": \"Joe Chrome\",\n \"age\": 27,\n \"hometown\": {\n \"city\": \"Playa Vista\",\n \"state\": \"CA\"\n },\n \"siblings\": [\"Polly\",\"Edgar\"]\n}"},"Notice that the information is wrapped in curly braces, making it one object. Within the braces are several “key-value” pairs. The keys are to the left of the colon, and the values are on the right.","All of the keys are strings (words wrapped in double quotes), but the values can be strings, numbers, arrays of values (wrapped in square brackets), or other objects with their own key-value pairs.","We will follow this same format for our extension settings.","Let’s create our second file and call it “manifest.json”. There are three things Chrome requires this file to contain:",{"orderedList":["The “manifest_version” tells Chrome about the format of the manifest. We'll be using version 3.","The “name” is what we call our extension and how it will be listed with Google. We’ll call our extension “Focus“.","The “version” field helps Google keep track of updates we make after our extension is published to the world. This needs to be a string, so we’ll call ours “1.0”."]},"With these items, our file should look like this:",{"codeBlock":"{\n \"manifest_version\": 3,\n \"name\": \"Focus\",\n \"version\": \"1.0\"\n}"},"While these are the only required fields for our manifest.json, they don’t make for an exciting Chrome extension! There are dozens of other fields we can add, but we only need a couple more to make our extension work as we expect.","Let’s tell others what our extension does by adding a “description” field. You can come up with this one on your own. Just be sure to wrap it in quotes!","Finally - and perhaps, most importantly - we need to link the code in our “main.js” file with Twitch.","Chrome gives us a few ways to do this. We will use a “content_scripts” field in our JSON file since our code needs to run in the context of a certain webpage.","Since more complex extensions often need to define multiple JavaScript files to run in different contexts, the “content_scripts” field is typically an array of objects. In our case, we will have only one object in our array.",{"codeBlock":"\"content_scripts\": [\n {\n \"matches\": [\"https://www.twitch.tv/*\"],\n \"js\": [\"./main.js\"]\n }\n]"},"You’ve probably guessed that the “matches” field within our “content_scripts” object tells Chrome that the “js” (JavaScript) code in “main.js” applies only when we are on Twitch’s website. Again, these fields are arrays in case we had multiple matches or JavaScript files to link together.","By now, our “manifest.json” file should look something like this:","
 ","We have some more behavior we want to accomplish with our code, but we are all set to test what we have as a Chrome extension!","In Google Chrome, navigate to “chrome://extensions”. Check the box “Developer mode” in the top right corner, and then click the “Load unpacked extension…” button to the left. Find the folder you created earlier and open it.","
 ","You should now see your new extension listed below with the name, version, and description you gave it. Make sure to click the 'Enable' slider in the bottom right of the extension card (should be blue!), then head over to Twitch.tv","
 ","What happened to our video feed?","Congratulations! You just created a first draft of a real Chrome extension! But we still want to replace the content we lost with something else. We’ll work on that next time.","Further Challenges:",{"list":["Did you notice our extension is listed with a default puzzle piece icon when we visit “chrome://extensions”? Try replacing that with something custom. (Check this out if you get stuck.)","Try to do the same thing we did to Twitch on another website (like Facebook). Keep in mind that the new item to hide might not be called 'contents'. Can you do this by modifying our existing Chrome extension?","Create a simple popup page for when users click on your extension’s icon in the top right of their browser. What do you need to do this? (Maybe a file to describe the popup page and an addition to our settings.)"]}]},"chrome-extension-4":{"subunitId":"chrome-extension-4","heading":"Project Part 4 - Libraries and jQuery","read":["JavaScript, by itself, is a powerful tool that lets us interact with and modify elements on a web page. As projects grow, however, developers often rely on third-party libraries—collections of pre-written code that make common tasks easier or faster to implement. One of the earliest and most influential of these libraries is jQuery, which became popular for simplifying DOM manipulation, event handling, and animations. In this section, we’ll use jQuery to explore how third-party libraries can extend JavaScript’s capabilities and make our code more efficient.","Check out jQuery's documentation to achieve what we did above in JavaScript, in jQuery. It’s important to note though, jQuery is still written in JavaScript, it just allows us to do more with less code.","For example:","const contents = $('#someID');","const contents = $('.someClass');","Now, our code is a lot cleaner, and more importantly, readable.","Apart from making JavaScript code easier to read, jQuery is well-known for making web page interactions like animations or element changes easier.","However, if we were to edit our webpage right now, using jQuery, we’d get an error. That’s because we haven’t added the code that makes up jQuery into our Chrome extension yet. To do this, we need to add jQuery, a ‘dependency’, to our manifest.json somehow. A dependency is just a bunch of additional code we can add on top of our own to gain additional functionality.","First, we need to download the code behind jQuery.","Download jQuery by clicking this link and then right-click and choose ‘Save as...’. Save the jQuery file as “jquery.min.js”, and place it in your Chrome extension folder.","Next, add it to your manifest.json (remember that just makes it available to our Chrome extension).",{"codeBlock":"\"content_scripts\": [\n {\n \"matches\": [\"https://twitch.tv/*\"],\n \"js\": [\"jquery.min.js\", \"./main.js\"]\n }\n]"},"Now, we can use jQuery!","With that in place, let’s go back to building our extension.","So, we’ve just removed contents from the list of elements that make up the Twitch web page. But, what if, we instead just replace the contents of contents with something else - like an image? Let’s do that now.","Remember how we removed contents?","JavaScript","const contents = document.getElementById('root');","contents.parentNode.removeChild(contents);","jQuery","const contents = $('#root');","contents.remove();","We did it by going up to its parent element and telling JavaScript to remove contents as one of its children. However, if we want to replace contents with an image, then we’ll need to keep a reference to where contents’ parent is on the page.","One solution, store the parent element in a variable.","const contentsParent = contents.parent();","However, if you remove contents first before storing a reference to its parent… what do you think would happen? You’d get an error, right? Why?","Well, because we’re trying to access contents’ parent, but contents doesn’t exist anymore. So, we need to change the order of our code then to have a reference to contents’ parent before we delete contents.","Alright, so at this point I’m assuming you’ve successfully deleted contents, but still have access to its parent.","As a challenge, figure out how to add (hint: prepend) an image as contentsParent’s first child.","
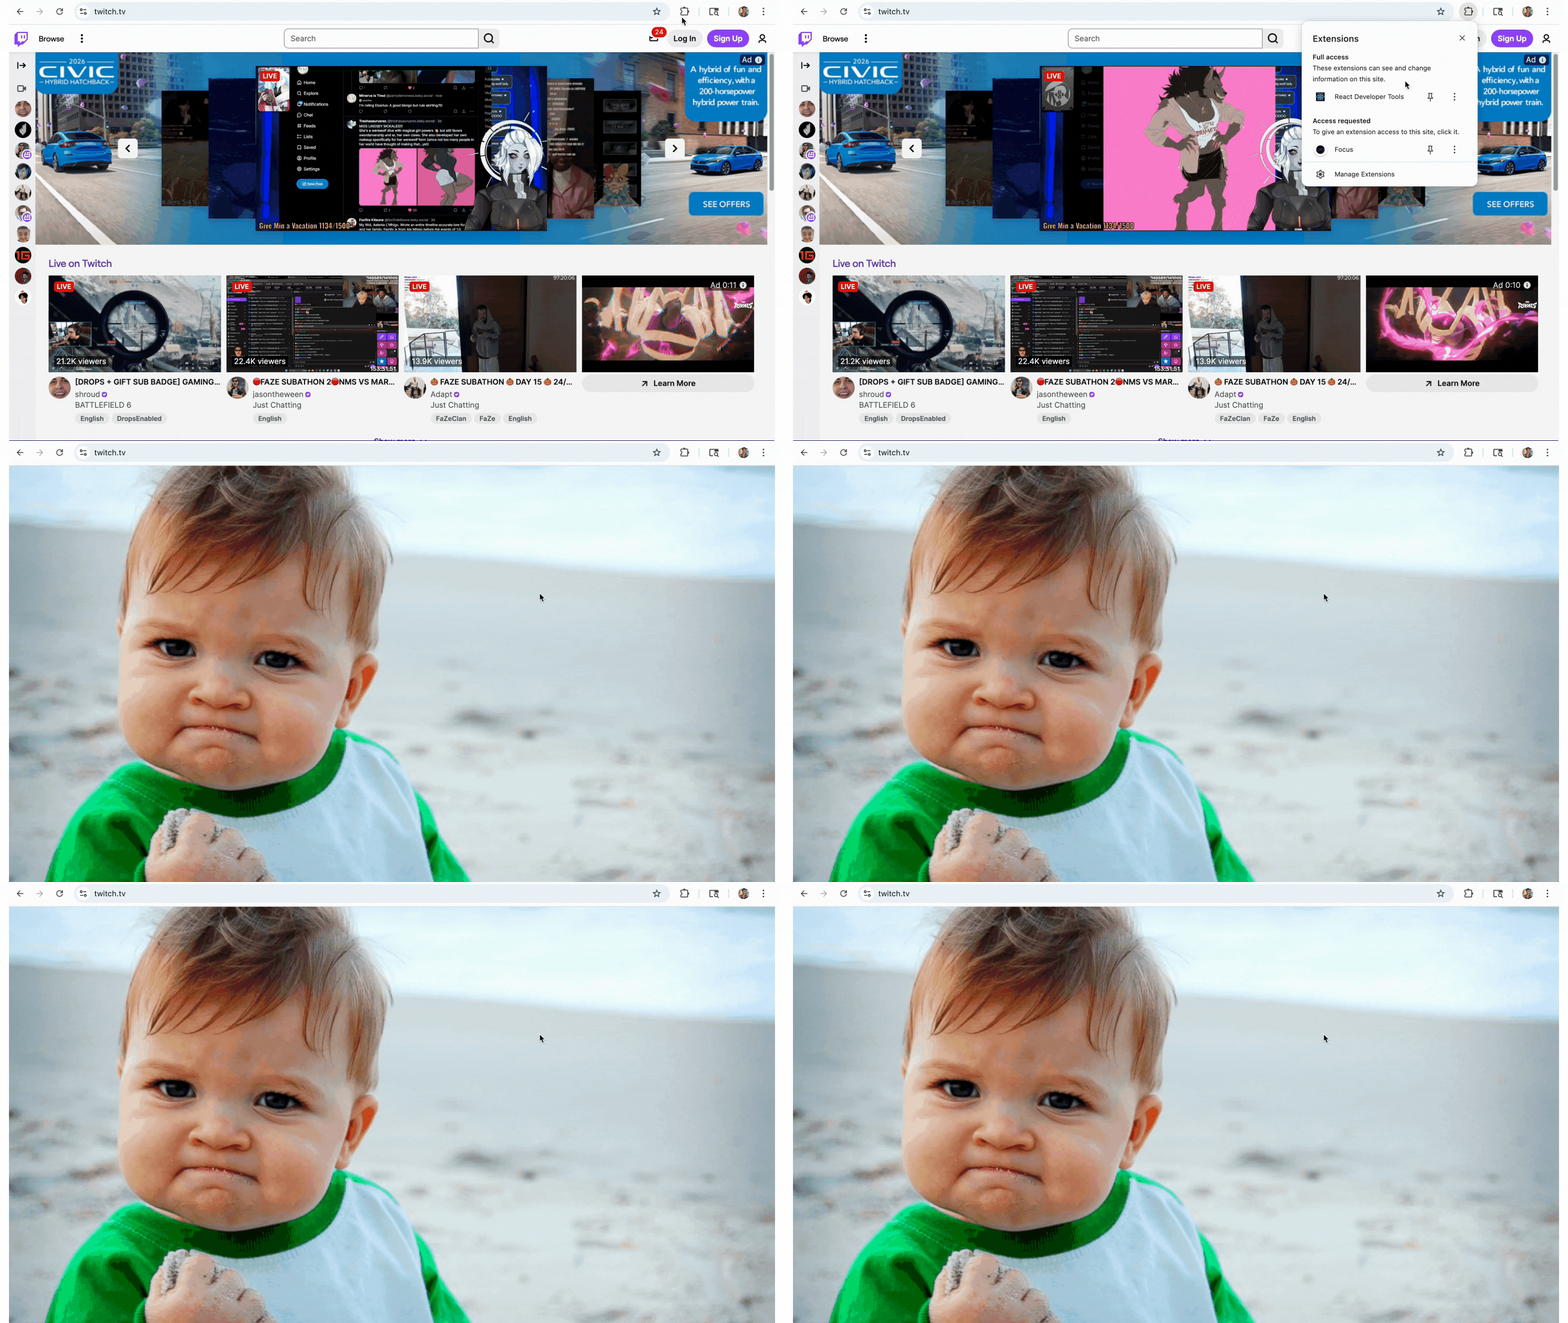 ","We’ve just done a remarkable thing! Not only have we removed elements from Twitch, but we’ve also replaced them with a proactive image, wooh!!","Now let’s truly make it our own by adding some text above the image.","In order to achieve this we want to add (or prepend) another child to contentsParent. This time, before the image, because remember, the web page will render elements from top to bottom, so the text will show above the image.","You can make it a div, span, or whatever you like as long as it says something truly inspirational… like “Get back to achieving your coding dreams”. Yeah, that will work.","
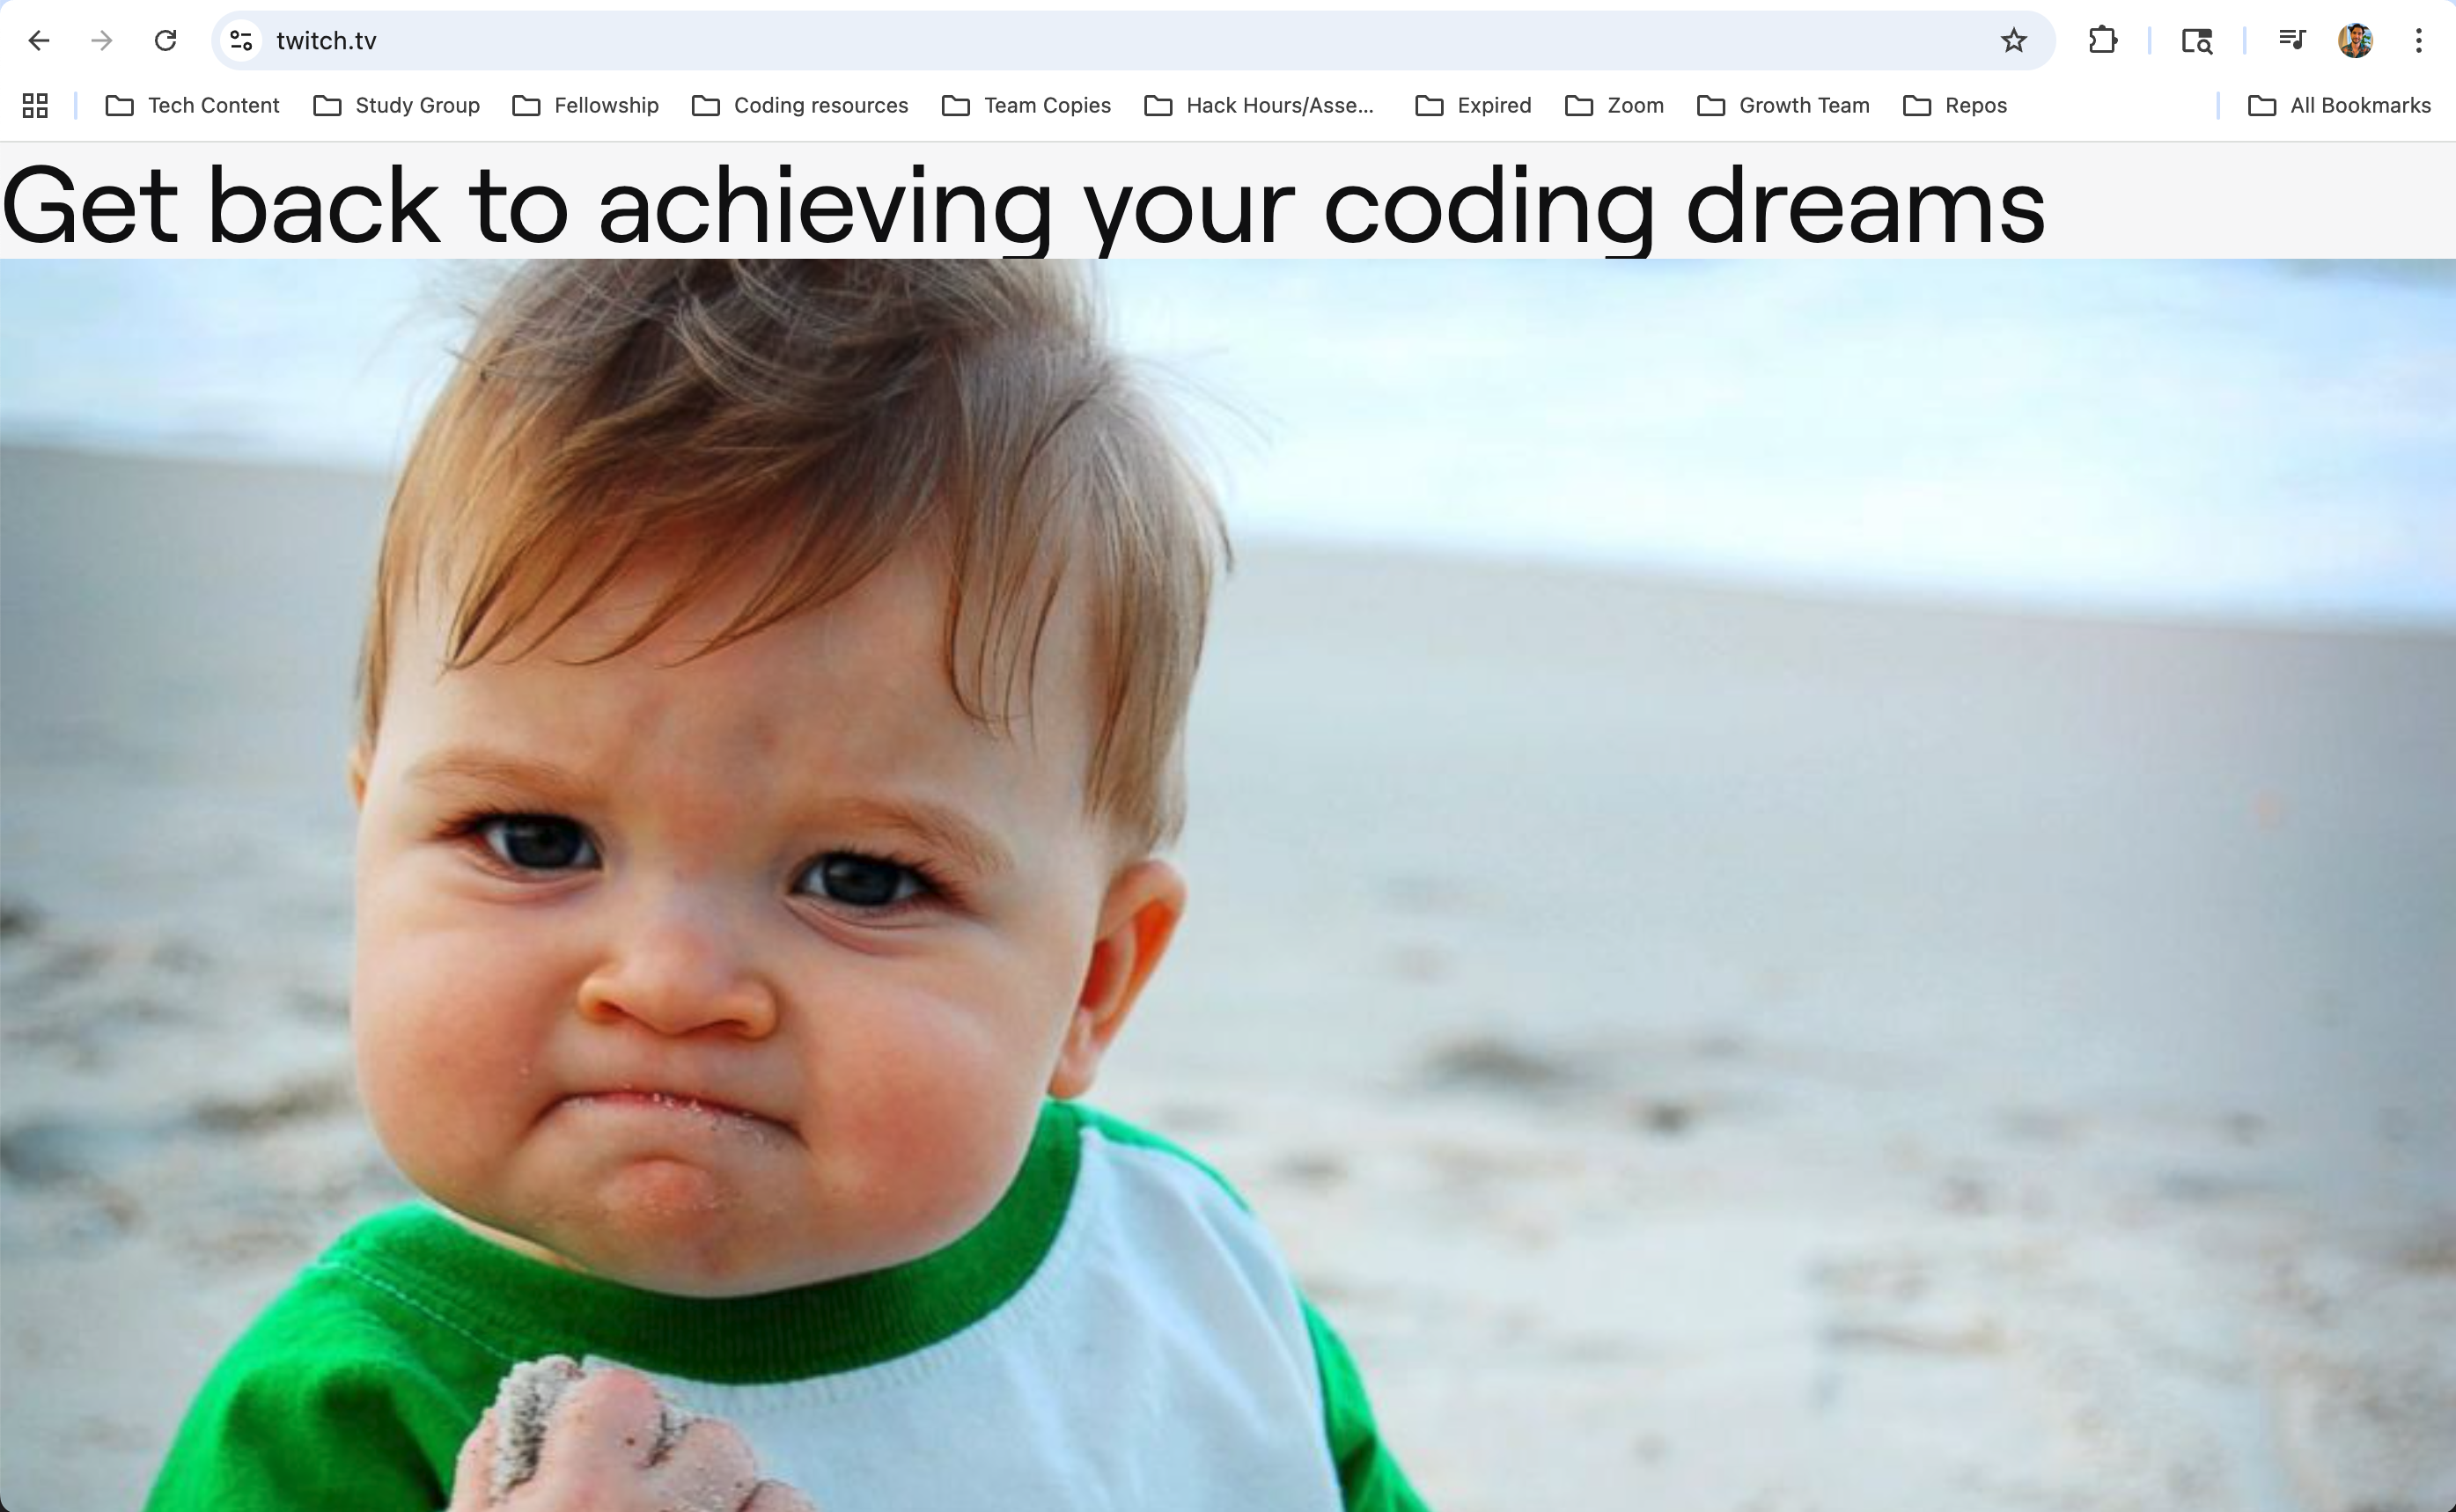 ","So things are going well, but isn’t our text just downright ugly? You’re probably thinking websites are usually these beautiful things, but right now, that text just isn’t cutting it. To mess with styling, we need to be dealing with CSS, or Cascading Style Sheets.","CSS is just a mechanism to add style to a web page. Go ahead and make an index.css file where all your files for the Chrome extension are.","OK great. Now, in order to style something on a web page we first need to identify the element that we want to change.","We’ve accessed an element before by using its ID, but this time we want to do it through its class.","So, go ahead and add a class, called beautText, to the text above the image.","According to jQuery’s docs we can add a class as follows:","$message.addClass('beautText');","What, that did nothing? Is what you should be saying at this point. We never defined beautText in our CSS file nor have we added it as a dependency like we did for jQuery. Do this now.",{"codeBlock":".beautText {\n color: green;\n}\n"},"That covers our CSS file.","In our manifest.json we can also add css files as dependencies. Add the following below our list of JavaScript dependencies:","\"css\": [\"index.css\"]","And now something beautiful happens. The color of the text we wrote above the image changes. That was only possible by first adding our index.css file as a dependency.","But, how does this all really work? How does the browser render HTML, and what does it look like under-the-hood? Jump to the next section for more info!","Further Challenges:",{"orderedList":["Animate the text across the page using jQuery","Cycle through multiple images instead of just one","Have the text change colors"]}]},"chrome-extension-5":{"subunitId":"chrome-extension-5","heading":"Project Part 5 - Asynchronous Callbacks and the JavaScript Engine","read":["Great! It looks like everything is working as planned. Now whenever we visit Twitch, we’ll see a message and an inspirational image…","The same inspirational image...every...time...","After a while, this image would become less and less motivating. Wouldn’t it be great if we could show a random image each time we visited the page?","Lucky for us, there are services called APIs that we can reach out to and request things like random images. This will be a great addition to our Chrome extension, but first we need to understand what is happening behind the scenes when we make such a request.","Because the images we want exist elsewhere on the internet (outside of what is already on Twitch’s page or in our code), we have to request them similar to how we request certain web pages by typing in their URL. Specifically, this is called an HTTP request.","As you know from visiting your favorite website, web pages always take some (usually small) amount of time to respond with content. This is also the case if we make requests to an API in our code.","Why is this important? Well, we haven’t mentioned it explicitly, but JavaScript runs synchronously. This basically means that one line of code executes completely before the next line begins, so we can only do one thing at a time.","This makes a lot of sense for what we have coded so far. We need to assign the element with the ID of root to a variable before we can use that variable to grab its parent. If those lines did not run synchronously, we might expect an error if the second line were to run before the first.","But in the case of requesting a random image, if we were to wait for the image to be returned, we would slow down, or block any code below the request from running until that time. If that code has nothing to do with the image, blocking it from running could be very annoying for the user - even if for just a split second.","Thankfully, web browsers allow us to run code asynchronously. Asynchronously essentially means multiple things can happen at the same time.","In our case, we can request content from an API in one bit of code, continue about the rest of our code as that request is being processed, then do something with the returned content when the response comes in.","How is this possible if JavaScript is synchronous in nature? We’ve talked about JavaScript running in the browser, but we haven’t mentioned the full context our code is running in.","Within the web browser, there is a component called the JavaScript engine. This is where our code runs, and it can only run things synchronously. But there are other browser components besides the JavaScript engine.","
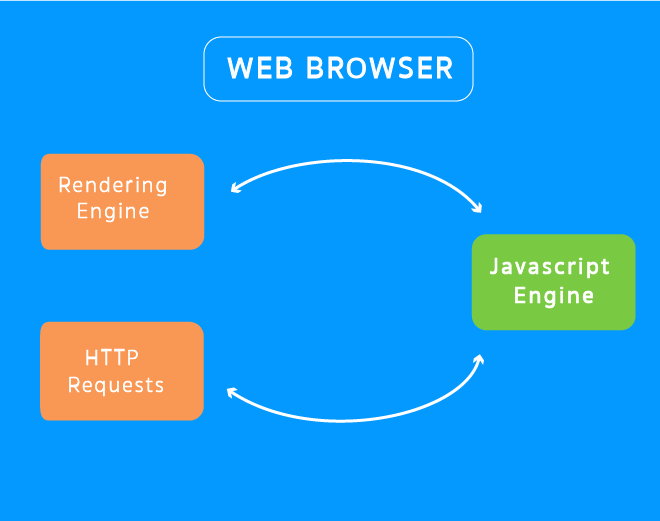 ","The rendering engine is the part responsible for displaying the HTML and CSS of a website, and it goes about its business separate from the JavaScript engine.","The great thing is that our code running in the JavaScript engine can communicate with the rendering engine to do things like manipulate the HTML and CSS. This is what we’ve done already - both with and without jQuery.","Besides these two components, there are also tools in the browser that deal exclusively with HTTP requests. It is an HTTP request that gets Twitch’s HTML, CSS, and JavaScript files for the other components to process in the first place.","Just like the rendering engine, HTTP requests have little concern for what’s happening in the JavaScript engine. This all means that if we make a request to an API for a random image, we can do so without worry that the rest of our code will be blocked!","However, there comes a bit of a downside with asynchronous code. We lose the predictable nature of our code.","Line by line, our code may translate into:",{"orderedList":["Ask an API for a random image and assign the image to a variable ‘myImg’.","Add ‘myImg’ to the page along with motivational message."]},"But given the request is asynchronous, what actually happens might be:",{"orderedList":["Ask an API for a random image... (request for image is sent)","Add ‘myImg’ to the page along with motivational message.","(response with image is received) ...assign the image to a variable ‘myImg’."]},"We have a problem here! In Step 2, we do something with ‘myImg’, but we don’t receive the actual image until later. So in Step 2, ‘myImg’ is actually undefined.","What if the request takes virtually no time to come back? There has to be a chance we will have the image in time, right?","Wrong! In fact, even if a response is received immediately, we will not have access to it until all of our other code finishes running.","To understand why this is, let’s look more closely at our JavaScript engine.","
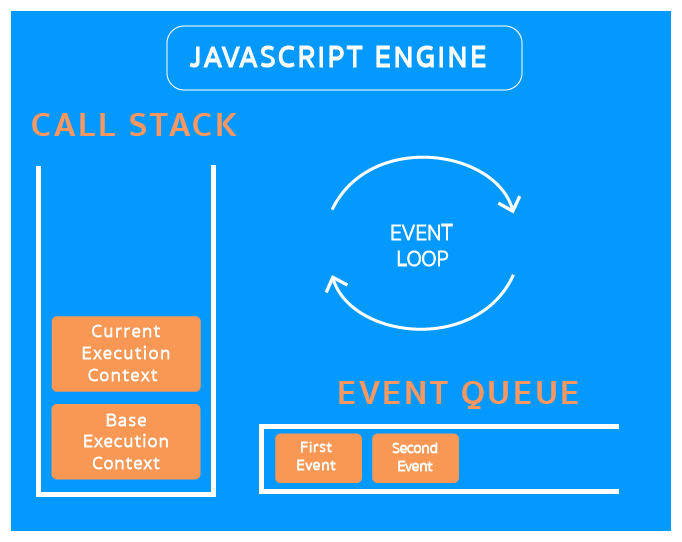 ","Within the JavaScript engine is something called the call stack (or execution stack). The call stack keeps track of our execution context - basically, where we are in our code.","If our code makes a call to JavaScript in another execution context - such as calling a function - that new execution context is pushed to the top of the call stack. Whatever is on top of the stack is the current execution context the JavaScript engine is processing. We go back down the stack only when the execution context on the top finishes and is popped off of the stack.","But remember, the HTTP request for our image doesn’t get handled by the JavaScript engine, so it doesn’t affect the call stack. How then does our code know when the response comes back?","Well in addition to the call stack, the JavaScript engine has something called the event queue. The event queue receives items whenever certain events happen - like a user clicks their mouse, or an HTTP response is received.","The JavaScript engine has a feature called the event loop that periodically checks the event queue for items to be processed - but only after the call stack is emptied. In the case of our code, this means the image we receive back will not be available until all of the synchronous code in our file completes. (Check out this video for an in-depth (but digestible!) explanation of the event loop.)","How then can we do something with the image only when we have access to it? That is where callbacks come in.","Callbacks are functions that run their code only when certain events occur. In our JavaScript, we can, for example, tell the browser we want to be alerted when the user clicks on any div.",{"codeBlock":"$('div').click(function() {\n alert('A div was clicked!');\n});"},"Try adding this code to your extension’s main.js file. Be sure to reload the extension in Chrome settings, and then visit Twitch and click around.","Pretty cool, huh? With our callback we were able to specify code that only runs when a certain event happens.","We can do the same thing when we request our random image, but in that case our callback will detail what to do with the image. If you want to play around more with these concepts, this visualizer is a great tool for understanding Javascript's call stack/event loop/callback queue.","We’ll get into that and how to make AJAX calls to APIs next time!","Further Challenges:",{"list":["Practice working with asynchronous code and callbacks. You can experiment in Chrome’s console with the built-in function ‘setTimeout’. Try this to start: setTimeout(function() { alert(“I am delayed”) }, 3000);","In your Chrome extension, change the click handler to make elements disappear when they're clicked","Experiment with other event listeners and callbacks"]}]},"chrome-extension-6":{"subunitId":"chrome-extension-6","heading":"Project Part 6 - APIs and AJAX","read":["Ready to dynamically render photos to the DOM?! *nerd high five* Hold your horses there. Before we go any further remember that an API is something we can request data from in the form of HTTP requests, and that’s exactly what we’re going to do.","With jQuery we can make HTTP requests using AJAX, or Asynchronous JavaScript and XML. Which means you can make requests using JavaScript, and that the process is asynchronous. That’s it. A bunch of fancy mumbo jumbo if you ask me.","Another important note is that most APIs return data in the form of JSON, which we discussed earlier, and Lorem Picsum is no different.","The URL we’ll be requesting images from is picsum.photos. You can visit this page before we even make the AJAX request. I recommend downloading a JSON viewer extension. I use JSON Formatter for Chrome, and it just makes the data easier to read, so give it a try if you’d like.","You may be asking what does an AJAX call look like? Well that’s for you to find out. Check out this link for more info.","Simple, right? A GET request looks something like this:",{"codeBlock":"$.ajax({\n method: 'GET',\n url: 'http://demo.com',\n success: function(result) {\n // result is whatever the URL sends back from the request\n },\n error: function(err) {\n // if any errors occur during the process you can check out the\n // the error by logging the 'err' argument\n }\n});"},"Or you can specify the type of HTTP request from the get-go. Like so:",{"codeBlock":"$.get('http://demo.com', function(result) {\n // result is whatever the URL sends back from the request\n});"},"Either one works. But do notice for the first example that we have these success and error callbacks that are exposed to us. Remember how we talked about asynchronicity before? Well, let’s talk about it again.","One way AJAX handles asynchronicity is through these two functions. And these type of functions have to always exist, otherwise we can’t handle the logic after the HTTP request is made. Remember that the JS Engine keeps executing code while this HTTP request is still in the works, and the request event is ultimately dequeued from the Event Loop once resolved.","If we were to try to access the response from outside the success block we would get an error. That’s because we only have access to the response inside the AJAX call, because that’s where it becomes defined!","Basically, we’ll want to move all of our logic inside of the success function, because otherwise elements will render out of order. We want our image to render first, and then append text above it, and this order is only possible once we know when the image is defined.","Anyways, let’s get back to the fun.","As a challenge go ahead and use the first AJAX example to make a GET request to the URL provided above to receive JSON data back, and then log it to the console. I got something like this:","
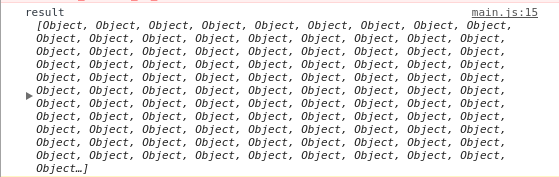 ","To me this is an extremely beautiful part of programming. All we did is make a request to a server at a particular URL and it responded with JSON data. Now, we can do whatever we want with it.","And what we’re going to do is cycle through a different photo each time we load Twitch, so our inspiration never withers! We can do so by randomly generating a different index to fetch an image object from this massive array on-load. How would we do this in JavaScript? Check out some of the methods on the Math class, and see if any of them look useful. Did Math.random catch your eye? It caught mine. Let’s use it.","Here’s an example I found on MDN:",{"codeBlock":"// Returns a random number between min (inclusive) and max (exclusive)\nfunction getRandomArbitrary(min, max) {\n return Math.random() * (max - min) + min;\n}"},"A few things to note about this. One, Math.random returns a floating-point number, or a number with decimals in it, so we have to floor that result to an actual integer, because we can only access elements in an array by an integer based index. And two, our max for the example above would be the length of the image array we got back from the URL.","Alright, just a few more steps and we’ll be there. Okay, so by now you can randomly access a different image object each time the page renders, but we still haven’t added the actual image to the DOM yet.","We’ll format our image element’s src property as follows:","https://picsum.photos/id/<image.id>/1200/800
e.g.
<img src=\"https://picsum.photos/id/127/1200/800\" />","The image ID is a key on the image object we access each time YouTube loads.","
 ","And boom! Isn’t that just beautiful? And the true magic is happening under the hood. Every time we load the page it makes an AJAX GET request to the Lorem Picsum URL, and it responds with an array of objects that each represent data about an image. We fetch one randomly by its image ID, and populate it to the DOM… and everything is done dynamically! Wooh! You did it!","Further Challenges:",{"list":["Make the images cycle just by clicking on it, instead of having to reload the page each time to see a new image","Register with the Lorem Picsum API and fetch images once properly authenticated via OAuth","Have the image fade in and fade out by using jQuery animations"]}]},"closures-divein":{"subunitId":"closures-divein","heading":"Dive into Closures","read":[{"subheading":"What We'll Cover","subcontent":[{"orderedList":["Execution Context","Scope","What is a closure?","What are closures used for?"]}]},{"subheading":"Execution Context","subcontent":["The execution context is the environment in which a JavaScript function is being executed. Each execution context has its own variable scope.","Whenever a function is invoked, a new execution context is pushed onto the call stack, and a new variable environment is created along with it. The function’s code runs in the new execution context and has access to the variable environment in the execution context directly below that new execution context (the one in which the function was invoked).","Upon exit of the function, the execution context is popped off of the call stack. Code in one execution context is stopped until the code in the execution context above it finishes running."]},{"subheading":"Scope","subcontent":["Variable environments are commonly referred to as “scope.” While each execution context is stacked on top of the execution context preceding it, each scope is created inside of the previous scope. Code being executed inside a scope not only has access to the variables in that scope, but also the variables in all the scopes that encase it. Therefore, code that runs in a given execution context has access to all the variables created in the execution contexts below it."]},{"subheading":"What is a closure?","subcontent":["A closure is a variable environment that has outlived its execution context and remains attached to a function that also has outlived the same execution context.","If multiple functions are created in the same execution context and all of them outlive that execution context, those functions each have their own closure, and each of these closures will access the same variables in memory. Therefore, mutation of those variables by one of those functions will affect the other functions in the manner that they will be accessing the same (mutated) variables."]},{"subheading":"What are closures used for?","subcontent":["Closures give us the ability to gain some benefits normally associated with object-oriented programming, namely data privacy and data encapsulation (thus name “closure”). When the structure of the encapsulated data and the methods used to access/manipulate the data is too simple to justify using actual object-oriented programming, closures provide a convenient solution.","Closures can aid in maintaining secure and private access to variables, by creating functions that serve as the only objects with access to these variables. The functionality of the functions themselves serves as a method of whitelisting the ways that those variables can be mutated. Because only the created functions have access to the variables, the procedural steps outlined in the created functions are the only procedures that can operate on the variables in the closure.","Closures are used especially often when functionality is being imported into a file from another file. The code in the imported file is executed, creating a closure for any function(s) exported from the file. This is a common method for JavaScript libraries to be made available for use to a developer’s application and helps developers maintain modularity of their code."]}]},"csx-prereqs":{"subunitId":"csx-prereqs","heading":"Prerequisites for CSX","read":["You’re going to hear a lot in CSX and in your journey to Codesmith about the importance of problem-solving and communication of your code - and that it’s more important than your ‘knowledge’ of JavaScript.","However you still have to understand these building blocks to be able to actually wield this knowledge to solve problems and communicate your code. You should just not fall into the trap of thinking coding is about ‘knowledge’ alone.","The journey to coding begins with an understanding of the fundamental building blocks of code: variables, functions, loops, if/else - the pieces that are almost universal to every programming language.",{"subheading":"Recommended prerequisites for CSX","subcontent":["You need to be comfortable with these basic building blocks - and part of that is just repetition and familiarity. There are numerous online resources for these initial foundations and each person finds the one that fits them best. The key is to not stop during these foundations.",{"list":["The CSX Precourse Unit - Part 1 and 2","Codecademy - Text-only teaching and simple challenges - free. You should complete the Introduction to JavaScript units 1-8","Team treehouse - Video-based - great introductory tutorials - but monthly subscription. You should complete parts 1-3 of their Learn JavaScript track before CSX","Freecodecamp - All the foundations you need in JavaScript, HTML and CSS. Also has an incredible community. You should complete Basic JavaScript (10 hours) before CSX"]},"Once you have completed one of these prerequisites, you may want to complete others or start doing the resources’ more advanced parts.","However, at some point you will begin to feel this sense of plateauing - how do I move from following along tutorials to beginning to have the autonomy to tackle new challenges without the tutorial structure. What is the path? The answer is moving to harder open-ended challenges and a deeper understanding of JavaScript.","So what’s stopping everyone from doing this?","Becoming an autonomous problem solver with code is really hard. One of the reasons most of us rely on guided tutorials is that the next level involves hitting lots of intellectual, learning and even emotional blocks - it’s a struggle.","At the same time though, this is where you grow as a software engineer and move beyond following tutorials.","So how can we hope to push through these blocks?","By being part of a learning and building community - and above all - by pair-programming."]}]},"csx-teaching-style":{"subunitId":"csx-teaching-style","heading":"What is the CSX teaching style?","read":["Learning to code is hard, there is no beating around the bush on that. But hard learning is what sticks, and hard things can be accomplished, especially with the right resources and support. We designed CSX to be ‘hard learning’ but we also created it with additional learning opportunities to help you overcome obstacles and grasp the concepts on a fundamental level.","Tutorial style learning feels amazing, but we often find ourselves asking - did we actually learn anything there? Did we retain this information and can we apply it in a new situation that isn’t an exact copy of how we learned it? Very rarely have we found ourselves answering ‘yes’ to those questions without feeling the ‘struggle’ to grasp a concept or connect the dots.","CSX is not tutorial-style learning! The challenges are meant to push you and help you become an autonomous problem solver. You will grapple with applying concepts in different situations, rebuild functions you’ve used without deeper thought, and write efficient clean solutions. But that is the good stuff - struggling is awesome, it leads to that deep understanding!","In order to assist with this struggle, we’ve also built help into CSX in the way of:",{"list":["Testing your code - there’s no better way to understand more about your solution’s viability than by testing your code. You can do so on each challenge by using the ‘check my answer’ functionality as well as by uncommenting the console logs in the boilerplate code.","Solution videos - many of our challenges have video walk-throughs of a solution in the subunit following that challenge. These walkthrough videos are created by our CSX Mentor team and are designed to show you a possible solution to the challenge (remember there are many ways to solve every challenge). We recommend attempting the challenge on your own before using the solution video as a resource! The csx-challenge-help channel on the CSX Slack - we’ll talk more about this slack channel later in the overview unit, but this channel is a great place to ask questions about challenges to the CSX community and receive helpful tips and tricks."]},"Additionally, we always recommend the use of:",{"list":["MDN Web Docs - a great place to find general information about JavaScript syntax and how things function","W3schools - another education website for learning to code with great references on language functionality"]}]},"csx-to-codesmith":{"subunitId":"csx-to-codesmith","heading":"What are the Codesmith programs and how is CSX related to them?","read":["Outside of CSX, Codesmith offers programs for all levels of JavaScript learners and for those with varying goals of learning to code. Each of our programs can be prepared for by working through related CSX Units! CSX was designed to help prepare you for Codesmith programs by teaching you JavaScript syntax and functionality, computer science fundamentals, and technical communication through a focus on pair programming.","JavaScript for Beginners -","JavaScript for Beginners (JSB) is designed for those with no previous coding experience and will teach JavaScript fundamentals, as well as provide a broader context to how coding works. The program offers students a launching point to continue their JavaScript studies and build a future in software engineering.","We recommend getting started with our Precourse - Part 1 Unit to familiarize yourself with JavaScript syntax so you can hit the ground running.","Software Engineering Immersive Program -","Our flagship program teaches full-stack JavaScript and computer science to prepare you for mid and senior-level software engineering roles. The expertly designed curriculum and supportive community immerses you in modern web technologies, such as React and Node.js, and encourages you to tackle unique and unfamiliar problems to prepare you for the ever-changing tech landscape. Codesmith offers an extensive hiring support program that guides students through the hiring process, including interview strategies, portfolio development, and post-graduation check-ins. By the end of the program, you will be an autonomous engineer, ready to make an impact at innovative tech companies worldwide.","In order to prepare for the Immersive Program you will need to have a firm grasp on all concepts covered in CSX up through Recursion. On the CSX Homepage on each Unit’s overview card you can see which concepts are ‘always’, ‘sometimes’, or ‘never’ tested on the Codesmith Technical Interview. To learn more about the Immersive program we recommend attending an Information Session.","Enjoy CSX and happy coding!"]},"curriculum":{"subunitId":"curriculum","heading":"Curriculum Overview of the Units to Come","read":[{"subheading":"JavaScript Units","subcontent":["CSX Precourse - Part 1",{"list":["[In-person or online workshop] Intro to JavaScript - Variables and Looping","The console","Variables and variable reassignment","Data types overview","Strings - concatenation, properties, and methods","Numbers - addition, subtraction, etc.","Booleans"]},"CSX Precourse - Part 2",{"list":["[In-person or online workshop] Intro to JavaScript - Variable and Looping","Arrays - examining and adding elements","Loops - for loops and while loops","Control flow","Objects - iterating through and adding properties"]},"Unit 1: Functions and Execution Context",{"list":["[In-person or online workshop] Intro to JavaScript - Functions and Objects","How the return keyword works","Function definition vs invocation","Arguments vs parameters","Execution contexts","Memory and thread of execution","Call stack"]},"Unit 2: Callbacks and higher order functions",{"list":["[In-person or online workshop] JavaScript the Hard Parts: Callbacks and Higher Order Functions","Principle of function abstraction","Applying function abstraction to functionality"]},"Unit 3: Closures, Scope, and Execution Context",{"list":["[In-person or online workshop] JavaScript the Hard Parts: Closures","What if our functions could remember their prior invocation?","Returning a function","Lexical scoping","Variable environment and the backpack"]},"Unit 4: Recursion",{"list":["[In-person or online workshop] JavaScript the Hard Parts: Async","Async callbacks, web browser","The Callbacks queue and event loop"]},"Unit 5: OOP",{"list":["[In-person or online workshop] Recursion: A Deep Dive","Parameters as storage","Performance"]},"Unit 6: Async",{"list":["[In-person or online workshop] JavaScript the Hard Parts: OOP","Prototype, __proto__ and the prototype chain","Factories, constructors and classes"]}," Project: Chrome Extension",{"list":["Chrome extension that makes you more productive and a better coder"]},{"button":"Next Unit"}]}]},"expectations":{"subunitId":"expectations","heading":"Our expectations of you in CSX","read":["In CSX we expect you:",{"orderedList":["To commit a certain number of hours per week minimum to working through CSX material. We recommend 10 per week if possible. Developing a routine that lets you get flow on the material is essential to growing your coding skills.","Attend at least 2 free coding workshops hosted by Codesmith to pair-program either online or in person","Support and contribute to the community and discussion as part of the CSX Slack channel","Develop in all 5 capacities that make an excellent software engineer that we described above"]},"You can expect of us:",{"orderedList":["Push you to develop your problem-solving, communication and depth of JavaScript knowledge that will help prepare you for a bootcamp or (with additional work) for Codesmith’s admissions process","Support a workshop and pair-programming environment that is engaging and supportive","Develop and create new CSX challenges and update/fix where there are bugs (email at csx@codesmith.io with bugs)"]}]},"future-code-take-home":{"subunitId":"future-code-take-home","heading":"Future Code Take-Home","solve":{"code":"// Write your code here\n","instructions":[{"instructionContent":["Write out pseudocode (a description of the steps you'd take) for solving this challenge. Then try to solve it in code!","Declare a variable
 name and initialize it to a string (your name!).","Create an array vowels that contains all of the vowels (a, e, i, o, u).","Using for loops, iterate through all the letters in your name to create a new string variable with the vowels capitalized.","Make sure you come up with ways to test your code!"]}]}},"help-stuck":{"subunitId":"help-stuck","heading":"Where can I get help if I am stuck?","read":["As previously mentioned, CSX is focused on helping you become an autonomous problem-solver equipped with the tools to solve challenges based on learned strategies and approaches, not memorized helper functions. This style of learning is only possible with the addition of the CSX Community!","The CSX Community was created to support and uplift those learning to code. It’s full of spaces to find others learning to code to work together, and a place to share successes and challenges.","Join the CSX Slack","The CSX Slack is the optimal way to engage with the CSX community. It’s the best place to ask questions, meet other community members, and find out about upcoming events and workshops. Key Channels",{"list":["General - the best place to introduce yourself, hear about CSX news, and learn about upcoming events, workshops and additional learning opportunities","Csx-challenge-help - the place to ask questions about CSX challenges and concepts","Pair-programming - the channel to find potential pair programming partners and interact with others learning to code","Coding-resources - the hub of shared resources for learning to code"]},""]},"intro":{"subunitId":"intro","heading":"What is CSX?","read":["Welcome to CSX, we’re so happy to have you here! CSX is both an online platform to learn JavaScript and an international community of folks committed to learning to code. Our videos and challenges are designed to teach you, beginner, to intermediate JavaScript and computer science fundamentals, and our community will help you overcome blocks and achieve your coding goals.","CSX is maintained by the instructor teams at Codesmith and Future Code NY. We originally built CSX as a tool for our potential students to use to prepare for our Full-time Immersive Program’s technical interview, but it’s grown to be so much more than that! We saw the need for a platform to learn JavaScript that combined difficult challenges with a supportive community so ‘hard learning’ could take place!","As our program offerings and free workshops have expanded, so have the content and community that makes up CSX:",{"orderedList":["All of our CSX Units can be supplemented with free weekly workshops taught by Codesmith on some of the same topics and concepts","CSX has beginner content designed to give folks their first taste of coding alongside our program JavaScript for Beginners (Precourse Part 1 Unit)","More intermediate level content for folks to deeply understand core JavaScript functionality. (Precourse Part 2 Unit and Functions & Execution Context Unit)","Intermediate to advanced concepts for further independent learning and preparation for our Software Engineering Immersive Program and Future Code NY (Callbacks & Higher-order Functions Unit, Closure, Scope & Execution Context Unit, Asynchronous JavaScript Unit, Object-Oriented Programming Unit, and AI Fundamentals)"]},{"read":null},"Keep in mind that CSX is not meant to be a standalone resource! As you are working through the challenges, we recommend using additional resources like MDN and W3Schools to supplement your learning.","Steps to getting started:",{"list":["We recommend filling out our CSX Track Quiz which will direct you to a unit based on your experience level and goals.","Join the CSX Slack Channel to start meeting other community members and asking questions."]},{"read":["Happy Coding!"]}]},"intro-async":{"subunitId":"intro-async","heading":"Introduction to Async","watch":["https://www.youtube.com/embed/xTjx3q2Nm1w",{"description":["Asynchronous JavaScript allows code to continue being executed while we wait for the result of an initiated action, such as starting a timer, reading a file, or requesting data from a server. While the timer is running, the file is being read, or the server is calculating its response, the thread of execution continues. This is called \"non-blocking\" behavior, and it results in better performance than what would come from waiting for things to resolve before continuing to the next line of code (which is called \"blocking\" behavior).","We recommend starting your learning by watching Codesmith CEO, Will Sentance take a deep dive into these concepts.","You can follow along the video with the slides here."]}]},"intro-callbacks-read":{"subunitId":"intro-callbacks-read","heading":"Introduction to Callbacks and Higher Order Functions Continued","read":[{"subheading":"Now let's dive in and learn a little more about Callbacks","subcontent":["Object-oriented programming was the most prominent programming paradigm for 25-30 years, but functional programming has taken the lead over the last 5-7 years. As Zoolander's Mugatu would say, \"It's so hot right now.\"","The reason for its rise is clear -- as applications grow in complexity, functional programming gives developers the ability to deliver intuitive, stateless, side-effect free code, greatly streamlining their development process and improving their applications.","Callbacks and higher-order functions are at the heart of functional programming, and they're an essential part of a JavaScript developer's toolbox. Let's explore these concepts together from the ground up."]},{"subheading":"Definitions","subcontent":["If you type “callback” into Google search, you'll see the first definition as “an invitation to return for a second audition or interview.” That’s definitely not the kind of callback we’re discussing here!","In JavaScript, a callback is a function that is passed as an argument to another function. If that doesn’t make sense yet, don’t worry -- we’ll break it down soon.","And what about higher-order functions? A Google search reveals an accurate description - “a function that takes at least one function as input and/or returns a function as output.”","Hmm...Let’s see a code example to clarify -",{"codeBlock":"const array = [1, 2, 3];\n\nfunction update(callback) {\n const output = [];\n for (let i = 0; i < array.length; i++) {\n const updated = callback(array[i]);\n output.push(updated);\n }\n\n return output;\n}\n\n// Callback functions\nfunction add10(num) {\n return num + 10;\n}\n\nfunction multiplyBy20(num) {\n return num * 20;\n}\n\nfunction stringify(num) {\n return num.toString();\n}\n\n// Call update with each callback function\nupdate(add10) // returns [11, 12, 13]\nupdate(multiplyBy20) // returns [20, 40, 60]\nupdate(stringify) // returns [‘1’, ‘2’, ‘3’]"},"So we have two function definitions, and we're executing update with add10 as input. One of these functions is the callback, and one of them is the higher-order function. Can you guess which one is which?","Spoiler alert - the callback is add10, and the higher-order function is update!","Why is add10 the callback? It satisfies these two conditions -",{"list":["It is used as input in another function call.","It is called inside of the other function."]},"Why is 'update' the higher-order function? It satisfies these two conditions -",{"list":["It takes a function as an argument.","It calls its input function when it is called. Hence, the term \"callback\" as one function call leads to another."]},"So basically, higher-order functions have callbacks as inputs and call those callbacks somewhere in their definition.","To clarify, although we may call a function a “callback” or a “higher-order function”, they are both just normal JavaScript functions. Nothing special about them except the terminology we use to describe them."]},{"subheading":"When Do You Use This Stuff","subcontent":["As fundamental building blocks in JavaScript, callbacks and higher-order functions are used in almost every web application. They solve a general set of code duplication problems.","Let’s start thinking about those problems. We’ll build up our understanding through a series of questions that highlight how we can write cleaner, more powerful code with callbacks and higher-order functions."]},{"subheading":"The Questions Begin","subcontent":["Let's say you are tasked with manipulating an array of numbers, such as stock prices. You begin by testing your skills on a small array to see if you can simply add 10 to each integer.","You might write some code that looks like this -",{"codeBlock":"const array = [1, 2, 3];\nconst output = [];\n\nfor (let i = 0; i < array.length; i++) {\n const updated = array[i] + 10;\n output.push(updated);\n}\n\nconsole.log(output); // prints [11, 12, 13]"},"If that were the only addition operation you needed to perform in your application, then this code is absolutely fine. However, you realize you need to add other values, too. How would you write new code to add other values, like 20, to each number?","Welp… looks like we’ll have to copy/paste the entire code block just to make one change -",{"codeBlock":"const array = [1, 2, 3];\nconst output = [];\n\nfor (let i = 0; i < array.length; i++) {\n const updated = array[i] + 20;\n output.push(updated);\n}\n\nconsole.log(output); // prints [21, 22, 23]"},"It feels dirty to repeat so much code for such a small change. And it’s inefficient because we have to store all this duplicated code in memory.","You may have heard of the DRY principle (Don’t Repeat Yourself). This code breaks that principle. In colloquial terms, it’s not DRY code."]},{"subheading":"For Every Problem, There Is A Solution","subcontent":["How can we solve this repetition problem? In other words, how do we abstract away the code that doesn’t change? Think about this deeply, then keep reading.","-- Stop here if you are just starting to think deeply --","-- If you haven’t thought deeply, you shouldn’t be reading this. Think deeply then come back!--","-- Start here when you’re done thinking deeply --","Time for the answer -- Any time we notice we are writing code that repeats except for one small part, we turn it into a function! The function body will contain the repetitive code block, and its parameter will replace the one thing we want to change. For example, if we want to change the number we’re adding, just replace all instances of that number with the parameter num.",{"codeBlock":"const array = [1, 2, 3];\n\nfunction addNum(num) {\n const output = [];\n for (let i = 0; i < array.length; i++) {\n const updated = array[i] + num;\n output.push(updated);\n }\n\n return output;\n}\n\nconsole.log(addNum(10)); // prints [11, 12, 13]\nconsole.log(addNum(20)); // prints [21, 22, 23]"},"How great is that! Instead of having to copy/paste the same code block over and over and over every time we want to change the number added, we just write one function. Now we can call that function with any number as input and get the appropriate output.","In other words, when we create our functions with parameters like this, we have no idea which number will be added in the future. Think about how cool that is... we are delivering a function that will calculate any possible addition you could throw at it… and all we did was abstract away one number!","This is incredibly useful if you need to frequently transform array elements using addition in your applications."]},{"subheading":"One Step Further","subcontent":["Thinking about our stock prices example, if all we needed to do was add values to the prices, then we could clap our hands and go home -- we would have all the functionality we need. Hooray!","But what if we wanted to perform other operations, like subtraction or more complex manipulation? Functions cannot take operators (like + and -) as parameters, so that's one limiting factor. But more importantly, we can't deliver custom functionality through simple value substitution.","If only we could use other functions as parameters to deliver custom functionality inside our function... oh wait, we can!"]},{"subheading":"First-Class Citizens To The Rescue","subcontent":["In JavaScript, functions are first-class citizens. This means that functions can be passed as input to other functions (as well as returned from other functions, modified, and assigned to variables). This gives developers the ability to use functions as parameters, which we refer to as callbacks.","So how could we perform more complex calculations in our stock prices example? Well, if a number parameter allows us to use any number (like 10 or 20), then a function parameter allows us to use any functionality (like adding, subtracting, or more complex manipulation)!","That’s hard to visualize without a concrete example. So, here’s a concrete example. Notice how the updated variable has changed and we can apply three different functions to the array quite easily -",{"codeBlock":"const array = [1, 2, 3];\n\nfunction update(callback) {\n const output = [];\n for (let i = 0; i < array.length; i++) {\n const updated = callback(array[i]);\n output.push(updated);\n }\n\n return output;\n}\n\n// Callback functions\nfunction add10(num) {\n return num + 10;\n}\n\nfunction multiplyBy20(num) {\n return num * 20;\n}\n\nfunction stringify(num) {\n return num.toString();\n}\n\n// Call update with each callback function\nupdate(add10) // returns [11, 12, 13]\nupdate(multiplyBy20) // returns [20, 40, 60]\nupdate(stringify) // returns [‘1’, ‘2’, ‘3’]"},"Compared to our previous example, we still changed the same variable, updated. Instead of using the ‘+’ operator and a number parameter, we replaced that code with a function call to the array element. This small change now allows us to use any function, referred to as a callback, when we run the update function!","This makes update a higher-order function because it now takes a callback as input. In fact, I’ve been hiding a secret from you this whole time… this update function is essentially the built-in map function in JavaScript!","Given a callback, map will output a new array where each element is the output of a call to the callback. It provides us a powerful tool to transform arrays, and we control the transformation through callbacks."]},{"subheading":"Wrapping Up","subcontent":["Let’s summarize what we’ve discussed in this article.",{"list":["Callbacks are functions that are passed as input to other functions.","Higher-order functions take at least one function as input (and/or return a function, although we haven’t dug into that aspect of them in this article. You can learn more about that in our post on Closures!)","Functions give us the power to use the same code without copy/pasting it. We insert parameters where we’d like control over changing values.","Higher-order functions provide an additional layer of abstraction, using callbacks as parameters to control functionality instead of simple values. The built-in map function is one example of an incredibly useful higher-order function that transforms arrays with callbacks."]}]}]},"intro-callbacks-video":{"subunitId":"intro-callbacks-video","heading":"Introduction to Callbacks and Higher Order Functions","watch":["https://www.youtube.com/embed/viQz4nUUnpw",{"description":["We recommend stating your learning by watching Codesmith CEO, Will Sentance take a deep dive into these concepts.","You can follow along the video with the slides here."]}]},"intro-closures":{"subunitId":"intro-closures","heading":"Introduction to Closure, Scope and Execution Context","watch":["https://www.youtube.com/embed/ZVXrJ4dnUxM",{"description":["We recommend beginning by watching this recording of Codesmith CEO, Will Sentance, taking a deep dive into these concepts. You do not need to finish this recording in entirety before moving on to the challenges!","You can follow along the video with the slides here."]}]},"intro-closures-pt-2":{"subunitId":"intro-closures-pt-2","heading":"Introduction to Closure, Scope and Execution Context (continued)","watch":["https://www.youtube.com/embed/ZVXrJ4dnUxM",{"description":["We recommend continuing to reinforce these concepts by watching the remainder of this lecture on closures if you haven't already.","You can continue to follow along the video with the slides here."]}]},"intro-functions-execution-context":{"subunitId":"intro-functions-execution-context","heading":"Introduction to Functions and Execution Context","watch":["https://www.youtube.com/embed/exrc_rLj5iw",{"description":["To gain insight on these topics we recommend beginning with the following recording of Codesmith CEO, Will Sentance diving into these topics."]}]},"intro-oop":{"subunitId":"intro-oop","heading":"Introduction to Object-Oriented Programming in JavaScript","read":[{"subheading":"What Is Object-Oriented Programming?","subcontent":["Object-oriented programming (OOP) is a programming paradigm that uses objects to model real world data. OOP in JavaScript allows us to create objects that serve as models, and then create new instances of those models. This is a process called instantiation.","How is object instantiation useful? Imagine that we have an application with many users, and we want to store data about all of those users. For each user we want to track their name, age, number of visits to the our website, and number of comments. We also want each user to have a method introduce that logs out its name. We could do so by creating a new object from scratch every time a user signs up, like so:",{"codeBlock":"function createUser(name, age) {\n return {\n name: name,\n age: age,\n visits: 0,\n comments: 0,\n introduce: function() {\n console.log('My name is ' + this.name);\n }\n };\n}"},"On the other hand, creating a new user object from scratch every single time might not be the most DRY approach. Each user object has the same fields, and all user objects will start with visits and comments set to 0. There are several ways in JavaScript that we can create a model, also known as a class, to serve as a template for creating future objects."]},{"subheading":"Create Objects Using a Function","subcontent":["Perhaps the most obvious way to create an object based on a template is to create a function that returns objects with a defined structure. For example, we could create a function createUser that accepts name and age parameters and returns a new object:",{"codeBlock":"function createUser(name, age) {\n return {\n name: name,\n age: age,\n visits: 0,\n comments: 0,\n introduce: function() {\n console.log('My name is ' + this.name);\n }\n };\n}"},"This works, but it still doesn't feel like the most elegant solution. Every object that we create has a new copy of the introduce method, but all of those introduce methods do the exact same thing. If only there were some way we could create new objects with access to the same methods, so that we don't have to keep copying those same methods over and over again (and thus using more and more memory!)."]},{"subheading":"The Prototype Chain","subcontent":["We're in luck! JavaScript does allow us to create new objects with access to the same properties and methods (without creating new copies of those properties and methods each time) through something called the prototype chain. The prototype chain connects objects that we create with another object that serves as a (you guessed it) prototype. Objects inherit properties and methods from objects that are in their prototype chain. You can create an object that inherits from another object, which inherits from another object, which inherits from another object, which...you get the idea! The last object in your chain will inherit properties and methods from every previous object in the prototype chain.","To make the prototype chain more concrete, follow the steps below. Keep in mind that arrays in JavaScript are actually just special object implementations. We'll see exactly how arrays are implemented here!",{"list":["Open your browser's dev tools (in Chrome or Firefox, right-click and then choose \"Inspect\").","Open the console.","Type const tinyArray = ['a', 'b', 'c'] and press enter.","Type tinyArray and press enter."]},"We now see our array with a little arrow next to it. Click the arrow, which will show you all of tinyArray's properties. You can see that it has a length property and a property for each index: 0:'a', 1:'b', 2:'c'. But it also has a mysterious __proto__ property. What is this? Click it to find out!","You will see a big list of properties and methods sprout from tinyArray. You will assuredly recognize some of them: these are JavaScript's native array methods! If you try calling any of those array methods on tinyArray in the console, you will find that they all work. In fact, all arrays in JavaScript have access to these array methods. And it's all thanks to the prototype chain. That __proto__ property of tinyArray is actually a link to the next prototype in the prototype chain. So all arrays in JavaScript are linked to the Array prototype, which is where all array methods and properties are actually stored. In other words, all arrays created in JavaScript inherit from the Array class.","Scroll down to the bottom of the Array properties and methods, and you will see another __proto__ property -- a link to the next step up in the prototype chain. Click it, and you'll see that the next step up is the Object prototype. So under the hood, the Array class is an extension of the Object class! Our tinyArray should have access to all of the Object properties and methods you see. Test this out by calling tinyArray.hasOwnProperty(0) in the console.","One last thing on the prototype chain: it only works in one direction. So although all arrays have access to methods of the Object prototype, objects do not have access to methods of the Array prototype."]},{"subheading":"Using the Prototype Chain","subcontent":["Now that you know what the prototype chain is, let's figure out how to use it! The challenge of this unit will lie in researching different methods of creating objects that inherit properties and/or methods from other objects using the prototype chain. As you proceed through the subunits, you should refer to the MDN documentation for Object.create(), using constructor functions, and using ES6 class syntax. Also check out this article if you want more information on the prototype chain. All right, let's dive in!"]}]},"intro-recursion":{"subunitId":"intro-recursion","heading":"Introduction to Recursion - Repeater","watch":["https://www.youtube.com/embed/21-MlQ_irLo",{"description":["To begin, watch this recording of Codesmith Lead Technical Mentor, George, diving deep into how recursion works -"]}]},"jshp-recordings":{"subunitId":"jshp-recordings","heading":"JSHP Recordings","read":["As mentioned, we live stream our weekly JavaScript the Hard Parts workshops and students interact virtually with the lecture content as well as pair program remotely with other viewers. Check out instructional videos on our youtube channel.","We would recommend starting with these -",{"list":["How to Understand Callbacks and Higher Order Functions","An Introduction to Functions, Execution Context, and the Call Stack"]},"Though viewing past lectures + videos on youtube is a great way to review content we highly recommend attending our workshops in person if possible, or attending remotely when it is live streamed. There is no equivalent to being fully engaged and immersed in the concepts during lecture that is occurring in real time. Online learning is amazing, but the in person experience with a combination of the pairing, community, and networking/drinks after the workshop cannot be beat.]"]},"learning-resources":{"subunitId":"learning-resources","heading":"What are other learning resources available?","read":["In addition to the challenges, written explanations, and instructional videos that make up CSX - we have many additional learning opportunities and resources to drive forward your learning!","Weekly Coding Workshops & Events","The most impactful addition to your CSX learning is our weekly free coding workshops. All of our workshops are taught live by our world-class instructors and feature opportunities to ask questions, interact with other attendees, and learn more about Codesmith Programs.","Each of our CSX Units has an associated workshop that’s mentioned in-depth in each individual Unit! We recommend RSVPing on our website because spots in these workshops do fill up.","Codesmith’s YouTube Channel","If you aren’t able to make the timing of our free weekly workshops, a great way to experience our instruction and additional in-depth explanations of CSX concepts is on our YouTube Channel. Be sure to check out our saved playlists if you’re looking for content on a particular concept.","Pair Programming Workshops","In addition to our speaker and instructional live workshops, we also host pair programming events. Pair programming is central to becoming a better problem solver, technical communicator, and excellent software engineer.","In pair programming workshops, you’re paired up with a partner of your similar experience level and given challenges to work through together. The way we conduct pair programming involves two programmers working together on one shared challenge set where one person is the driver, writing the code, and one person is the navigator, talking through the logic. We also have mentors available for help!"]},"online-in-person-community":{"subunitId":"online-in-person-community","heading":"Online and In-Person CSX-Community","read":["A key component of CSX is the community. Though the units can be completed individually, the best way to grow yourself as a developer involves interacting with other learners and journeying together. A key aspect of the developer community at large involves shared resources, open source contributions, and an ideology that communal knowledge is for the greater good - an excellent example is Stack Overflow!","The in-person CSX Community is vital for CSX growth. The best way to understand the concepts covered is to attend a free in person workshop at Codesmith HQ in Los Angeles or New York City. If you aren't able to attend in person, many of the workshops are also streamed online. There are 6 total workshops in CSX, and key parts of the units are associated with workshops. You can do them before, after, or during the unit - but whatever you do, do them, it will make a big difference in your understanding of the material. The workshops are combined with the units as followed:","Precourse Workshop: JavaScript the Easier Parts - Variables, Control Flow, and Looping","Unit 1 Workshop: JavaScript the Easier Parts - Functions & Objects","Unit 2 Workshop: JavaScript The Hard Parts - Callbacks and Higher Order Functions","Unit 3 Workshop: JavaScript The Hard Parts - Closures, Scope, and Execution Context","Unit 4 Workshop: Recursion - A Deep Dive","Unit 5 Workshop: JavaScript The Hard Parts - Asynchronous JavaScript","Unit 6 Workshop: JavaScript The Hard Parts - Object Oriented Programming","During every workshop there is dedicated time to discuss problem solving methodology, resources for continued practice, and pair programming - the best way to cement knowledge and practice technical communication. In person events are a great way to connect with CSX mentors and form study groups outside of the usual workshop schedule.","In addition to the in person CSX Community, there is the CSX online community. Every JavaScript - The Hard Parts lecture is live streamed and allows viewers to pair up remotely to work through challenges no matter where they are in the world."]},"pair-programming-read":{"subunitId":"pair-programming-read","heading":"Bonus Unit: Pair Programming","read":["When we do ‘hard learning’ it’s very tempting to avoid the struggle - yet this is where the growth is at. There are many ways people avoid the feeling of challenge but the 3 major ones are:",{"orderedList":["By giving up","By focusing on researching and understanding every last detail of the topic but not actually coding","By making it work using code snippets from Stack overflow with no idea how the snippets work"]},"Clearly 1 (giving) up is not a good strategy","However, 2 (researching) and 3 (making it work) are actually vital parts of being an engineer. When these approaches become avoidance is when you get stuck in doing only one of them and don’t balance them both.","Ideally we want to balance ‘research’ with ‘making it work’. How can we do so? With pair programming.","Pair programming is a phenomenal approach that when done right should land us with the ideal balance of ‘researching and understanding’ with ‘making it work’."," ","You should expect to attend all CSX workshops at least once (many CSX students attend multiple times) to work through the challenges in a pair programming setting.","Here’s the essence of a pair programmed approach to learning. If I have an approach (even if it’s just console logging a variable but all the way up to a sophisticated strategy to tackle the challenge) I will not type it myself but rather explain to my pair programming partner this approach. My partner must then interpret my explanation and implement it in actual typed code.","Following this model of navigator (the explainer) and driver (the implementer) requires you to rationalize (at least a little) why you’re following your approach while still jumping into the code without spending your time only researching.","Simultaneously it requires you to explain your strategy to your partner with clarity and precision - improving your technical communication (one of our 5 key capacities of a software engineer) and underlying problem-solving approach.","Some caveats:",{"list":["If your partner is explaining an approach that you believe is incorrect, let it continue. Half of the time you’ll find they have introduced you to a new approach. If they are in fact incorrect, run the code and see the error - now you have the opportunity to debug together","If your partner consistently has ideas on how to approach the problem. Have that partner explain it to you then you can navigate them back while they type","Try to switch driver/navigator role at least every 15 mins"]}]},"pair-programming-read2":{"subunitId":"pair-programming-read2","heading":"Pair Programming Workshops","read":["Codesmith believes Pair Programming is the key to a complete software engineering education. Apart from connecting with community members through the CSX Slack to schedule pair programming sessions and pair programming during live workshops, Codesmith also has weekly Pair Programming Sessions on Thursdays at 6:00 pm EDT.","This is an additional opportunity to pair program and create a community and network of other CSX users, while also improving your understanding of core Javascript principles. You’ll work through blocks faster as a team and improve your technical communication as you learn how to best communicate your ideas with others.","The ability to work well with others and effectively communicate is as important as understanding the technical aspects of software engineering. As you continue on your journey, we hope that you continue to make time for Pair Programming!"]},"parameters-as-storage":{"subunitId":"parameters-as-storage","heading":"Parameters as Storage","watch":["https://www.youtube.com/embed/m8A1D9IBD50",{"description":["To gain a deeper understanding of recursion, watch George explain parameters as storage."]}]},"precourse-data-types":{"subunitId":"precourse-data-types","heading":"Data Types","read":[{"subheading":" ","subcontent":["Now that you know how to declare variables, it would probably be useful to learn what kinds of data you can store within your variables, no?","JavaScript includes data types similar to other programming languages like Java or C#. Data type indicates characteristics of data. It tells the compiler whether the data value is numeric, alphabetic, etc., so that it can perform the appropriate operation.","JavaScript includes primitive and composite data types."]},{"subheading":"Primitive Data Types","subcontent":[{"orderedList":["String: a series of characters (letters, numbers, spaces, symbols, etc.) wrapped in quotes","Number: integers, floats, etc","Boolean: true or false","Null: intentionaly having no value","Undefined: a declared variable that hasn't been assigned a value yet","Symbol: a unique value that's not equal to any other value. Note, this is an ES6 feature that never really took off, so don't worry about it for now."]}]},{"subheading":"Composite Data Types","subcontent":[{"orderedList":["Object: Objects in JavaScript, just as in many other programming languages, can be compared to objects in real life. Objects are standalone entities, with properties stored in key/value pairs. Compare it with a person, for example. A person is an object, with properties. A person has a race, a date of birth, a weight, a height, an eye color, etc. The same way, JavaScript objects can have properties, which define their characteristics.","Array: Used to store multiple values in a single variable. Similar to a list. Technically, arrays are objects in JavaScript, but we'll dive into that more in second half of the pre-course."]},"Here are some examples of all the above pertinent data types:",{"codeBlock":"// String\nconst name = \"Kyle\"; // <= quotes tell us this is a string\n\n// Number\nconst favNum = 17;\n\n// Boolean\nconst iLoveCoding = true; // <= no quotes\nconst iLoveBeets = false;\n\n// Null\nconst blackHole = null;\n\n// Undefined\nlet address; // here we declared the variable, \n // but never gave it a value, so \n // it is Undefined\n\n// Object\nconst person = {\n name: \"Bart Simpson\",\n dob: \"02/23/88\", \n weight: 65,\n hairColor: \"blonde\" \n}\n\n// Array\nconst fruits = [\"apples\", \"oranges\", \"pears\", \"bananas\"];\nconst myArray = [21, \"pear\", [3, 7, 22], { objectsToo: true }];"},"Take note of the fact that Arrays & Objects can contain an assortment of different data types all stored inside one variable! This is what makes them Composite data types by definition."]},{"subheading":"Conclusion","subcontent":["We'll dive deeper into each of these data types individually over the course of the pre-course, so don't worry if this is all a bit confusing at this point. For now, just take note of each's existence and general syntax."]}]},"precourse-fizzbuzz-solution":{"subunitId":"precourse-fizzbuzz-solution","heading":"Solution: fizzbuzz","watch":["https://www.youtube.com/embed/J7n9O8j4rUY",{"description":["After you've completed the challenge, watch our CSX Mentor, Xavyr, explain his solution for fizzbuzz.","Please note that this solution video describes one way to solve this challenge, not the only way. There are many ways to solve every challenge!"]}]},"precourse-variables":{"subunitId":"precourse-variables","heading":"Variables & Constants","read":[{"subheading":"What is a variable?","subcontent":["Defining and manipulating data is the basis of programming. Without data, programming has no purpose. Data in JavaScript is stored in variables to be reused when needed. We do this by using special JS reserved keywords. For variables that can be changed later, we use
 var or let, and for constant variables, we use const. let and const declarations come with additional restrictions on how the variable can be used."]},{"subheading":"Var","subcontent":["JavaScript has many different data types. Some of these types are numbers, strings, and booleans. Variables are used in order to store these values. In the code below, the variable is named favoriteShow and the value that is being stored under the name favoriteShow is currently \"Shameless\".",{"codeBlock":"var favoriteShow = \"Shameless\";"},"As we mentioned above, the word var is a keyword in JavaScript which signifies that we are going to create a variable. This is followed by the variable name, then the assignment operator (=) assigns whatever is to the right of the equals sign to the variable name.","Once you create a variable with the var keyword, you can also update that variable's value. First, we create a variable called tvShow and assign it the value \"Black Mirror\". Then, without using the var keyword we reassign tvShow to equal \"Parks and Recreation\".",{"codeBlock":"var tvShow = \"Black Mirror\";\nconsole.log(tvShow) // => \"Black Mirror\"\ntvShow = \"Parks and Recreation\";\nconsole.log(tvShow) // => \"Parks and Recreation\""},"Notice the different outputs on lines 2 and 4 each time we call console.log(tvShow). In the first one on line 2, the output is \"Black Mirror\", but after we change the value of tvShow to \"Parks and Recreation\" on line 3, we get a different output for our console.log(tvShow). Why are we getting different outputs for the same exact console.log? As you can see on line 3, we reassigned the value of tvShow from \"Black Mirror\" to \"Parks and Recreation.\" Once we change the value of a variable to a new value, it will remain that value until it is changed again."]},{"subheading":"Let & Const","subcontent":["let and const were introduced with the release of ECMAScript 2015, or more commonly, ES6. You'll see this term quite a lot while you're learning JavaScript, but for now, don't worry too much about it, it's just a version of JavaScript. We'll go more into detail on what that means in a later lesson.","In the example below, you can see that the value of variables declared with the var and let keywords may be reassigned.",{"codeBlock":"let fridge = \"empty\";\nconsole.log(fridge) // => \"empty\"\nfridge = \"full\";\nconsole.log(fridge) // => \"full\"\n\nvar house = \"dirty\";\nconsole.log(house) // => \"dirty\"\nhouse = \"clean\";\nconsole.log(house) // => \"clean\""},"At this point you may be asking \"what's the difference between let and var?\" This is a more advanced topic relating to how let and var (and const) are scoped. You'll learn more about scope in later lessons.","While using the var and let keywords allows us to reassign a variable's value, const operates a bit differently.","The const keyword is used to create a constant. Now, while a const declaration looks mainly the same as let and var variables, the value of a constant cannot be changed throughout the code. Like let, const is also limited to the scope in which it is declared.","Consider the following:",{"codeBlock":"const pet = \"cat\";\n\npet = \"dog\"; // => TypeError: Assignment to constant variable."},"This would result in the error \"Assignment to constant variable\""]},{"subheading":"Knowing What to Use and When","subcontent":["In JavaScript today, it is considered best practice to avoid using var. You should try and use let and const whenever possible. Just remember to use let when you will be changing the value of the variable and const when you won't be changing the value. Getting in the habit of using let and const properly now in the early stages of your learning will help you keep your code easier to manage."]},{"subheading":"5 Rules for Naming Variables and Constants","subcontent":["There are a few things to know about naming your variables and constants.","1. Variable names are case-sensitive. This means a and A are two different variables, regardless which keyword (var, let or const) that was used to define them.",{"codeBlock":"let a = \"hello\";\nlet A = \"goodbye\";\n\nconsole.log(a); // => \"hello\"\nconsole.log(A); // => \"goodbye\""},"2. Variable names should begin with a lowercase character.","3. Variable names cannot begin with a number.","4. Variable names cannot contain symbols.",{"codeBlock":"// VALID\nlet user;\nlet applicant3;\nlet favoriteCandy;\n\n// INVALID\nlet 3applicant;\nlet fav-candy"},"5. camelCased variable names are best practice. camelCase is a naming convention in which a name is formed by connecting multiple words together as a single word with the first letter of each of the multiple words capitalized so that each word that makes up the name can easily be read. The only word not capitalized is the first.",{"codeBlock":"// YES\nlet favFood;\nlet camelCasedVariable;\nlet userName;\n\n// NO\nlet favoriterestaurant;\nlet tobecompleted;"}]},{"subheading":"Conclusion","subcontent":["We've covered A LOT of material here! Now we're going to spend the next 3 challenges practicing declaring variables and constants. It may seem overwhelming right now, but don't worry, we'll take it slow, and you'll be a pro in no time."]}]},"precourse-what-is-js":{"subunitId":"precourse-what-is-js","heading":"Javascript: What is it?","read":[{"subheading":"JavaScript is Everywhere!","subcontent":["Not to be confused with Java, JavaScript is the language of the modern web. Along with HTML and CSS, it has become an essential web technology. If you want to get into web development, it is necessary that you learn JavaScript.","Users today expect a lot from their online experience. They want web applications that are fast, responsive and efficient. This is what JavaScript does, and for now, there’s no replacement.","You use JavasScript every day, whether you know it or not. It might be something to make your life easier, like your calendar app, or maybe it’s something to help you stay in contact with your friends like Instagram. Whether you’re sharing documents, catching up on the world by reading a digital news site, watching videos online, or any of the million things we do online daily, you’re encountering and working with JavaScript somewhere behind the scenes."]},{"subheading":"The Modern Web","subcontent":["Modern web architecture is comprised of three key ingredients: HTML, CSS, and JavaScript.","Think about it like this. If our webpage is a car, HTML is the frame of the car, CSS is the styling of the car, the color of the car, the rims of the car, etc, and JavaScript is the engine. It’s what makes our car do what a car is supposed to do: DRIVE!"]},{"subheading":"HTML","subcontent":["HTML, Hypertext Markup Language, is the backbone of the web. It’s right underneath the surface of everything you see on the web. HTML is a markup language, which means that it tells the browser how to display information. Whether it’s the text of a paragraph, or a link, HTML is what gives our sites their content."]},{"subheading":"CSS","subcontent":["CSS stands for Cascading Style Sheets with an emphasis on “Style.” While HTML is used to structure a webpage, CSS comes through and specifies your document’s style. Page layouts, colors, and fonts are all determined with CSS. Think of HTML as the foundation (every house has one), and CSS as the aesthetic choices."]},{"subheading":"JavaScript","subcontent":["JavaScript, or \"JS\" for short, is a full-fledged dynamic programming language that, when applied to an HTML document, can provide dynamic interactivity on websites.","What you can do with JavaScript in the browser can be broken down into two categories. First, is JavaScript’s ability to interact with the browser elements we mentioned before (HTML/CSS). Second, is the ability JavaScript gives us in shaping and manipulating data.","Let’s say someone named Brandon visited our website and entered his name into the an HTML text field. With the power of JavaScript we can read his entry and create interactive content that is unique to him! Now, whenever Brandon visits our website again we will be able to display a greeting, such as, ‘Welcome back, Brandon!’","When combining JavaScript with HTML & CSS, software engineers are able to make interactive web applications that are creative, powerful, fast, and unique! This is just the beginning of a very exciting journey."]}]},"recursion-performance":{"subunitId":"recursion-performance","heading":"Introduction to Recursion (cont.) - getLength","watch":["https://www.youtube.com/embed/1lx3VAs_lBM",{"description":["Let's continue to break down recursion - watch George explain performance in JavaScript."]}]},"slack-community":{"subunitId":"slack-community","heading":"Slack/Facebook Community","read":["In addition to the weekly workshops, the CSX slack community is a great place to ask questions, compare approaches, and share resources with other CSX students. CSX Mentors will also be active in the slack and responding to questions and giving insight.","Slack is a wonderful tool to stay connected and engaged in the community no matter where you are located - join the CSX Slack here.","We also encourage students to join the CSX Facebook group here."]},"solution-after":{"subunitId":"solution-after","heading":"Solution: after","watch":["https://www.youtube.com/embed/thmw-aEuQe0",{"description":["After you've completed the challenge, watch our CSX Mentor, Mitchel, explain his solution for after.","Please note that this solution video describes one way to solve this challenge, not the only way. There are many ways to solve every challenge!"]}]},"solution-ajax-simulate":{"subunitId":"solution-ajax-simulate","heading":"Solution: ajaxSimulate","watch":["https://www.youtube.com/embed/zFqx7aWyiWs",{"description":["After you've completed the challenge, watch our CSX Mentor, Jon, explain the solution for ajaxSimulate.","Please note that this solution video describes one way to solve this challenge, not the only way. There are many ways to solve every challenge!"]}]},"solution-array-builder":{"subunitId":"solution-array-builder","heading":"Solution: arrayBuilder","watch":["https://www.youtube.com/embed/pG1JCk4G0W8",{"description":["After you've completed the challenge, watch our CSX Mentor, Ruth, explain her solution for arrayBuilder!","Please note that this solution video describes one way to solve this challenge, not the only way. There are many ways to solve every challenge!"]}]},"solution-censor":{"subunitId":"solution-censor","heading":"Solution: censor","watch":["https://www.youtube.com/embed/cyjaWV_H-78",{"description":["After you've completed the challenge, watch our CSX Mentor, Sara, explain her solution for censor.","Please note that this solution video describes one way to solve this challenge, not the only way. There are many ways to solve every challenge!"]}]},"solution-create-function":{"subunitId":"solution-create-function","heading":"Solution: createFunction","watch":["https://www.youtube.com/embed/Sn0bbIU6DvI",{"description":["After you've completed the challenge, watch our CSX Mentor, Phillip, explain his solution for createFunction.","Please note that this solution video describes one way to solve this challenge, not the only way. There are many ways to solve every challenge!"]}]},"solution-cycle-iterator":{"subunitId":"solution-cycle-iterator","heading":"Solution: cycleIterator","watch":["https://www.youtube.com/embed/4u0lHYkhVoU",{"description":["After you've completed the challenge watch our CSX Mentor, Mejin, explain the solution for cycleIterator.","Please note that this solution video describes one way to solve this challenge, not the only way. There are many ways to solve every challenge!"]}]},"solution-date-stamp":{"subunitId":"solution-date-stamp","heading":"Solution: dateStamp","watch":["https://www.youtube.com/embed/PrRM9ciNSgE",{"description":["After you've completed the challenge, watch our CSX Mentor, Heidi, explain her solution for dateStamp.","Please note that this solution video describes one way to solve this challenge, not the only way. There are many ways to solve every challenge!"]}]},"solution-disemvowel":{"subunitId":"solution-disemvowel","heading":"Solution: disemvowel","watch":["https://www.youtube.com/embed/f2tYPU-0qV4",{"description":["After you've completed the challenge, watch our CSX Mentor, Xavyr, explain his solution for disemvowel.","Please note that this solution video describes one way to solve this challenge, not the only way. There are many ways to solve every challenge!"]}]},"solution-either-callback":{"subunitId":"solution-either-callback","heading":"Solution: eitherCallback","watch":["https://www.youtube.com/embed/d47lDekXf4E",{"description":["After you've completed the challenge, watch our CSX Mentor, Jared, explain the solution for eitherCallback.","Please note that this solution video describes one way to solve this challenge, not the only way. There are many ways to solve every challenge!"]}]},"solution-factorial":{"subunitId":"solution-factorial","heading":"Solution: Factorial","watch":["https://www.youtube.com/embed/S1hXOyvgl5o",{"description":["After you have completed the challenge, watch George dive into his solution to Factorial.","Please note that this solution video describes one way to solve this challenge, not the only way. There are many ways to solve every challenge!"]}]},"solution-flow":{"subunitId":"solution-flow","heading":"Solution: flow","watch":["https://www.youtube.com/embed/pwftU5vjMY0",{"description":["After you've completed the challenge, watch our CSX Mentor, Samantha, explain her solution for flow.","Please note that this solution video describes one way to solve this challenge, not the only way. There are many ways to solve every challenge!"]}]},"solution-for-each":{"subunitId":"solution-for-each","heading":"Solution: forEach","watch":["https://www.youtube.com/embed/xjvizrVY3Qs",{"description":["After you've completed the challenge, watch our CSX Mentor, Ben, explain the solution for forEach.","Please note that this solution video describes one way to solve this challenge, not the only way. There are many ways to solve every challenge!"]}]},"solution-for-each-async":{"subunitId":"solution-for-each-async","heading":"Solution: forEach","watch":["https://www.youtube.com/embed/ASmSIU-A2wc",{"description":["After you've completed the challenge, watch our CSX Mentor, Dan, explain the solution to forEach.","Please note that this solution video describes one way to solve this challenge, not the only way. There are many ways to solve every challenge!"]}]},"solution-for-loops-arrays":{"subunitId":"solution-for-loops-arrays","heading":"Solution: For Loops and Arrays","watch":["https://www.youtube.com/embed/gaAcOR5yWxw",{"description":["After you've completed the challenge, watch our CSX Mentor, Pauline, explain her solution for For Loops and Arrays.","Please note that this solution video describes one way to solve this challenge, not the only way. There are many ways to solve every challenge!"]}]},"solution-for-loops-fundamentals":{"subunitId":"solution-for-loops-fundamentals","heading":"Solution: For Loops - Fundamentals","watch":["https://www.youtube.com/embed/P-iMJN1Yad4",{"description":["After you've completed the challenge, watch our CSX Mentor, Nisa, explain her solution for For Loops - Fundamentals.","Please note that this solution video describes one way to solve this challenge, not the only way. There are many ways to solve every challenge!"]}]},"solution-function-with-input":{"subunitId":"solution-function-with-input","heading":"Solution: createFunctionWithInput","watch":["https://www.youtube.com/embed/0YEabRrrpEk",{"description":["After you've completed the challenge, watch our CSX Mentor, Phillip, explain his solution for createFunctionWithInput.","Please note that this solution video describes one way to solve this challenge, not the only way. There are many ways to solve every challenge!"]}]},"solution-functions-short-circuiting-a-loop":{"subunitId":"solution-functions-short-circuiting-a-loop","heading":"Solution: Short-Circuiting a Loop","watch":["https://www.youtube.com/embed/SoFJPtHJi8w",{"description":["After you've completed the challenge, watch our CSX Mentor, Ryan, explain the solution for Short-Circuiting a Loop.","Please note that this solution video describes one way to solve this challenge, not the only way. There are many ways to solve every challenge!"]}]},"solution-get-length":{"subunitId":"solution-get-length","heading":"Solution: getLength","watch":["https://www.youtube.com/embed/noDwyiUUYGA",{"description":["After you've completed the challenge, watch our CSX Mentor, Pete, explain the solution for getLength.","Please note that this solution video describes one way to solve this challenge, not the only way. There are many ways to solve every challenge!"]}]},"solution-group-by":{"subunitId":"solution-group-by","heading":"Solution: groupBy","watch":["https://www.youtube.com/embed/5AzgSa6olDo",{"description":["After you've completed the challenge, watch our CSX Mentor, Katrina, explain the solution for groupBy.","Please note that this solution video describes one way to solve this challenge, not the only way. There are many ways to solve every challenge!"]}]},"solution-intersection":{"subunitId":"solution-intersection","heading":"Solution: intersection","watch":["https://www.youtube.com/embed/Xm-rT8ncaTc",{"description":["After you've completed the challenge, watch our CSX Mentor, Kyle, explain the solution for intersection.","Please note that this solution video describes one way to solve this challenge, not the only way. There are many ways to solve every challenge!"]}]},"solution-invoking-functions":{"subunitId":"solution-invoking-functions","heading":"Solution: Invoking Functions","watch":["https://www.youtube.com/embed/NUqFKYTeTs0",{"description":["After you've completed the challenge, watch our CSX Mentor, Xavyr, explain his solution for Invoking Functions.","Please note that this solution video describes one way to solve this challenge, not the only way. There are many ways to solve every challenge!"]}]},"solution-map":{"subunitId":"solution-map","heading":"Solution: map","watch":["https://www.youtube.com/embed/PhbNDieKAOk",{"description":["After you've completed the challenge, watch our CSX Mentor, Schno, explain the solution for map.","Please note that this solution video describes one way to solve this challenge, not the only way. There are many ways to solve every challenge!"]}]},"solution-multi-map":{"subunitId":"solution-multi-map","heading":"Solution: multiMap","watch":["https://www.youtube.com/embed/CJXQ2tYHDf0",{"description":["After you've completed the challenge, watch our CSX Mentor, Denis, explain the solution for multiMap.","Please note that this solution video describes one way to solve this challenge, not the only way. There are many ways to solve every challenge!"]}]},"solution-multiply-all":{"subunitId":"solution-multiply-all","heading":"Solution: multiplyAll","watch":["https://www.youtube.com/embed/A4mSdIyM8PY",{"description":["After you've completed the challenge, watch our CSX Mentor, Rob, explain the solution for multiplyAll.","Please note that this solution video describes one way to solve this challenge, not the only way. There are many ways to solve every challenge!"]}]},"solution-obj-adding-properties":{"subunitId":"solution-obj-adding-properties","heading":"Solution: Objects - Adding Properties","watch":["https://www.youtube.com/embed/RPaYQaidxXA",{"description":["After you've completed the challenge, watch our CSX Mentor, Aki, explain the solution for Objects - Adding Properties.","Please note that this solution video describes one way to solve this challenge, not the only way. There are many ways to solve every challenge!"]}]},"solution-obj-of-matches":{"subunitId":"solution-obj-of-matches","heading":"Solution: objOfMatches","watch":["https://www.youtube.com/embed/euRZldF1o3U",{"description":["After you've completed the challenge, watch our CSX Mentor, Matthew, explain the solution for objOfMatches.","Please note that this solution video describes one way to solve this challenge, not the only way. There are many ways to solve every challenge!"]}]},"solution-once":{"subunitId":"solution-once","heading":"Solution: once","watch":["https://www.youtube.com/embed/iFslomR92E0",{"description":["After you've completed the challenge, watch our CSX Mentor, Mejin, explain her solution for cycleIterator.","Please note that this solution video describes one way to solve this challenge, not the only way. There are many ways to solve every challenge!"]}]},"solution-person-constructor":{"subunitId":"solution-person-constructor","heading":"Solution: PersonConstructor","watch":["https://www.youtube.com/embed/Mc6zn8fkHXc",{"description":["After you've completed the challenge, watch our CSX Mentor, Mejin, explain her solution for PersonConstructor.","Please note that this solution video describes one way to solve this challenge, not the only way. There are many ways to solve every challenge!"]}]},"solution-person-from-person-store":{"subunitId":"solution-person-from-person-store","heading":"Solution: personFromPersonStore","watch":["https://www.youtube.com/embed/OO_hGJWb05M",{"description":["After you've completed the challenge, watch our CSX Mentor, Erik, explain the solution for personFromPersonStore.","Please note that this solution video describes one way to solve this challenge, not the only way. There are many ways to solve every challenge!"]}]},"solution-reduce":{"subunitId":"solution-reduce","heading":"Solution: reduce","watch":["https://www.youtube.com/embed/ELX-FBXZ-3g",{"description":["After you've completed the challenge, watch our CSX Mentor, Luis, explain the solution for reduce.","Please note that this solution video describes one way to solve this challenge, not the only way. There are many ways to solve every challenge!"]}]},"solution-repeater":{"subunitId":"solution-repeater","heading":"Solution: Repeater","watch":["https://www.youtube.com/embed/Ks252i3zY1U",{"description":["After you have completed the challenge, watch CSX Mentor, Billy, explain his solution for repeater."]}]},"solution-run-in-order":{"subunitId":"solution-run-in-order","heading":"Solution: runInOrder","watch":["https://www.youtube.com/embed/micF_oeeeko",{"description":["After you've completed the challenge, watch our CSX Mentor, Jon, explain the solution for runInOrder.","Please note that this solution video describes one way to solve this challenge, not the only way. There are many ways to solve every challenge!"]}]},"solution-save-output":{"subunitId":"solution-save-output","heading":"Solution: saveOutput","watch":["https://www.youtube.com/embed/ww3yb3qNPyM",{"description":["After you've completed the challenge, watch our CSX Mentor, Keiran, explain the solution for saveOutput.","Please note that this solution video describes one way to solve this challenge, not the only way. There are many ways to solve every challenge!"]}]},"solution-union":{"subunitId":"solution-union","heading":"Solution: union","watch":["https://www.youtube.com/embed/AHAcaJUG_Qo",{"description":["After you've completed the challenge, watch our CSX Mentor, Casey, explain her solution for union.","Please note that this solution video describes one way to solve this challenge, not the only way. There are many ways to solve every challenge!"]}]},"unit-11-ai-literacy-1":{"subunitId":"unit-11-ai-literacy-1","heading":"Introduction: Why AI Literacy Comes First","read":["So far throughout CSX, you've built real programming skills: variables, functions, closures, recursion, and your first project (maybe even grown some gray hairs along the way!). From this unit on, you'll keep building those skills, but now you'll do it the way a lot of modern developers actually work: with an AI assistant!","There are better and worse ways to use AI. Used poorly, it becomes a crutch: you paste in code you don't understand, it runs sometimes, and you learn approximately nothing. That is the exact trap that we DON'T want you to fall into. Used well, AI can be an incredible learning and building tool. The difference comes down to one thing: understanding.","That's the philosophy behind everything in Units 11-14: Empowerment over dependence, process over polish, and putting your understanding first.","This is the very first unit of the AI track. You won't touch VSCode, a terminal, Git, or GitHub just yet. If those words currently sound like someone dropped a toolbox down the stairs, totally fine. All of that comes in Unit 12. Unit 11 stays entirely in your browser, with zero new tooling to install. So why does AI come before the developer tools?",{"orderedList":["You meet your most powerful helper first. Unit 12, with the terminal, Git, and GitHub, is one of the steeper climbs in the track. Walking into it with an AI assistant you already know how to use makes the climb much less dramatic.","It's a gentle on-ramp. Everything here happens in a browser tab, with nothing to install and very little to accidentally break. A beautiful little sandbox. We love a sandbox.","The habits you build here will support you throughout the rest of the unit and onward. You'll explain things before you move on and you won't just blindly trust the first response you get from an AI chatbot."]},"By the end of this unit, you'll build something useful, your own JavaScript tutor bot, an AI helper that you design and define entirely through a set of written instructions called a System prompt.","The bot that you build will be a hints-only tutor. When you're stuck on a JavaScript problem, it will not simply hand you the answer. It will ask what you've tried, nudge you toward the next step, and make you do the thinking because that is how you actually learn, and learning is what you're here for!","Why is building your own bot such an effective way to learn?",{"orderedList":["You learn prompting by doing it. You'll write, test, and rewrite real instructions, then watch how the bot's behavior changes.","A hints-only tutor bot will actually help you build knowledge instead of just giving you the answer. It's designed to make you explain and think, not copy and paste your way into a future bug museum.","You walk away with a study tool that you can use for the rest of CSX and beyond."]},"After this introduction, you'll move on through:","Part 2: What an LLM Is (and Isn't)",{"list":["An LLM is a pattern-completer trained on text, not a fact database","Prompt, context, and output as a single pipeline","Why AI hallucinates and how to verify its claims","\"Confident is not the same as correct\"","Probabilistic AI vs. the deterministic, traditional code you've written so far","A quick map of the four kinds of AI coding tools: browser chatbot, IDE assistant, Copilot-style autocomplete, and agentic tools"]},"Part 3: Set Up Your Prompting Tool",{"list":["A five-minute setup of a free browser tool that keeps the System prompt and User prompt visibly separate","Confirming your prompting workspace actually works"]},"Part 4: Prompting Basics: System vs. User",{"list":["System prompts vs. User prompts, and why the difference matters","Watching the exact same question produce very different answers depending on the standing rules you give the assistant"]},"Part 5: The Anatomy of a System Prompt",{"list":["The four parts of a strong prompt: Role, Goal, Instructions, Output format","Prompting as an iterative skill. Vague in, vague out. A classic."]},"Part 6: Build Your JavaScript Tutor Bot",{"list":["Writing the System prompt that defines your bot's behavior","Testing it against real learning road blocks and refining it","Tuning it so it gives hints instead of answers"]},"We'll start where every good AI user starts, by understanding what these systems actually are. Once you know how an AI model works, you'll be much better at deciding when to trust it, when to question it, and when to ask it to show its work like it's back in math class. Let's get to it!"]},"unit-11-ai-literacy-2":{"subunitId":"unit-11-ai-literacy-2","heading":"What an LLM Is (and Isn't)","read":["Last section, we promised you'd build your own tutor bot. Before you can direct an AI well, though, it helps to know what you're actually talking to. So let's pop the hood.","An LLM (Large Language Model) is a pattern-completer. ","It was trained by reading a truly staggering amount of text. Its main purpose is predicting what text most plausibly comes next.","You already know a tiny version of this. Think of the autocomplete on your phone suggesting the next word in a text message. An LLM is like that idea turned up to a thousand. Instead of guessing one word, it can continue a whole explanation, a paragraph, or a chunk of JavaScript, one plausible piece at a time.","When you ask an LLM \"what does this function return?\", it is not looking the answer up in some internal database of facts. There is no filing cabinet in there. It is generating the most likely continuation to your question based on the patterns it learned. A lot of the time the most likely continuation is the correct answer, because the truth showed up often in its training. But not always, and that's what causes the most common problems.","Almost every surprising thing an AI does makes sense the moment you remember it is completing patterns, not retrieving facts.","Prompt, context, output: the pipeline","Whenever you use an AI, three things are always in play:",{"list":["Prompt: what you ask. The question or instruction you type in.","Context: everything the model can \"see\" right now, which is your prompt plus the conversation so far plus any code or additional resources you've pasted in. Crucially, it only knows what is in front of it. It cannot see your screen, your other files, or what you meant but didn't actually say.","Output: its best guess at a plausible continuation, given that prompt and that context."]},"Picture it as a short pipeline, prompt and context go in, output comes out. This hands us the first practical rule of prompting, which we'll cover more in the next section: vague in, vague out. If the context is thin, like just asking about \"my code\" without pasting any code, the output has no choice but to be vague right back. Feeding the model the relevant snippet is how you prevent half of the disappointing answers you'll ever get.","","Why the same question can give two different answers","Every function you've written in CSX so far has been deterministic: same input, same output, every single time. Run it now, run it tomorrow, or even on the moon, and you get the same result. That predictability is exactly what makes it easier to debug.","An LLM is probabilistic instead. Ask it the exact same question twice and you may get two different answers, both reasonable, just worded differently or taking a slightly different approach. This surprises people, and occasionally annoys them. It is not a bug and nothing is broken; it is simply how these systems work. The repeatability you're used to from your JavaScript code does not fully apply here.","When AI confidently makes things up","Because the model produces what is plausible, and plausible is not the same as true, it will sometimes invent things out of thin air. It might make up a JavaScript method that doesn't exist (rest in peace, array.shuffle(), which sounds real, feels real, and would honestly be pretty cool to have... is very much not real). Or the model might misremember how a built-in works, or state something flatly wrong with total confidence. This has a name: a hallucination. 😶🌫️","When the model hallucinates, it's not intentionally lying to you, it's just doing what models do, generating plausible text, and this time \"plausible\" simply landed on something false. Same machine, same process, sometimes it just gets it wrong.","Confident is not the same as correct","People get hung up on the fact that AI output sounds authoritative. Smooth, well-organized sentences read like true sentences, even when they happen to be nonsense. So just remember that confident is not the same as correct.","Whenever the AI states a fact about your code, quietly ask yourself: \"How would I actually check whether this is true?\" Run the code. Read the official docs. Test one tiny example. It's our job as developers to verify the output we receive. If the AI has made a mistake, it's our job to catch it and fix it.","A map for the road ahead","There are four main categories of AI coding tool:",{"orderedList":["Browser chatbot: if you've used ChatGPT before, this will feel familiar. You type in a browser tab, it replies, and it only knows what you paste in.","IDE assistant: an AI that lives inside your code editor and can actually see your project's files.","Copilot-style autocomplete: suggests lines of code as you type, like your phone's autocomplete but for programming.","Agentic tools: the most capable of the bunch. These can take multi-step actions on their own, reading files, running commands, and making changes across a whole project."]},"For this first unit, you'll be working mainly with the first tool on the list, the browser chatbot. The rest of the map will unfold throughout the rest of the course.","To put this all simply, an AI model is a fluent, confident, occasionally-wrong pattern-completer that only knows what's in front of it and won't always answer the same way twice. In the next section, we'll dive into the anatomy of a prompt and how small, deliberate changes to what you ask produce big changes in what you get."]},"unit-11-ai-literacy-3":{"subunitId":"unit-11-ai-literacy-3","heading":"Set Up Your Prompting Tool","read":["In the last section, we learned what an LLM is (and isn't). Before we can put that understanding to work, dissecting prompts and building your tutor bot, you need a place to actually run one. So this section is just a quick, five-minute setup.","Why not just any chatbot?","You may already have a browser chatbot you like. So why are we sending you somewhere new? Because of one important feature. In a plain consumer chatbot (like ChatGPT), everything you type goes into a single box. For this unit we need a tool that keeps two things visibly separate:",{"list":["The System prompt - the rules the AI assistant follows every single time.","The User prompt - the message or question the user sends to the model."]},"If that feels a little unclear, don't worry. Seeing the two separate from one another during this set up will help a lot!","For this activity, we'll be using Google AI Studio, a free tool from Google that gives us access to the System Instructions field (aka the \"System prompt\"). It's free to use in the browser, and signing in just needs a Google account, no payment details required.","Setting up Google AI Studio",{"list":["Go to aistudio.google.com in your browser.","Sign in with a Google account. If you don't have one, create a free\n one, it takes a minute and needs no credit card.","The first time in, you may be asked to accept some terms. Read and\n accept them to continue.","Look at the right side of the screen for the Run settings panel."]}," ",{"list":["If it's collapsed, click the settings or \"tune\" icon in the top-right to expand it."]},"
 ",{"list":["Inside, find the System Instructions field. This is\n where the standing rules will go, and it's the field we came here for.","Now notice the separate chat box near the bottom (it usually says\n something like \"Start typing to see what our models can do\") and a Run button next to it.\n That box is for your one-off questions, the User message."]},"That's the whole setup. Two fields and a Run button.","Confirm it works","Let's make sure it works. Leave the System Instructions field empty for now, type a simple question into the chat box, something like How can I make a perfect grilled cheese sandwich?, and click Run. After a few seconds you should see a reply appear.
  That's it: you have a working prompting workspace, and you're ready for the hands-on part of this unit!","One important note, treat this like any public tool and don't paste anything private into it, no passwords, personal details, or real secrets. Free tools sometimes use what you type to help improve their models, so assume anything you enter could be seen.","Notice that you left the System Instructions field empty this time. In the next section we'll start filling it in, and you'll watch the exact same question produce very different answers depending on the standing rules you give the assistant. Congratulations, you're on your way to becoming a prompt engineer!
  "]},"unit-11-ai-literacy-4":{"subunitId":"unit-11-ai-literacy-4","heading":"Prompting Basics: System vs. User","read":["Last section you got your workspace running but we left the System Instructions field empty. Now we'll fill it in! We'll start with a small experiment. Let's ask the model the exact same question twice, change only the standing rules between the two runs, and watch the answer transform.","Round 1: a question with no rules","First, the baseline. We want to see what the model does when you give it no guidance at all.",{"orderedList":["Make sure the System Instructions field is completely empty.","In the chat box at the bottom (the User message), type: How can I make a perfect grilled cheese sandwich?","Click Run and read what comes back."]},"","Take a moment to review the reply. How long is it? Who does it seem to be talking to, a beginner or an experienced chef? Is the tone chatty or textbook? You didn't ask for any of that, so the model just picked its own defaults. With no standing rules, it fills in the blanks however it wants to. Let's give it some rules to make the response a little more beginner-friendly.","Round 2: same question, new rules","Copy this into the System Instructions field, exactly as written:","You are an enthusiastic chef helping an absolute beginner. Keep your answer to three short sentences.","We're not going to change the question. Type How can I make a perfect grilled cheese sandwich? exactly as it was in the chat box, and click Run again.","
 ","Look at the difference. You asked the same question but got a completely different answer. This one is shorter, friendlier, and aimed at someone who's just learning to cook. The only thing that changed was the set of standing rules sitting in the System Instructions field, and that was enough to reshape the role the assistant played, the tone it used, and the length of its reply.","Before reading on, think about what changed between the two answers, and which rule do you think caused it?","Just to review the difference:",{"list":["The System prompt (the System Instructions field) holds the standing rules, the guidance the assistant follows on every single turn, no matter what the user asks.","The User prompt (the chat box) is the one-off ask, the specific question you're sending this time."]},"There's a big difference between the two. We don't often have access to a model's system prompt (like when using ChatGPT). That's why we're using the Google AI Studio. In the following section we'll dive deeper into the anatomy of a System prompt one piece at a time, adding a Role, Goal, Instructions, and an Output format. You'll see how each change alters the model's behavior.","Have a little fun with it before moving on! Change a few words in the System Instructions, make it an angry pirate who teaches cooking, and Run the same question again. Same question, very different vibe. Once you've gotten your sea legs, we'll set sail for the next section. 🙃 🏴☠️"]},"unit-11-ai-literacy-5":{"subunitId":"unit-11-ai-literacy-5","heading":"The Anatomy of a System Prompt","read":["Last section you watched a single set of standing rules reshape an answer. That was the power of a System prompt. This section is about the parts it's made of, and the method for building a good one: on purpose, one piece at a time, instead of dumping everything in at once and hoping it works out.","The four parts of a System prompt","Every strong System prompt is built from a few named pieces. You'll lean on this same vocabulary for the rest of the track, so let's meet the four that matter most. You may run into slightly different names for them elsewhere, but the ideas don't change. To make them concrete, we'll use a running example: an assistant that tells you fun facts about animals.",{"list":["Role - who the assistant is being. \"An enthusiastic museum guide who loves animals.\" Note: a Role doesn't give the model new skills or knowledge it didn't already have. The purpose is to help shape the model's tone and delivery.","Goal - what success actually looks like. \"Help the user walk away remembering one genuinely surprising fact.\"","Instructions - the specific dos and don'ts. \"Keep it short, and skip anything gross or scary.\"","Output format - how the reply should be shaped. \"A headline, then three facts formatted in bullets\""]},"We're not going to write all four at once. We'll add them one at a time and watch each one work so we can see how each one brings us closer to our desired output.","Here's something you need to get in the habit of practicing early on when iterating on prompts: predict before you run. Before each change, think about what impact that change might have. Then run it and check. If you were right, great! You've learned a little more about how the model responds to that kind of change. If you were wrong, that's useful too. You'll find yourself repeating this cycle over and over:","Predict → Run → Check → Improve.","As you gain experience, you'll start noticing patterns in how different prompt changes affect the output. Professional AI engineers follow this same process, just in a more structured way. Instead of relying just on memory, they'll often save different versions of their prompts and the model's responses. That makes it easier to compare results, see what worked, and make smarter improvements over time!","Clear the System Instructions field so it's empty, and in the chat box type this question: Tell me about hamsters.","One thing won't change for the rest of this activity: the question. The User prompt stays exactly the same on every run. The only thing we touch is the System prompt. That's the part you design and grow while the user's question is just the input you test it against.","Run it once now, with the System Instructions still empty, just to see the \"before.\" Its answer will be fine but probably pretty generic. That's our baseline.","Keep a prompt-iteration log","For each iteration on your prompt, keep a short log, four lines each. This little record is meant to help you identify the different parts that make up a good System prompt while also getting you in the habit of logging your process like real developers do. Eventually you'll be using fancy code to do this but, for now, let's just build the habit. Here's what to write down:",{"list":["What I added - which part of the prompt (Role, Goal, and so on).","What I predicted - your guess, written before you run it.","What actually changed - what the new answer did differently.","Did my prediction hold? - yes, no, or \"sort of,\" plus one word on why."]},"Round 1: add a Role","Paste this into the System Instructions field, exactly as written:","You are an enthusiastic museum guide who loves sharing cool facts about animals.","Predict first: what do you think changes when the model knows who it's supposed to be? Write your guess in the log, then click Run.","Read the reply and notice two things.",{"list":["What changed? The voice probably got warmer and more excited, more like a person showing you around.","What didn't? Maybe it was still a long answer. Maybe the answer was too short. Maybe none of the facts were all that surprising or memorable."]},"That gap is the point. A Role tells the assistant who to be, but it never said what to aim for or how to shape the answer, so we'll focus on that next.","Round 2: add a Goal and Instructions","Now we tell it what success looks like and give it a couple of concrete rules. Paste the additional lines below into your System Instructions (the Role line stays; we're stacking on top of it):","Your goal is to help me walk away remembering one genuinely surprising fact.
Keep it to a few facts a curious kid would find amazing, and skip anything gross or scary.","Predict, then Run. The Goal (\"help me remember one surprising fact\") points the assistant at a target, and the Instructions (\"just a few facts,\" \"nothing gross or scary\") are the specific dos and don'ts that get it there. Watch the substance change: instead of everything it knows, you should get a tighter, more curated handful. Maybe even something surprising! Remember to log what changed and whether your guess was correct.","You may still notice the answer is shaped however the model feels like shaping it, sometimes a paragraph, sometimes a list. We haven't said anything about shape yet. We'll focus on that next.","Round 3: constrain the Output format","Last round. We tell it exactly how the reply should be shaped. Add these to your stack of existing System Instructions:","Shape every reply as a fact card: a one-line headline, then exactly three short facts as a bulleted list, then a single line that starts with \"Wow:\" and gives the most surprising fact of all.","Predict, then Run one last time. The Output format is the rule that controls the structure of the reply, and it's often the one that makes an answer suddenly feel finished and usable. You asked the very same question you started with, but the reply should now be a clean, tidy, predictable card every single time! Maybe something like this:","
 ","Read your log top to bottom","You asked the same question every single time, made three rounds of changes to the standing rules, and ended up with a completely different response at the bottom than the one you started with. Those changes introduced the four parts of a System prompt, added in order and observed one at a time:",{"list":["Role - who it is.","Goal - what it's aiming for.","Instructions - the specific dos and don'ts.","Output format - how the reply is shaped."]},"
 \n The point is, a good System prompt usually isn't written all at once from a template. \n It's grown: you add a piece, watch what the model does, and let what you see \n tell you what to add next. You just did a miniature version of that, and you'll do it again on \n bigger, more useful projects later on. In fact, in the next section, you'll use this \n strategy to build something that you can really use! Let's go! 🦾"]},"unit-11-ai-literacy-6":{"subunitId":"unit-11-ai-literacy-6","heading":"Build Your JavaScript Tutor Bot","read":["This is the one we've been building toward. Last section we led you through building a fun little animal-facts bot, grown one piece at a time. Now you'll use the method you learned to build your own hints-only JavaScript tutor bot. It's the centerpiece of this whole unit, and unlike the animal-facts bot, this is a tool you might find genuinely helpful for the rest of CSX and beyond.","So what is a \"hints-only\" tutor? In our case, it's a bot whose entire job is to make you do the thinking. When you're stuck, it won't hand you a finished answer to copy and paste. It nudges. It asks what you've tried. It gives you one clue and then waits for you to take the next step yourself. This is a tool that will reinforce the value of \"hard learning\". It's the exact opposite of the vibe-coding trap we warned you about back in the introduction. You're about to build the anti-vibe-coding mentor with your own two hands.","This time, you will write the System prompt yourself. We're not going to hand you the text to paste in. You don't need us to, because you already have everything required, the build method from last section and the four-part vocabulary you've been learning. This bot is yours. Let's design it.","Design your four parts","Here's how to think about each one for a tutor bot. Write each in your own words as you go. While there will definitely be some \"wrong answers\", there are no perfect \"right answers\" here, and figuring out the wording is the skill.",{"list":["Role - who should your tutor be? Give it an identity in a sentence. Remember, the role does not give the model any special powers or knowledge. The purpose is to shape the tone and delivery. Is your Tutor bot patient and encouraging, or blunt and direct? Is it a peer, a mentor, or a teacher? Which of these (or any others you come up with) will hold the most value toward achieving your goal?","Goal - what counts as success? Be careful here, because this will define just how helpful your tutor bot will be. Success should not be \"the student gets the answer.\" A real tutor's job is to make sure you actually reach a level of understanding. How can you define a goal that guides the student toward finding the answer on their own? Put that target into words, since it shapes everything the bot does.","Instructions - the specific dos and don'ts that keep it hints-only. This is the heart of the bot, so we'll brainstorm it just below.","Output format - how should every reply be shaped so it stays a nudge instead of a lecture? A popular choice for a tutor bot is one hint, followed by a single guiding question, but the shape is yours to decide. State it clearly."]},"Instructions will be very important here, so give them some real thought. Think back to your favorite teacher in elementary school. When you were stuck, how did they lead you to find the right answer without giving it away? Here are some ideas to get the wheels turning:",{"list":["Should the tutor offer one clue at a time, then pause and let you try it?","Should it ask you to explain what you've already tried, or what you think should happen next?","What if you ask it about hamsters instead of JavaScript and programming? (it is a JavaScript tutor after all, if it could answer everything it would just be a regular chatbot)."]},"Feel free to use any of these that you agree with, along with the ones you come up with on your own. Put them all together into clear instructions for the model. The more specific you are, the better your bot will behave.","Build it the way you practiced","Don't paste all four parts in at once. Grow the prompt exactly the way you grew the animal-facts bot, one piece at a time, with a predict → run → check on every step and a line in your iteration log for each one. A good order:",{"orderedList":["Clear the System Instructions field. Add only your Role, predict what it'll change, then Run.","Stack on your Goal and Instructions, predict, then Run again.","Add your Output format last, predict, then Run one final time."]},"To test it on each run, you'll need a genuine challenge to throw at it. Use a real problem you're struggling with right now if you have one. If not, congratulations! Apparently you know everything there is to know about JavaScript! 🧐. But if you're having trouble coming up with something right away, you can paste this sample User prompt every time so the only thing changing is your System prompt:","I'm trying to write a function that returns the largest number in an array, but I'm not sure how to start.","Here's an example of the type of response you should be aiming for once the prompt is doing its job:","
 ","(The picture above shows the behavior we're after. How you get your bot there is up to you.)","Test that it behaves","A bot that \"sounds\" like a tutor but coughs up the full answer hasn't done its job, so check it honestly against your challenge prompt. Did the reply hand you a hint and a guiding question, or did it just dump working code you could paste without understanding a line of it?","If it's over-helping, that's not a success either. Find the Instruction that should have kept it in check, make it sharper and more explicit, and Run again. Remember, predict → run → check. Keep nudging until the behavior matches what you set out to build.","Save your Tutor Bot!","This bot will be a useful tool throughout your learning journey, so hang on to it!","Just to be safe, copy and paste your System prompt into a document to save locally on your computer. If you've enabled Google Drive to save your chats, you should be able to return to this chat with the System prompt intact, but it's always good to have a backup. You can also save the entire chat transcript if you want to keep a record of your iteration log.","
 \n Take a beat and appreciate this: you just built a working AI tool, defined\n entirely by instructions you wrote yourself. Now you have a healthy study partner you can ask for help with tricky JavaScript\n concepts going forward. If you find yourself in need of assistance with technologies other than JavaScript, now you know how to adjust your System prompt to fit your needs! In fact, you might find it pretty helpful in the next unit, where you'll be setting up your own development environment and learning to use Git and GitHub."]},"unit-12-dev-env-1":{"subunitId":"unit-12-dev-env-1","heading":"Introduction: Why This Unit Is Heavy (and How We Paced It)","read":["Up to this point, nearly all of CSX has taken place in your browser (with the exception of lightly using a text editor in the Chrome Extension Unit). Starting now, you're leaving the browser and stepping into the tools real developers use every day: VSCode, the terminal, Git, and GitHub.","This is the heaviest unit in the track. It’s going to introduce you to four new tools, a new way of talking to your computer, and a couple of mental models that take some time and repetition to get comfortable with. If it feels like a lot, that doesn’t mean that you’re falling behind. You’ll get there with time and consistency.","We paced this unit out to help make this introduction to these tools less overwhelming. So, instead of handing you VSCode, the terminal, Git, and GitHub all at once, this unit is split into two phases:","
- 12a: Your local machine. Just you, your computer, VSCode, the terminal, and Git running locally. Nothing leaves your computer.
- 12b: Collaborating remotely. We’ll get our hands dirty with GitHub, along with forking, cloning, branches, and making your first pull request.
 ","By the end of this unit, you'll be able to open a project, move around inside it, save your work with Git, get it onto GitHub, and explain in plain English what each step did. That’s a lot, but it’s a big hurdle and it’s really going to pay off in Unit 13!"]},"unit-12-dev-env-10":{"subunitId":"unit-12-dev-env-10","heading":"Branch, Commit, Push","read":["Alright! You've now got two copies of the practice project. One on your fork on GitHub, and one on your computer, sitting in the learn-github-repo folder you cloned last subunit. They match perfectly right now, but neither of them has any of your work in it yet. So, in this subunit you're going to make a small edit on your computer, snapshot it with a commit, and then send that commit up to your fork on GitHub using the push command.","Before we get started, let's talk a little bit about branches.","
What's a branch, and why bother?
","A branch is a parallel line of work in a Git project. Every repo starts with one branch, usually called main, and up until now that's the only branch you've had. When you want to try something new, like adding a feature or fixing a bug, you can make a new branch off of main, do all your work there, and leave main completely untouched while you experiment. If it works out, you can bring the branch's work back into main. If it doesn't, you can just throw the branch away, and main is exactly like it was before you started. ","You might be thinking, \"If I'm the only one working on this, why branch at all?\" Fair question. There are a couple of reasons why. First off, this is the workflow professional developers use even on solo projects, so it's good to build the habit now. Second, branches give you the ability to create pull requests, which you'll be doing in the next subunit. A pull request is essentially asking the main branch to pull in the work from a new branch. Without having a separate branch, we won't be able to safely merge changes into our main branch. So let's make one!","
Step 1: Check where you are
","Before we create a new branch, let's check what branch we're currently on. Open your VSCode terminal (if it isn't already), and make sure you're inside the learn-github-repo folder we cloned last subunit. Hopefully you've been starting to build the habit, but you can check with:","pwdgit status ","
","Step 2: Create a branch
","To create a new branch and hop onto it in one move, use git switch -c, followed by a name for your branch. The -c is short for \"create.\" Let's name our branch something that describes the work we're about to do. We're going to add your name to the hello.txt file, so:","git switch -c add-my-name ","Run git status again:","
git statusStep 3: Make a small change
","In VSCode's Explorer on the left, click hello.txt to open it. It's probably a very short file, just a line or two. Add a new line at the bottom with your name and a quick note. Something like:","Hi from [your name]! This is my first commit on a branch.Step 4: Commit it
","Once again, start by checking your Git status:","git statusgit add .git commit -m \"Add my name to hello.txt\" ","The commit we just made only exists on your computer, on the add-my-name branch. Right now, if you looked at your fork on GitHub, it wouldn't know anything about this change at all. Neither the new branch nor the commit exist online yet. The two copies are officially out of sync! To bring them back together, we need to push the version on your computer up to GitHub.","
Step 5: The push
","Most of the Git commands we've used up until now, init, add, commit, have been Git working entirely on your computer, offline. Push will actually reach out over the internet, talk to GitHub, and send your commits up to your fork.","from and to?\" You should be thinking something like, \"The copy on my computer isn't changing at all, about to travel from my computer up to my fork on GitHub.\" If that's making sense, go ahead and run the command:","git push -u origin add-my-nameStep 6: The auth pop-up
","This is the very first time you're asking Git to actually talk to GitHub on your behalf, and before GitHub lets you write to your fork, it needs to check that you are, in fact, you. ","On most modern setups, a browser window will pop open automatically asking you to sign in to GitHub and authorize Git to act on your behalf. Sign in with your GitHub account.
  ","Click the green \"Authorize\" button.
  ","Now you can go back to your terminal. After a moment, Git should finish the push. When it does, you'll see the output that mentions your branch name being sent and something along the lines of Branch 'add-my-name' set up to track 'origin/add-my-name'. That last bit is the -u shortcut being saved.
  ","You only have to authorize once. From here on out, Git will remember, and every future push in this unit (and the next few) will happen with no browser popup at all.","
A gentle warning
","Before we celebrate, let's revisit something we talked about a while ago and haven't reinforced.","You should never paste a password, token, or credential into an AI chat. Not your tutor bot, not ChatGPT, not Claude, not any AI, ever.","When it comes to Authentication, you should always be doing the work yourself. Your AI helper is great for reading error messages, explaining commands, and walking you through what a step means, but the moment credentials are involved, you should only trust yourself to handle them. If you get an error while trying to push and you find yourself Googling \"Personal Access Token\" or getting instructions to generate one, you should never paste the token into a chat window.","We're only emphasizing this because it's possible for credentials to leak if they end up in your AI chat history. There's no \"undo\" for that. If you accidentally add your password to an AI chat, you should change it. This will be important in the next unit when you generate your first API key, and even more important anytime you handle secrets in your career.","If the push errors out
","If your terminal spits out an error instead of a success message, don't panic, this is very common on a first push. Here's a safe way to get unstuck:","- \n
- Read the error text carefully first. Git errors are usually pretty descriptive if you\n slow down and actually read them. \n
- If it still doesn't make sense, copy just the error text (not any commands you ran, and\n absolutely not any tokens, passwords, or usernames) and paste it into your AI tutor bot with a\n note like \"I ran git push and got this error. What does it mean and what should\n I check next?\" \n
- Check the AI's suggested steps one at a time before taking any action \n
Step 7: See the branch on GitHub
","Assuming your push went through, let's go take a look at what changed. Open your browser and head back to your fork on GitHub (your-username/learn-github-repo). At first, it may still look exactly like it did before, that's because GitHub is showing you the main branch by default, and main is still exactly like it was. If you see a yellow banner that says something like, \"add-my-name had recent pushes 3 seconds ago\", you can go ahead and click the green Compare & pull request button.","If not, look for the branch dropdown, it's a button near the top left of the file list, and it currently says main. Click it. You should now see two branches listed: main and add-my-name. Click add-my-name. ","The page should refresh to show you the project's files on the new branch. Click hello.txt. You should see the new line of text that you added earlier. That is your commit, on your branch, on your fork, on GitHub!
  ","
","Recap
","Let's talk through everything we just did one more time:","- \n
- Before you started, both copies were identical. Your computer and your fork on GitHub\n matched, both sitting on the main branch with no work of your own on either one. \n
- After git switch -c add-my-name, a new branch appeared on your computer, and you were\n standing on it. The copy on GitHub knew nothing about it yet. \n
- After git commit, your snapshot was saved into the history on your computer, on the\n add-my-name branch. The two copies were now officially out of sync. \n
- After git push -u origin add-my-name, your commit and the branch itself finally\n traveled up to your fork on GitHub. The two copies are back in sync, now with your work on both. \n
Quick self-check
- \n
- In your own words, what is a branch, and why did we make one for such a small change? \n
- When you ran git switch -c add-my-name, what two things happened at once? \n
- You ran git commit and then git push. What did each\n of those commands do, and which copy did it change? \n
- What does the -u in git push -u origin add-my-name do, and why do you only need\n it on the first push of a new branch? \n
- What should you never paste into an AI chat? \n
What's a pull request?
","A pull request (or PR for short) is exactly what it sounds like. It's a request to pull the work from one branch into another. In our case, we're going to ask the main branch on our fork to pull in the commit sitting on our add-my-name branch. That's it. Once main pulls it in, the change lives on main, and both branches will be back in sync.","In a real team, this is where other developers would come in. Someone on your team would open a PR, and a teammate would look at the code, leave comments, ask questions, maybe request some changes, and eventually approve the PR so it can be merged into main. This process is called code review, and it's an important part of professional software development.","Because you're currently working on your own, there's no teammate to review your code on the other side of the PR. So in this case you are going to be both the person opening the PR and the person reviewing it. It may come as no surprise to you that this is called self-review! You should treat this as if you were reviewing a teammate's PR. You'll read your own diff like a stranger wrote it, ask yourself what changed and why, and catch anything sloppy before it gets pulled into main.","Something to look out for. When we open our PR, we're going to be careful to point it at our own fork's main branch, not the original CodesmithLLC repo. GitHub is going to try to direct this PR to the original repo, because that's the default behavior for a fork. We'll change it. You don't want your practice PR showing up on Codesmith's actual repository. It doesn't hurt anything, but it's not what we want to do here.","Step 1: Head back to your fork on GitHub
","Open your browser and go to your fork's page:","https://github.com/your-username/learn-github-repo ","If the banner isn't there, no problem. Just click the Pull requests tab near the top of the repo page, then click the green New pull request button. Either path takes you to the same \"Open a pull request\" screen.
  ","
","Step 2: Point the PR at the right place
","Take a look at the top of the page. You should see two dropdowns with an arrow between them. On the left is base, on the right is compare. The way to read it is \"pull the work from compare into base.\" ","Now, look closely at what those dropdowns say. There's a good chance the base repository says CodesmithLLC/learn-github-repo and the base branch says main. That means right now, GitHub is set up to open a PR against Codesmith's original repo, not your fork. We need to change that.","Pause and predict. Before you click anything ask yourself, which copy of the project should this PR touch? You should be thinking something like, \"Not Codesmith's original repo. My own fork. I want to pull my add-my-name branch into the main branch on my fork.\" If that feels clear to you, let's go ahead and set that up.","Click the base repository dropdown (the one currently showing CodesmithLLC/learn-github-repo) and select your-username/learn-github-repo from the list instead.
  ","The page will refresh. Now check all four dropdowns and confirm they read like this, left to right:
 - \n
- base repository: your-username/learn-github-repo \n
- base: main \n
- head repository: your-username/learn-github-repo \n
- compare: add-my-name \n
 If your base and compare dropdowns match the list above, and you see a green \"Create pull request\" button, go ahead and click it. This should take you to the \"Open a pull request\" page if you aren't there already.
  ","
","Step 3: Write a title and description
","Just below the branch dropdowns, GitHub will show you a preview of the changes and give you a form to fill out. There's an Add a title field at the top and a bigger Add a description field below it.","GitHub has probably auto-filled the title with your commit message, \"Add my name to hello.txt\". That's a perfectly good title. Leave it, or tweak it if you'd like.","The description is where you write your PR summary. A good PR summary tells a reviewer (in this case, future you) three things: what changed, why it changed, and how to check that it works. It doesn't have to be long. A few plain-English sentences work just fine.","Something like this is great:","What: Added a greeting line with my name to hello.txt.\n\nWhy: Practicing the full Git and GitHub workflow (e.g., branch, commit, push, PR).\n\nHow to verify: Open hello.txt on the add-my-name branch and confirm the new line is there. ","
","Step 4: Read the diff (this is the self-review)
","Scroll down. Below the title and description, GitHub shows you the diff. This is a side-by-side (or top-to-bottom) view of exactly what your PR is proposing to change. Lines that were added show up in green and lines that were removed show up in red.","For this tiny PR, the diff should show just one new green line in hello.txt, and that's it. If you see anything else, extra files, changes to files you didn't touch, or something you don't recognize, stop and figure out what happened before you keep going.","Step 5: Open the pull request
","Click the green Create pull request button.","The page will refresh and drop you onto your brand new pull request. It has a number now, probably #1 since it's the first one on your fork. Take a second to look around. You'll see your title at the top, your description below it, the Conversation, Commits, and Files changed tabs, and, near the bottom, a green Merge pull request button. ","You've officially opened your first pull request!","
Step 6 (optional): Leave a self-review comment
","You can leave inline comments directly on your own diff. Click on the Files changed tab. Then, hover over any line in the diff and you'll see a little blue + button appear in the gutter. If you click it, a comment box pops up right on that line. ","This is optional for this PR, but you should try it once so you know how it feels. Leave a short comment on your added line, something like \"Just my name and a note that this is my first branch commit.\" Click Start a review or Add single comment. On a real team, this is how reviewers ask questions or leave feedback tied to a specific line.","
Step 7: Merge your own PR
","On a real team, this is where things would pause. A teammate would look at your PR, maybe ask for changes, and then approve it. Only then would it get merged into main. For our self-review workflow, you're the reviewer and you've already read the diff so, if you're happy with it, you're good to merge! If you left a self-review comment, go ahead and click the green Submit review button and submit your review. ","Let's reflect one more time. Which copy is about to change when you click merge? You should be thinking, \"The main branch on my fork is about to change. It's going to pull in the commit from add-my-name\". Your computer, on the other hand, has no idea any of this is happening. Its main branch is going to be out of date the moment you click that button. Now, on the \"Add my name to hello.txt\" page, scroll down and click Merge pull request.
  ","GitHub will ask you to confirm with a Confirm merge button. Click that too.
  ","The page will refresh, and the PR banner will now be purple and say Merged. That's it. Your add-my-name branch has been merged into main on your fork!
  ","GitHub will also offer you a Delete branch button. You can click it if you want, it's a common thing to do after a branch has been merged. Remember though, it only deletes the branch on GitHub, not the copy on your computer. For now, feel free to leave it or delete it, either way is fine.","
Step 8: Confirm main actually changed
","Let's go check with our own eyes. Click the repo name near the top of the page to head back to your fork's landing page. Make sure the branch dropdown near the top left says main (not add-my-name). Click hello.txt. ","Your line should be sitting right there, on main. You created a new branch on your computer, added a change, committed that change, pushed up to a branch on your fork, opened a PR into main, merged in those changes, and now you see that change reflected in main!","
One small thing about your computer
","Remember what we said before hitting merge? The main branch on your computer doesn't know any of this happened. It still looks exactly like it did when you first cloned the repo. Your fork's main on GitHub is one commit ahead of your computer's main right now, and the two copies are officially out of sync again.","We're not going to leave it like that. You already know that push sends work up. It has a matching move that brings work back down, and it's the last Git move of this unit: pull.","Step 9: Pull it back down
","Head back to VSCode and open the integrated terminal. First, confirm you're standing in the right place. You know the drill:","pwdgit switch main ","Your line isn't there! Don't panic, this is exactly what we expected. Your computer's copy of main is still the old version. The merged commit only exists on GitHub right now.","One last pause and predict. Which copy is about to change, and which direction is the work moving? You should be thinking, \"The copy on GitHub isn't changing at all. The merged commit is about to travel down from my fork's main to the main on my computer.\" Push sends commits up, pull brings commits down. Let's run it:","
git pull ","By the way, notice that you typed plain git pull with no extra words. When you cloned this repo, Git automatically wired your local main to the main on your fork, so it already knows where to pull from. It's the same way the -u flag set that up for your add-my-name branch when you pushed.","
Recap
","Let's walk through what we just did:","- \n
- Before you started, your add-my-name branch was up on your fork, but your\n fork's main branch didn't know anything about your change. \n
- You opened a pull request, pointed it at your own fork's main (not\n Codesmith's), with a short summary explaining what changed and why. \n
- You reviewed your own diff, confirmed the only change was the line you meant to\n add, and (if you did Step 6) left yourself an inline comment. \n
- You merged the PR, which pulled your commit from add-my-name into main\n on your fork. Both branches on GitHub (main and add-my-name) now match each other perfectly. \n
- You switched back to main and ran git pull, bringing the merged commit down to your\n computer. Both copies of the project are in sync, with your work on both. \n
Quick self-check
- \n
- In your own words, what is a pull request, and what does it actually do when you merge it? \n
- Why did we have to change the base repository dropdown before creating the PR? What\n would have happened if we didn't? \n
- What are the three things a good PR summary tells a reviewer? \n
- Right after you clicked Confirm merge, which copy of the project was out of date,\n and which command brought it back in sync? \n
- In terms of the two-places model, what's the difference between push and\n pull? \n
- What's the difference between git switch main and git switch -c main? \n
What's next
","That's the end of Unit 12. Nice work! We know this one was pretty dense, but look at what you can do now: you just ran the complete developer loop. Branch, commit, push, pull request, self-review, merge, and pull. That's the same loop professional developers run every single day. In Unit 13, we'll turn on the next tool in the belt: an agentic, codebase-aware AI assistant called OpenCode. You'll finally install Node (told you it was coming!), create your first API key, connect it to OpenCode, and use it to explore a codebase you didn't write, one file at a time. You'll also exercise those Git and GitHub muscles you just built to commit, push, branch, and open PRs on the work you do there. See you in Unit 13!"]},"unit-12-dev-env-2":{"subunitId":"unit-12-dev-env-2","heading":"Setup: VSCode, Git, and a GitHub Account","read":["Before we touch the terminal or make our first commit, we need to get your machine set up. This subunit is just setup: two installs and one account signup. So, don't worry, no new concepts... yet. Some of this may feel a little tedious but take it slow and confirm each step actually worked before you move on to the next one.","By the end of this subunit you'll have three things ready to go: VSCode, an Integrated Development Environment (IDE) where you'll write and edit code; Git, the tool that saves snapshots of your work; and a GitHub account, where those snapshots will live online. We won't use Git or GitHub for anything just yet. That's what the rest of Unit 12 is for. Right now, we're just getting the tools installed and confirming they're there. ","A note on your operating system: the steps below differ slightly depending on whether you're on a Mac or a Windows machine. Find your OS below and follow those instructions. And, again, don't worry if your screen doesn't match a screenshot from the other OS, that's expected.","
Step 1: Install VSCode
","Already have VSCode installed? We made an optional recommendation of using VSCode in the earlier Chrome extension unit, so you may already have it on your machine. If you do have it, make sure it's the latest version by opening VSCode and going to Help → Check for Updates. If it says you're up to date, you can skip forward to Step 2. If not, follow the prompts to update and restart the application before moving on.","To install on Mac:- \n
- Go to code.visualstudio.com and\n download the Mac version.
- Open the downloaded file and drag the\n VSCode icon into your Applications folder.
- Open VSCode from\n Applications (or Spotlight search) to confirm it launches.\n \n
- \n
- Go to code.visualstudio.com and\n download the Windows version.
- Run the installer. When prompted,\n check the boxes for \"Add to PATH\" and \"Add 'Open with Code' action\". These\n make things easier later.
- Open VSCode from the Start menu to\n confirm it launches.\n \n
 ","Nice to have (Mac): If you're on a Mac, open VSCode and press Cmd+Shift+P to open the Command Palette. Then type shell command, and select Shell Command: Install 'code' command in PATH. This lets you open any folder in VSCode by typing code . in the terminal, which will come in handy later in this unit. If you're on Windows, don't worry, you already did this when you checked the \"Add to PATH\" box during the installer in Step 1.
  ","
","Step 2: Install Git
","Git is a tool for tracking your changes over time. Think of it like clicking \"save\" as you update a Word document, except each save is a snapshot that you can look back at (or return to) later. We'll start using it later in this unit. Eventually, you'll be using it every day as you build out applications.","Mac: Git usually comes pre-installed. Open VSCode's built-in terminal (we'll cover this properly later in this unit, but for now: View → Terminal) Then type git --version. If you see a version number, you're done. If not, follow the prompt that appears. It will offer to install the Xcode Command Line Tools, which include Git.","Windows: Git does not come pre-installed. Go to git-scm.com and download Git for Windows. Run the installer. The default options are fine for everyone in this program, so it's safe to click through using the defaults. This install also gives you Git Bash, a terminal you may see referenced later (we'll cover what a terminal is later in this unit).","Success check (both OS): open a terminal and type git --version. Seeing something like git version 2.43.0 means it worked (the exact number doesn't matter).","
 ","
","Step 3: Create a GitHub Account
","GitHub is a separate thing from Git. Don't worry, we'll unpack that distinction properly later on. For now, just know you need an account there, the same way you'd need an account on any website.","Go to github.com and sign up with an email address you check regularly. Choose a username you're comfortable being professionally associated with (future employers will probably see this). The free plan is all you'll ever need for this program.","Success check: you can log in to github.com and see your profile page. ","
","You're set up. Now what?
","If all three success checks above worked, you're ready to move on. In the next few subunits, we'll build the mental model you need and then start actually using the terminal and VSCode together. If any step didn't work, that's completely normal. In fact, this is a great time to dive deep and start getting comfortable reading error messages. Ask your AI tutor for step-by-step help, paste the exact error you're seeing, ask questions, and check each suggested step before running it."]},"unit-12-dev-env-3":{"subunitId":"unit-12-dev-env-3","heading":"Files and Folders as a Tree","read":["In the last subunit you installed your tools. Before we open the terminal and start typing commands, we're going to slow down and solidify an important mental model: how your computer actually organizes your files. This might sound obvious, but many people use computers for years without ever getting a clear picture of it and it's a big reason why the terminal can feel confusing. So if this is fuzzy for you right now, let's clear it up.","The files and folders on your computer are arranged as a tree. A folder can hold files, and it can also hold other folders, which can hold their own files and folders, and so on. That nesting, folders inside folders, is the whole concept. Everything on your machine lives somewhere in this branching structure.","You've probably seen this without thinking of it as a tree. Your Desktop, Documents, and Downloads are folders. Open Documents and you might find more folders inside it. Each of those is a branch, and the branches keep splitting the deeper you go.","Every tree has a starting point that everything else grows out of. On your computer, all of your files and folders ultimately live inside one top-level location, and everything branches down from there. You rarely need to think about the very top, but it helps to know the tree isn't floating in space, it has a base and every file has a path back to it.","Imagine a project folder called my-first-project. Inside it, the tree might look like this:","- \n
- my-first-project/\n
- \n
- images/\n
- \n
- logo.png \n
- banner.png \n
\n - index.html \n
- notes.txt \n
\n - images/\n
 ","You already have a tool that shows you this tree visually. Open VSCode and open a folder (File → Open Folder, then pick any folder on your machine). The panel that appears on the left, the Explorer, is this exact tree. Folders have little arrows you can click to expand or collapse them, revealing the files and folders nested inside. Clicking around in there is the same thing we just drew, only interactive.","
 ","At any given moment, you are always somewhere in this tree. Your specific position will always be the folder you're currently sitting inside of. When you use the terminal in a couple of subunits, every command you type will run relative to wherever you happen to be standing in the tree. So knowing your position is important for understanding how each command will work.","For example, let's say you're \"in\" your my-first-project folder. Many users are used to seeing that folder in Finder or File Explorer, like this:","
 ","But, in your terminal, being \"in\" your my-first-project folder looks like this:","
 ","Now, any commands you run in your terminal will be relative to the folder you are currently in (my-first-project). Here, you can run commands like listing all of my-first-project's children, navigating into a different folder, and a bunch more that we'll get into later.","When you're working with file systems, you'll often hear the word path. A path is just an address, the route from one point in the tree to a specific file or folder, with each level separated by a slash. For example, the banner image above lives at my-first-project/images/banner.png. Start at the project folder, go into images, and there's the file. If you can read that as a set of directions through the tree, you've got the idea.","A quick note on your operating system: Mac and Linux write paths with forward slashes (images/banner.png), while Windows traditionally uses backslashes (images\\banner.png). So don't let the slash direction throw you if an example doesn't match your screen exactly.","Quick self-check:
 - \n
- In your own words, what does it mean that files and folders form a tree? \n
- In the example above, what is the parent of logo.png? \n
- What does it mean to say you are \"in\" a particular folder right now? \n
- Read this path out loud as a set of directions: my-first-project/images/logo.png. Where do you start, and where do you end up? \n
 "]},"unit-12-dev-env-4":{"subunitId":"unit-12-dev-env-4","heading":"A Tour of VSCode","read":["In the last subunit you learned that your files live in a tree, and you used one panel of VSCode, the Explorer, to look at one. Now we're going to slow down and get comfortable in the rest of that window. By the end of this subunit, you should be able to look at any part of VSCode and understand what it's for.","You may already have a simple text editor on your computer, like TextEdit on a Mac or Notepad on Windows. Those programs let you type and save text, including code. VSCode is basically a much more powerful version of that. It lets you write code too, but it also highlights your code with colors, suggests what to type next, helps you find mistakes, and includes a bunch of tools that make programming much easier.","Open a folder first. VSCode is most useful when it's pointed at a folder. There's a menu for this (File → Open Folder), or you can open a fresh VSCode window, then drag a folder off your desktop and drop it right onto the middle of the window. Pick any folder you already have (Documents or Desktop is fine). We'll make a real project folder in the next subunit, so don't worry about picking the \"right\" one. Below, we're dropping in a folder labeled \"articles\" which just has a few simple txt files.","
 ","VSCode may ask whether you trust the authors of the files in this folder. It's your own folder, so yes. And notice what dropping it in didn't do. It didn't move the folder, copy it, or change anything inside it. VSCode is simply pointing at it now so we can make edits to it.","Now try dragging in a single file, any file on your desktop. Watch what's different. The file opens in a tab in the middle, but the tree on the left doesn't change. Drop a file, you get that file. Drop a folder, you get the whole tree. A folder arrives with all of its children, a file arrives alone. It's also the reason we open folders and not files when we're working on a project. You want the whole tree in front of you, not one leaf.","
 ","Here's VSCode, with its parts named:","
 ","
","- \n
- The Activity Bar is the vertical strip of icons on the far left. Each icon changes what the panel next to it shows. The top icon (the two stacked pages) is the Explorer. \n
- The Side Bar is the panel right next to it. By default it's showing the Explorer: the file tree that we just dropped in. \n
- The Editor is the big area in the middle. This is where files open when you click them, each one in its own tab across the top. \n
- The Panel is the drawer along the bottom. It's usually hidden. It holds a few things, and the one we care about is the integrated terminal. \n
- The Status Bar is the thin strip at the very bottom. It quietly reports things about your project. Ignore it for now, but know it's there, because later in this unit it will start telling you useful things about Git. \n
Ctrl + ` (that's the backtick key, usually just above Tab on the left side of your keyboard) — this works on both Mac and Windows. (Cmd + J also toggles the whole Panel on Mac.) The Panel slides up from the bottom, and inside it you'll see some text ending in a cursor."," ","Don't type anything yet. We'll learn what to have that cursor say in the next subunit. But notice one thing, the terminal opened inside the folder you have open in VSCode. Remember that you are always standing somewhere in the tree? The integrated terminal starts you standing in the folder you opened (in our case, my-first-project). That's why developers use the terminal inside the editor instead of as a separate app. The editor and the terminal are already looking at the same place.","Now let's talk about the Command Palette. Press
 Cmd + Shift + P (Mac) or Ctrl + Shift + P (Windows / Linux). A box drops down from the top of the window. Make sure you can see the greater-than symbol (>). That's how you know you're actually in command mode."," ","Every single thing VSCode can do lives in that box, and you find it by typing what you want rather than by hunting through menus. Rename a file, change your color theme, split the editor, open the terminal, run Git commands. All of it is searchable by name. If you only memorize one keyboard shortcut from this entire unit, make it this one. It means you never have to remember where anything is, only roughly what it's called.","Let's run one command. With the palette open, type new file and choose File: New File... from the list. The file appears in the Explorer on the left and you're prompted to give it a name. Give it the name hello.txt and press enter. You'll notice that the file is already open in the Editor. Type a sentence into it, anything you like. There are other ways to create folders and files and we'll definitely be looking at that later on in the unit.","
 ","Notice how hello.txt is now in the Explorer tree, right where you'd expect it, because the Explorer and the folder on your computer are the same thing viewed two ways. If you haven't yet saved your changes, the file's tab has a small filled dot on it instead of an ✕. That dot is VSCode telling you this file has changes you haven't saved yet. It disappears the moment you save. This tends to trip people up, especially beginners. Don't forget to look for that dot. So, if you haven't yet, save with
 Cmd + S (Mac) or Ctrl + S (Windows / Linux). You can also turn on \"Auto Save\" by going to File → Auto Save and then you don't ever really need to worry about it.","Quick little AI teaching moment here! Remember, if something isn't where we said it would be, that's a perfect thing to ask your AI assistant about. For example:","- \n
- \"I'm on Windows, using VSCode. I'm trying to open the integrated terminal, but View → Terminal isn't doing anything. Where should I look?\" \n
- \n
- Without looking back, can you name the 5 parts of the VSCode window and what they do? \n
- Which part of the window shows you the file tree you learned about in the last subunit? \n
- In one sentence, what is the Command Palette, and what keys open it on your machine? \n
- You opened the integrated terminal. Which folder in the tree is it standing in, and how do you know? \n
- What does a filled dot on a file's tab mean? \n
 "]},"unit-12-dev-env-5":{"subunitId":"unit-12-dev-env-5","heading":"Walk the Tree in the Terminal","read":["In the last subunit you toured VSCode and opened the integrated terminal, but we told you not to type anything into it yet. Now you're going to! In this subunit, you'll finally talk to your computer by typing one line at a time and start walking through an actual file tree.","For a lot of people, the terminal is the scariest part of this whole unit. A blinking cursor on a mostly-empty screen, no buttons to click, maybe even a little fear of typing the \"wrong thing\" and breaking your computer. If that's you, we got you! None of the commands we're learning today delete or overwrite anything that already exists. So don't worry.","
What the terminal actually is
","Everything you do on your computer, you do through some kind of interface. Creating a folder, deleting a file, opening a program, all of it. Normally that interface is a mouse and a screen full of icons and buttons. The terminal is just a different interface to the exact same computer. But instead of pointing and clicking, you tell your computer what to do by typing. Anything you can do with clicks, you can do with a typed command. The terminal can even do a few things clicks can't. You type one line, press Enter, and the computer does that one thing and then waits for your next line. That's basically it! Type a command, press Enter, read what comes back, type the next one. It feels like rocket surgery (lol) but it's really just a different way of talking to your computer.","In VSCode, open the integrated terminal again the way you learned last subunit (View → Terminal, or Ctrl + `, which works on both Mac and Windows). (Cmd + J also toggles the whole Panel on Mac.) You'll see a line of text ending in a cursor. That line is called the prompt. It's the computer's way of saying \"I'm ready, what next?\" The prompt usually shows a hint about where you are in the tree, and it ends in a symbol (often % on a Mac and $ or > for Windows) followed by your cursor. You type after that symbol. In the example below, you will see a ~ symbol after your-name@MacBook-Pro, which is shorthand for your home directory (this works the same way in Git Bash on Windows and on Linux, too), the default folder your account always starts in. That symbol is immediately followed by the prompt symbol, %, which is your computer's way of saying \"okay, tell me what to do!\"  ","This integrated terminal isn't a special VSCode invention either. It's the same terminal program your computer already has (Terminal.app on Mac, PowerShell/Command Prompt on Windows), just conveniently built into the editor so you don't have to switch windows. That becomes really helpful for developers because, as you'll soon find out, you'll be using your terminal a LOT during development. Below you'll see both terminals side-by-side.
  ","
","Five questions, five commands
","Earlier, we said that moving around the terminal is really just asking the computer a handful of questions: \"where am I?\", \"what's in here?\", \"take me there,\" \"make a new folder,\" and \"make a new file.\" Each of those is a single command.","- \n
- pwd: \"where am I?\" (print working directory) \n
- ls: \"what's in here?\" (list) \n
- cd: \"take me there\" (change directory) \n
- mkdir: \"make a new folder here\" (make directory) \n
- touch: \"make a new, empty file here\" \n
pwd: \"where am I?\"
","Remember what we said earlier, 'at any moment, you're always standing somewhere in the tree.' Your position in that tree is exactly what pwd is for. It shows you which directory (aka 'folder') you are currently standing in. Type it and press Enter:","pwd ","Strong developers run this command constantly in order to confirm where they are before doing anything else. Get comfortable answering \"where am I?\" before every other move. It will save you a lot of headaches in the future.","
Build something first
","Commands like \"what's in here?\" and \"take me there\" aren't very interesting on an empty folder. So before we practice looking around, let's actually give ourselves a small file tree to look around in. We can do this with two commands: mkdir and touch.","First, mkdir makes a brand-new, empty folder inside the folder you're currently standing in:","mkdir my-first-projectcd my-first-projectmkdir imagestouch hello.txttouch notes.txt ","Last step: get VSCode actually looking at the folder you just made, the same way you opened a folder in the last subunit, by dragging it into a VSCode window. Open your file browser (Finder or File Explorer), find my-first-project, and drag it onto this VSCode window. VSCode will reload with that folder as your project, Explorer and all.","
 ","Keep this window open. For the rest of this lesson, every example we show you is happening inside this exact folder, so your terminal should be showing you the exact same thing ours is. In this new VSCode window, open the integrated terminal again. Can you remember the command for that? VSCode will automatically open the terminal in the folder you have open in the Explorer. So once the terminal is open, you should be standing in the my-first-project directory.
  ","
","ls: \"what's in here?\"
","Now that you know where you are, let's see what's around you. You just ran this command in the section above, but just to give you a little more context: ls lists the contents of the folder you're currently standing in. It'll show you the files and the folders inside it:","ls ","So far we've learned how to ask the computer \"where am I?\" (pwd) and \"what's here?\" (ls) without changing anything at all. You've just been looking. But how can we actually move around? We know that we're always standing somewhere in the tree so how can we move to a different directory?","
cd: \"take me there\"
","cd moves you from the folder you're in into a folder that's sitting inside of it. This is how you navigate through the branches of a tree. ls just showed us a folder named images. We can step into it with:","cd images ","Run ls again in here. It's empty, which makes sense, we made images but never put anything inside it.","To go back up to the parent folder, the one that contains the folder you're in, use two dots:","
cd .. ","
","A note on your operating system
","In a bash-style terminal (macOS Terminal and Git Bash on Windows), these five commands (pwd, ls, cd, mkdir, and touch) work the same, so everyone can follow the same steps today. If you're on Windows and a command like touch isn't recognized, open a new terminal in VSCode and switch the profile to Git Bash. A few things will still look a little different: your prompt symbol may be $ or >, and the paths that pwd prints use forward slashes on a Mac (/Users/you/Desktop) and backslashes on Windows (C:\\Users\\you\\Desktop). The idea is the same. You're navigating the same tree with slightly different punctuation. I promise, nothing is broken.","A word of caution
","The commands we used today are all safe, but as you explore, your AI tutor (or a random tutorial online) might eventually suggest a command you don't recognize. Before you run any unfamiliar command, especially one that might delete or overwrite something, just ask, \"What exactly does this command do, and is it safe to run in my project folder?\" and read the answer before pressing Enter. Curiosity is lovely, but it's never a good idea to blindly copy-paste into the terminal.","Quick self-check:- \n
- Which command answers \"where am I right now?\" and why did we ask you to run it as a reflex? \n
- What's the difference between ls and cd, in your own words? \n
- You run cd images and then cd .. Where do you end up, relative to where you started? \n
- What's the difference between mkdir and touch? \n
- You ran a command and \"nothing happened\", no error, no message. Why is that often totally normal in the terminal? \n
 "]},"unit-12-dev-env-6":{"subunitId":"unit-12-dev-env-6","heading":"Your First Commit","read":["In the last subunit you talked to your computer by typing, built the my-first-project folder, and walked up and down its tree with pwd, ls, cd, mkdir, and touch. Everything so far has been about creating and moving around. Now we're going to put a little bit of real content in it and take our very first snapshot with Git.","This is also the last Git lesson of Phase 12a (woohoo!). This subunit is the checkpoint gate before you move on to Phase 12b. By the end of this lesson you'll have made your first commit and, just as importantly, you'll be able to explain in plain English what that commit actually did. Once you're comfortable with that, you'll be ready to move on to 12b where you'll actually push that commit up to GitHub so it lives online, not just on your laptop, and you'll pick up the skills that make working with other developers possible like forking, cloning, branching, and opening your very first pull request!","
A quick reminder: what Git actually is
","Back when you installed it, we compared Git to clicking \"save\" on a Word document, except each save is a snapshot that you can look back at or return to later. As you build projects, you'll make changes, break things, fix them, and change your mind. Git lets you take a labeled snapshot of your whole project at a moment in time. That way you always have a record of what it looked like when you were working. You edit your project, take that snapshot, and now you can always go back to that version later on, even if you take more snapshots. Each of those snapshots is called a commit.","Git runs locally, right on your computer. It has nothing to do with the internet yet, and nothing to do with GitHub. We're staying entirely on your own machine for this whole subunit.","First: \"Who am I?\"
","We ended the last subunit with a joke: you'd learned \"where am I?\", \"what's here?\", \"take me there,\" and \"make something new,\" but not \"who am I?\" Here's the thing though. When you use Git, every commit you make gets stamped with a name and an email, so that later on, anyone looking at a project's history can see who took which snapshot. Before Git will let you start making commits, it needs to know who you are.","Now, real quick, let's take a second to connect two things. Back in the setup subunit, you installed Git, so it's a program sitting on your computer right now, just like VSCode is. And in the last subunit you learned that the terminal is for walking around folders as well as talking to your computer and the programs on it by typing. So to set up Git, we don't open some settings window with buttons to click. Instead, we talk to the Git program directly through the terminal. Every command we run in this lesson starts with the word git, which is just how we specify that the following command is for Git! Next, we'll use the terminal to hand Git a couple of configurations, settings that tell it who you are. You only have to do this once. In your VSCode terminal, run these two commands, swapping in your own name and the email you signed up for GitHub with:","git config --global user.name \"Your Name\"git config --global user.email \"you@example.com\"git config --global --list ","
","Turn a folder into a project Git is watching: git init
","Right now, my-first-project is just a plain folder. Git isn't paying any attention to it yet. To ask Git to start tracking a folder, you initialize it. First make sure you're standing in the right place, this is exactly why we drilled pwd so hard last time. In the integrated terminal, type:","pwdgit init ","An important note: you run git init once per project, in that project's top folder. You only run it on folders you want to track (so, not your Home or Desktop folders). If you ever see a message about a repository already existing, that's Git telling you this folder is already being watched, and that's fine.","Quick tip: If you ever want to clear your terminal so that it doesn't get too crowded, just run the clear command.","
Ask Git what it sees: git status
","This is a command that you're going to use a lot. git status tells you, right now, what Git thinks is going on in your project. For example, what's changed, what it's about to save, and what it isn't tracking yet. Run it:","git status ","
","Give yourself something worth snapshotting
","A snapshot of empty files is pretty useless so let's put some real content in one! Open notes.txt in VSCode by clicking it in the Explorer, type a sentence or two, anything you like, and save it (remember the filled dot on the tab means unsaved changes). Something as simple as this is perfect:","This is my very first project that Git is tracking.The staging area: git add
","Making a commit happens in two small steps. Before Git takes the snapshot, you tell it which changes belong in this snapshot. That's what git add does. Picture lining people up for a group photo: git add is you waving the files you want into the frame, and the commit (next step) is the camera actually taking the photo. The lineup area even has a name. It's called the staging area.","To wave everything that changed into the frame, run:","git add . Note: If there are ever changes you've made to files that you do not want to add to a commit, you can always stage the files you do want to add one at a time with git add <filename>. If we ran git add notes.txt then ONLY notes.txt would have been added to the staging area and hello.txt would remain unstaged.
  ","
","Take the snapshot: git commit
","Now the moment we've been building toward. git commit takes the snapshot of everything you staged and saves it into your project's history, along with a short message describing what this snapshot is. Run it exactly like this:","git commit -m \"My first commit\" ","It's best to write your commit messages like you're writing for a human, ideally future-you. \"My first commit\" is fine for today, but as you start to build real things, a good message finishes the sentence \"This commit will...\", for example \"Add a homepage heading\" or \"Fix the broken image link\". You'll thank yourself later when you're scrolling back through a project's history trying to remember what you changed and why.","Now run git status one final time. Git should tell you there's \"nothing to commit, working tree clean.\" That's Git's way of saying \"everything here is safely snapshotted, no unsaved changes.\" You now have your first commit sitting in your project's history.","
See your work: git log
","Want proof the snapshot exists? Run:","git log ","
","Let's do it again
","Open notes.txt again and add a second line, then save. Something like:","And now I'm adding this line!git status ","Stage the change:","
git add .git commit -m \"Add a second line to notes.txt\" ","
","The Checkpoint Gate
","And that's the basics of working with Git! Change something, stage it with add, snapshot it with commit. Then do it again. Every time you make a new change, you stage it again, because each commit only captures what's in the staging area at that exact moment. Alright! We're almost ready to move on to Phase 12b! But first, you need to be able to do three things on your own:","- \n
- Navigate through a project folder in the terminal. Open a new project in VSCode, and use pwd, cd, mkdir, touch, and ls to move around, add to, and see what's in that project folder. \n
- Make a commit. Stage a change with git add and snapshot it with git commit -m, on your own. \n
- Explain, in plain English, what that commit did. Your commit message should clearly finish the sentence, \"This commit will...\"\n (e.g., git commit -m \"Add message to notes.txt\") \n
- \n
- In your own words, what is a commit? \n
- What does git init do to a folder, and how often do you run it for a given project? \n
- What's the difference between git add and git commit? Use the group photo analogy if it helps. \n
- Why do we always include -m \"your message\" when we commit? \n
- You ran git status and it said \"nothing to commit, working tree clean.\" What does that tell you? \n
 "]},"unit-12-dev-env-7":{"subunitId":"unit-12-dev-env-7","heading":"Meet Your IDE Assistant","read":["You cleared the checkpoint gate. You can navigate a project in the terminal, and you can make a commit and explain in plain English what it did. Before we start working on GitHub, there's one more tool we want to introduce you to inside of VSCode, an AI assistant that lives inside your Integrated Development Environment (IDE).","
Wait, haven't we already met the AI assistant?
","Sort of, but not like this. Back in Unit 11 you built a tutor bot in your browser. That bot only knows what you paste into it. If you wanted help with a file, you had to copy the whole thing, switch over to a browser tab, paste it in, and copy the answer back. An IDE assistant skips all of that. It lives right inside VSCode, so it can already see the file you have open, sometimes even the whole project.","This isn't a replacement for your browser tutor bot, they're just suited for different jobs. Your browser bot is still a great place to ask things like \"what is a closure again?\". But the IDE assistant's superpower is that it's already looking at your code, so it's the better choice when your question is about something sitting right in front of you.","Find it
","Most versions of VSCode come with some form of AI assistant panel already built in, usually opened from an icon in the Activity Bar (that strip of icons on the far left) or from View → Chat in the top menu. If you don't see one, open the Command Palette and search for Chat: Open Chat. Open it now and just look around, you don't need to type anything yet. ","A quick note: exactly what this panel looks like, and what it's called, can vary a bit depending on your version of VSCode and what's installed. That's fine. If you still can't find it, that's a perfectly good question to bring to your AI tutor from Unit 11!","
Give yourself something to ask about
","Let's get an idea of what this baby can do. We're going to add one more file to my-first-project, a tiny JavaScript file with a bug hiding in it on purpose. Back in your terminal, make sure you're still inside of my-first-project and run:","touch math.jsfunction average(numbers) {\n let total = 0;\n for (let i = 0; i <= numbers.length; i++) {\n total += numbers[i];\n }\n return total / numbers.length;\n}\nconsole.log(average([2, 4, 6]));Ask for an explanation, not a fix
","You're still in the process of solidifying your understanding of JavaScript and software development in general. Learning is the priority here so we want hints and explanations, not answers. Select the code inside math.js (or just make sure the file is open and active), then in the chat panel, ask something like:","- \n
- \"I walked through this function and I think it returns NaN instead of the average, because the loop \n reaches one index past the end of the array. Can you check my thinking and explain what's actually going on, \n without fixing it for me?\" \n
Judge the explanation before you touch anything
","Read whatever the assistant gives back. Somewhere in there it should point at the loop condition, i <= numbers.length, and explain that this lets the loop run one time too many, reaching past the end of the array into a spot that doesn't exist, which adds undefined into the total and turns the whole thing into NaN.","Before you change any code, ask yourself, \"does the explanation actually match what the code says?\". Scroll back up to math.js and check it line by line against what the assistant just told you. It's always a good idea to verify the response. An IDE assistant will usually sound confident, but that's not the same as being correct. Believe it or not, AI assistants make plenty of mistakes, no matter how sure they sound, so double check.","Now, before moving on in your own words, why does looping while i <= numbers.length reach one step too far? If you're still not really sure, ask some follow-up questions in the chat panel before moving forward, that's exactly what it's there for!","Now make the fix yourself
","Once you can explain the bug in your own words, you make the edit, not the assistant. Change the loop condition so it stops one step earlier.","Snapshot it
","You already know this next part from last subunit! Back in the terminal:","git statusgit add .git commit -m \"Fix off-by-one loop bug in average function\"Stick to the habit
","You now have two different AI helpers. Your Unit 11 browser tutor bot only knows what you paste in, while this IDE assistant can already see the file in front of you. But the exact same rule applies to both, ask for an explanation before a fix, verify that explanation against the real thing, and then make the change yourself. That's going to be our workflow while we're learning, regardless of which AI tool we're using.","Quick self-check:- \n
- What's the practical difference between your Unit 11 browser tutor bot and the IDE assistant you just used? \n
- In your own words, why was i <= numbers.length a bug? \n
- Why did we ask the assistant to explain the bug instead of asking it to fix it? \n
- What does it mean to \"verify\" an AI's explanation, and how did you do that with math.js? \n
 "]},"unit-12-dev-env-8":{"subunitId":"unit-12-dev-env-8","heading":"The Two Places Model: Your Computer & GitHub","read":["Welcome to Phase 12b. Hopefully you're starting to feel like you're getting a handle on your local machine now, VSCode, the terminal, Git, and an AI assistant right there in your editor. Everything you've done so far has been on your computer. That's about to change.","
Git is not GitHub
","First, it's important to remember that, even though they sound the same, Git and GitHub are two different things.","- \n
- Git is the tool you've been using. It's a program that runs on your computer and watches a\n folder so you can save snapshots of it (commits). Every git command you've\n typed so far, git init, git add, git commit, has been Git working on your machine, totally offline,\n and not talking to anything on the internet. \n
- GitHub is a website. It's a place on the internet that hosts copies of Git projects so people\n can share them, back them up, and collaborate on them. GitHub is owned by Microsoft, but it's just one of a few\n services that do this (GitLab and Bitbucket are others). It's not part of Git itself, it's a separate product\n built on top of it. \n
The two-places model
","So, from this point on, your project is going to live in two places at once:","- \n
- Your computer. This is the copy you've been working on. It's where you edit files in VSCode, run\n commands in the terminal, and make commits with Git. It's yours, it's local, and only you can see it. \n
- GitHub. This is a second copy of the same project. It's remote, sitting on GitHub's servers on the internet.\n Anyone you allow (including future you, on a different computer) can see it. \n
 ","Almost everything you're about to learn in this half of the unit is really just a way of moving work between those two copies.","
Commits are what travel
","Remember, a commit is a saved snapshot of your project at a specific moment, with a message describing it. Commits aren't just for you and your local history, commits are also the unit of work that travels between your computer and GitHub.","When you want to send work up to GitHub, you don't upload the whole project every time. You send your new commits, and GitHub adds them to its copy so both sides are in sync again. Moving work the other direction (from GitHub down to your computer) works the same way in reverse. Your computer pulls down any commits it doesn't have yet, and the two copies match up again. You won't really have much reason to move work in that direction during this unit, since you're the only person working on your project, but it's the same process.","This is why we spent so much time in Phase 12a making sure you could actually make a commit and explain what it did. You're going to be sending commits back and forth from here on out.","A quick preview of what's coming
","You don't need to memorize any of these yet because we'll look at them one at a time in the next few lessons. But it's helpful to see before we start our walk through. Almost all of these are really just a specific direction of travel between your two copies (fork is the one exception, moving work between two spots on GitHub before your computer is even involved):","- \n
- fork: make your own copy of someone else's project on GitHub. (This one moves work between two\n spots on GitHub, before your computer is even involved) \n
- clone: copy a project down from GitHub onto your computer, so you have a local copy to\n work on. \n
- push: send your local commits up from your computer to GitHub. \n
- pull: bring commits down from GitHub to your computer. \n
 ","where is the work moving from and to?\"","
Why we introduced the model first
","In the next subunit you're going to fork a repo and clone it down, and it's going to be really tempting to just type what we tell you and keep it moving but PLEASE resist that. Before every command, we're going to ask you to say out loud (or in your head), \"Which copy is about to change and where is the work going?\". If you can answer that, you understand the command. If you can't, come back here and look at the diagram again.","Quick self-check- \n
- What's the difference between Git and GitHub? \n
- Where do the two copies of your project live in the two-places model? \n
- What actually travels between those two copies when you send work back and forth? \n
- You haven't learned push yet, but based on the preview above, take a guess at which copy\n push changes, and in what direction the work is moving? \n
- \n
- Fork a practice repository we've set up for you, so you have your own copy of it on GitHub. \n
- Clone that copy down onto your computer, so you have a local copy you can actually edit in VSCode. \n
Step 1: Find the practice repo
","We've prepared a small practice repository for you to work with for the rest of this unit. It's not much, just a tiny project with a couple of files, but it's enough to walk the full GitHub workflow with.","Open your browser and go to:","CodesmithLLC/learn-github-repo","Take a second to look around the page. You should see a file tree in the middle of the screen (this is someone else's repository right now, sitting on GitHub). You should see a README.md that GitHub is displaying below the file list, and a row of buttons up near the top right that includes Fork. ","Pause and predict. Before you click anything, look at the diagram from the last subunit below. Right now, this project exists on GitHub, but not on your GitHub. It belongs to CodesmithLLC. And it definitely doesn't exist on your computer yet. So which direction will this project move in first? ","
Step 2: Fork the repo
","A fork is your own personal copy of someone else's project, made on GitHub. It's like grabbing a book off a library shelf and photocopying the whole thing, you now have a copy you can scribble in, and the original one on the shelf stays totally untouched.","Forking happens entirely on GitHub. Your computer isn't involved yet at all. Both the original and your fork live on GitHub's servers. This is the one operation in our diagram above that moves work between two spots on GitHub.","Click the Fork button in the top right of the page. GitHub will take you to a screen that asks where you'd like to fork it to and what to name it. The defaults are fine, your own GitHub username as the owner, and learn-github-repo as the name. Leave the \"Copy the main branch only\" checkbox checked. Then click the green Create fork button at the bottom. ","Give it a second, and GitHub will drop you on a new page that looks almost identical to the one you were just on, except the name at the top now reads your-username / learn-github-repo instead of CodesmithLLC / learn-github-repo. Right underneath that name, in smaller text, you should see something like \"forked from CodesmithLLC/learn-github-repo\". That little line tells you where this copy of the repo came from.
  ","At this point, on GitHub, there are two copies of this project. The original that belongs to Codesmith, and your fork that belongs to you. It still does not exist on your computer. Forking a repository doesn't touch your machine at all. That's the next step.","
Step 3: Grab the clone URL
","To copy your fork down to your computer, you're going to use git clone. But first, Git needs to know which repository to copy, and where it lives. That's what the clone URL is for.","On your fork's page, look for the green <> Code button, near the top right of the file list. Click it. A little dropdown will appear with a few tabs, HTTPS, SSH, and GitHub CLI. Stay on the HTTPS tab (the default). You'll see a URL that looks something like:","https://github.com/your-username/learn-github-repo.git ","
","Step 4: Pick a home for it on your computer
","Now hop over to VSCode and open its integrated terminal (View → Terminal, or Ctrl + `). Before you clone anything, ask pwd where you are:","pwdStep 5: Clone
","In the terminal, type git clone, then a space, then paste the URL you copied. It'll look something like this:","git clone https://github.com/your-username/learn-github-repo.gitlscd learn-github-repolsOpen it in VSCode
","Still in the terminal, open the whole folder in VSCode with:","code . ","If
","If code . doesn't work, that just means the shortcut isn't wired up on your machine yet, which is common on a fresh install. No problem, you can open the folder from your file explorer instead. On Mac, run:","open .explorer .git statusRecap
","Let's replay the whole thing against the diagram from last subunit:","- \n
- Before you started, the project existed in one spot: on GitHub, owned by CodesmithLLC.\n It was not on your computer yet. \n
- After Fork, the project existed in two spots on GitHub: the original, and your personal\n copy. Your computer still had nothing. Fork didn't touch your machine. \n
- After Clone, the project existed in three spots: the original on CodesmithLLC, your fork on\n GitHub, and a local copy of your fork on your computer. The clone is the piece that finally bridged GitHub and your machine. \n
Quick self-check
- \n
- In your own words, what's the difference between fork and clone? \n
- When you forked the repo, where did the new copy go? \n
- When you cloned it, where did the work move from and to? \n
- Why didn't you need to run git init in the cloned folder? \n
- How many copies of this project exist right now, and where are they? \n
"]},{"subheading":"Alumni Advisor Calls","subcontent":["For a more customized approach, we recommend you schedule a call with an Alumni Advisor. They can help you determine your particular learning to code path and answer your questions about Codesmith programs. In addition, Alumni Advisors can help you determine which concepts to focus on, what may be your next step, and give advice from their own personal experience of becoming a Software Engineer."]}]},"what-now-software-engineering-as-a-career":{"subunitId":"what-now-software-engineering-as-a-career","heading":"Software Engineering as a Career","read":["As you prepare for your career as a Software Engineer, you should attend additional workshops - check out our events page for more!","If you are not able to attend a live session, our YouTube channel features recorded panels and workshops. We recommend starting with “Upleveling Your Tech Career,” where Shaundai Person, a senior engineer at Netflix, shares tips on career growth and balancing ambitious goals.","While CSX focuses on the “why” of JavaScript, we encourage you to continue learning by building projects, like those created by students in Codesmith’s Software Engineering Immersive, and moving on to advanced resources like Interview Cake and JavaScript30.","You may also find it valuable to continue engaging with the CSX Slack community and mentoring those who are still in their CSX journey through the csx-challenge-help channel. This will allow you to review key concepts and practice your technical communication skills while helping others whose shoes you were just in.","Please keep in mind that coding is a lifelong journey of perfecting your craft, and that there will always be new tools and technologies to learn! By starting your journey with CSX and engaging in hard-learning, you are nurturing your ability to become a lifelong learner.","Remember to stay motivated and stay involved! Completing CSX is a great first step to becoming a Software Engineer and Codesmith is here to support you on the rest of your journey as well."]},"what-now-structured-programs":{"subunitId":"what-now-structured-programs","heading":"Structured Programs","read":["Congratulations on making it through CSX! You should now be ready to apply for one of Codesmith’s flagship Software Engineering Immersive Programs, taught remotely full-time and part-time.","The program teaches full-stack JavaScript and computer science to prepare you for mid- and senior-level software engineering roles. The expertly designed curriculum and supportive community immerses you in modern web technologies, such as React and Node.js, and encourages you to tackle unique and unfamiliar problems to prepare you for the ever-changing tech landscape.","The inclusion of four different types of projects is one of the key elements that sets Codesmith’s curriculum apart and prepares students for mid- and senior-level software engineering roles.","Codesmith also offers an extensive hiring support program that guides students through the job search process, including interview strategies, portfolio development, and post-graduation check-ins. By the end of the program, you will be an autonomous engineer, ready to make an impact at innovative tech companies worldwide.","In the next subunit, we’ll discuss how to prepare for the Software Engineering Immersive Program technical interview!"]},"what-now-technical-interview-prep":{"subunitId":"what-now-technical-interview-prep","heading":"Technical Interview Prep","read":["In each Unit’s overview card on the CSX Homepage, you can see which concepts are ‘always,’ ‘sometimes,’ or ‘never’ tested on the Codesmith Technical Interview. You can learn more at our “How to Pass the Technical Interview” workshops that are scheduled roughly every five weeks! Keep an eye on our workshops page for the next event.","The following concepts are always tested on the Technical Interview for Codesmith’s Software Engineering Immersive:",{"list":["Functions and Execution Context","Callbacks & Higher-order Functions","Closure, Scope & Execution Context","Recursion","Object Oriented Programming"]},"Apart from the technical elements, we also look for technical communication skills and the ability to debug, which you can practice in a pair programming session or through the CSX Slack pair-programming and csx-challenge-help channels.","To learn more about the Immersive program we recommend attending an Information Session or scheduling a call with an Alumni Advisor.
",{"subheading":"CS Prep","subcontent":["If you are looking for more structured supplemental instruction before applying for an Immersive program, you may want to consider CS Prep, our live intermediate to advanced prep program.","CS Prep is a 2-week program covering JavaScript concepts, engineering best practices, and technical communication. The program includes live-online instruction, daily problem-solving workshops, and a passionate coding community to help you prepare for top coding boot camps such as our selective Software Engineering Immersive programs, and equips you with the tools to solve real-world problems.","We do not require any coding experience to apply to CS Prep, but we strongly encourage completing up through Callbacks & Higher-Order Functions. CS Prep moves quickly, as there is a lot of ground to cover taking you from introductory to intermediate JS, so the more familiarity you have with these concepts the better! Don’t worry though, in the program we’ll discuss JavaScript fundamentals like functions and data types, closures, callbacks, recursion, and algorithms at length."]}]},"workshop-async":{"subunitId":"workshop-async","heading":"Workshop - JavaScript the Hard Parts Async & Promises","read":["During the JavaScript the Hard Parts: Async & Promises workshop video, we will explore asynchronous JavaScript under-the-hood. This is one of our most advanced workshops in this series - to get the most out of it, we recommend that you be comfortable with concepts covered in the earlier units such as callbacks and closure. In this video we will cover:",{"list":["The challenge with single-threadedness in JavaScript","How asynchronicity enables much of modern web development","The challenge with asynchronicity in JavaScript and how promises fix the problem of inversion of control"]},"We will begin the workshop by experimenting with a native timer function called
setTimeout, and then we will explore how events such as HTTP responses and button clicks be paired with asynchronous callbacks to update the Document Object Model (DOM) in order to give feedback to the user.","Our mental models of asynchronicity in javascript - the event loop, callback queue - are no longer enough. We have to augment them with the new world of native promises and async/await and understand them intuitively. In this video, we’ll do this so you can write readable code and debug effectively."," "]},"workshop-callbacks":{"subunitId":"workshop-callbacks","heading":"Workshop - JavaScript The Hard Parts: Callbacks and Higher Order Functions","read":["Congratulations on graduating from Codesmith’s “Intro to JavaScript” series to the “Javascript the Hard Parts” series! The first video workshop in this series is JavaScript the Hard Parts: Callbacks and Higher Order Functions. Understanding how callbacks and higher order functions work under the hood will provide a solid foundation to comprehend more advanced topics such as closure, object oriented programming and asynchronous JavaScript later in this series. This video workshop will cover core concepts like:",{"list":["Building functions like map, reduce, and filter from scratch","Using higher order functions to keep code clean even in complex situations","How to diagram through higher order functions and callbacks scenarios"]},"In addition to Callbacks and Higher Order Functions being an essential building block of JavaScript, they’re also always tested on the Codesmith Immersive Program technical interview. This video workshop is key to understanding both how these functions work as well as what level of technical communication on them we are expecting to see during your interview.","
 "]},"workshop-closures":{"subunitId":"workshop-closures","heading":"Workshop - JavaScript The Hard Parts - Closure, Scope, and Execution Context","read":["Closure is one of the most important yet misunderstood features of JavaScript. You have probably already seen closure in action or will soon in classic challenges like once, memoize, and password-protected functions.","Most students watch JavaScript The Hard Parts: Closure, Scope, and Execution Context multiple times in order to fully grasp these concepts.","The specifics of this workshop include:",{"list":["How closure works under the hood","Core JavaScript runtime features - execution context, the JavaScript execution model and the variable environment","How to wield, optimize and debug popular pro utility functions like once and memoize","How to implement the module pattern - one of the cleanest and most resilient design patterns in JavaScript"]},"These concepts, especially closure, are always tested in the technical interview for the Codesmith immersive program, which makes this video workshop an essential part of your CSX and Codesmith journey.","
 "]},"workshop-functions-and-objects":{"subunitId":"workshop-functions-and-objects","heading":"Intro to Coding: The Ingredients and Recipes of JavaScript","read":["The video workshop that pairs with this CSX unit is Intro to Coding: The Ingredients and Recipes of JavaScript.","This workshop is designed to dive under-the-hood of Functions so even if you’ve been programming with functions or are completely new to them, you can learn more about how they work.","In this video, we will cover:",{"list":["What happens when our code runs in the browser?","A closer look at objects","Objects and arrays","Reusing our logic (declaring/invoking functions)"]},"Now that you are becoming familiar with the basics of Javascript, this is a great time to start practicing your technical communication skills. Attending live workshops will give you the opportunity to explain your code to others so that you can work on the clarity of your explanation.","See upcoming sessions and RSVP here!","
 "]},"workshop-intro-to-javascript":{"subunitId":"workshop-intro-to-javascript","heading":"Workshop - Intro to Javascript: Variables, Control Flow, and Looping","read":["The video workshop that pairs with CSX Precourse - Part 1 is Codesmith’s Intro to Javascript: Variables, Control Flow, and Looping workshop.","During this video, we will cover:",{"list":["The web and how it is comprised of HTML, CSS, and JavaScript","Variables (const/let)","Objects and arrays","For loops and conditional logic (if/else)"]},"See upcoming events and RSVP here.",""]},"workshop-js-fundamentals-pt1":{"subunitId":"workshop-js-fundamentals-pt1","heading":"Intro to JS Pt. 1","watch":["https://www.youtube.com/embed/TwLcYFFvPdo?start=0",{"description":["If you are unable to attend a live workshop, you may find it useful to watch the following recording of Online Instructor Jinsung to gain insight on these topics."]}]},"workshop-jshp-oop-pt1":{"subunitId":"workshop-jshp-oop-pt1","heading":"JSHP: OOP Pt. 1","watch":["https://www.youtube.com/embed/MSmpf47YaFY",{"description":["If you are unable to attend a live workshop, you may find it useful to watch the following recording of the Chief Academic Officer at Codesmith, Phillip, to gain insight on these topics."]}]},"workshop-jshp-oop-pt2":{"subunitId":"workshop-jshp-oop-pt2","heading":"JSHP: OOP Pt. 2","watch":["https://www.youtube.com/embed/3qgYKLf9w-Y",{"description":["If you are unable to attend a live workshop, you may find it useful to watch the following recording of the Chief Academic Officer at Codesmith, Phillip, to gain insight on these topics."]}]},"workshop-oop":{"subunitId":"workshop-oop","heading":"Workshop - JavaScript the Hard Parts Classes and Prototypes","read":["It’s time to go under the hood of Object Oriented Programming (OOP) and the prototype chain with Codesmith’s JavaScript the Hard Parts: Classes and Prototypes video workshop! This is one of our most advanced workshops, so we encourage you to watch it as many times as you need.","We’ll cover:",{"list":["4 approaches to object-oriented programming in JavaScript","Prototype, __proto__ and the prototype chain","Factories, constructors and classes","ES5 and ES6 approaches"]},"As an advanced workshop in the JavaScript the Hard Parts series, we highly recommend attending it live. Attendance is helpful for any level of experience with OOP! This is also a great way to work on your technical communication and continue pair programming.","
 "]},"workshop-recursion":{"subunitId":"workshop-recursion","heading":"Workshop - Exploring Recursion in JavaScript","read":["The next video workshop in our series is Exploring Recursion in JavaScript. In this video, we’ll delve into one of the most powerful, but often confusing concepts in programming: functions that call themselves! Recursion is a hard concept to grasp so we recommend reviewing this video as many times as you need.","Specifically, we'll be covering:",{"list":["When to use looping vs. recursion","How to set up recursive functions","How you can return a value out of a recursive call"]},"
 "]}}}
"]}}}